Best practices for using AWS access keys
AWS access keys enable us to use programmatic or AWS CLI services in a manner similar to using a username and password.
AWS access keys have account privileges – for better and for worse.
For example, if you save access keys (credentials) of a root account inside code, anyone who uses this code can totally damage your AWS account.
Many stories have been published about security breaches due to access key exposure, especially combined with open source version control systems such as GitHub and GitLab.
In order to avoid security breaches, here is a list of best practices for securing your environment when using access keys:
- Avoid using access keys for the root account. In case you already created access keys, delete them.
https://docs.aws.amazon.com/IAM/latest/UserGuide/best-practices.html#remove-credentials - Use minimum privileges when creating account roles.
https://docs.aws.amazon.com/IAM/latest/UserGuide/access_controlling.html - Use AWS IAM roles instead of using access keys, for resources such as Amazon EC2 instance.
https://docs.aws.amazon.com/IAM/latest/UserGuide/id_roles_use_switch-role-ec2.html - Use different access keys for each application, in-order to minimize the risk of credential exposure.
https://docs.aws.amazon.com/IAM/latest/UserGuide/id_credentials_access-keys.html - Protect access keys by storing them on encrypted machines or encrypted volumes, and avoid sending access keys via email or any other insecure medium.
https://docs.aws.amazon.com/kms/latest/developerguide/services-s3.html - Rotate (change) access keys on a regular basis, to avoid reuse of credentials.
https://aws.amazon.com/blogs/security/how-to-rotate-access-keys-for-iam-users/ - Remove unused access keys, to avoid unnecessary access.
https://docs.aws.amazon.com/cli/latest/reference/iam/delete-access-key.html - Use MFA (Multi-factor authentication) for privileged operations/accounts.
https://docs.aws.amazon.com/IAM/latest/UserGuide/id_credentials_mfa.html - Configure billing alerts using Amazon CloudWatch, to get notifications about anomaly operations in your AWS account.
https://docs.aws.amazon.com/awsaccountbilling/latest/aboutv2/monitor-charges.html - Use AWS CloudTrail auditing to review when was an access key was last used.
https://aws.amazon.com/blogs/security/new-in-iam-quickly-identify-when-an-access-key-was-last-used/ - Use open source tools such as git-secrets to avoid storing passwords and sensitive information inside a GIT repository.
https://github.com/awslabs/git-secrets - Work according to GitHub recommendations and avoid using sensitive information in a public repository.
https://help.github.com/articles/removing-sensitive-data-from-a-repository/
How I passed the CCSP exam
The CCSP is one of the hardest vendor-neutral cloud related certifications in the industry.
The CCSP exam test the candidate’s knowledge in the following domains:
- Architectural Concepts and Design Requirements
- Cloud Data Security
- Cloud Platform and Infrastructure Security
- Cloud Application Security
- Operations
- Legal and Compliance
I strongly recommend to take this exam if you are a solution or cloud security architect, passionate about cloud computing.
CISSP certification gives you an advantage when taking the exam, due to the amount of study material, amount of exam questions and the exam length.
Here are the steps I took in-order to pass the exam:
Official Cloud Security Alliance course and exam – I have attended the CCSK course and took the official exam.
As part of the CCSK exam preparation, I read the following documents:
- Security Guidance for Critical Areas of Focus in Cloud Computing, V3
- The European Network and Information Security Agency (ENISA) whitepaper “Cloud Computing: Benefits, Risks and Recommendations for Information Security“
Official CCSP CBK training – I took the official live on-line training. Most of the study were based on the official book – “Official (ISC)2 Guide to the CISSP CBK”
As part of the instructor’s recommendations, I have summarized key aspects of the material and reviewed those couple of times (instead of reading 600 pages of the CBK more than once).
The online training was not cheap, but an exam voucher (for one year) was included.
Extra reading – I read the “CCSP (ISC)2 Certified Cloud Security Professional Official Study Guide”
Purchasing this book allowed me access to Wiley’s test bank of more than 700 practice exam questions, which allowed me to better test my knowledge and prepared for a long time-based exam.
Mobile applications – I have installed the following free applications with practice exam questions:
Free CBT – I watched the Cybrary’s free CCSP Training, which covers the exam materials
Work experience – I have no doubt that work experience gave me allot of knowledge for passing some of the tough scenarios.
I have not measured the time it took me to review the written material and prepare myself for the exam, but I am guessing couple of months of preparations.
I am proud to hold the CCSP (Certified Cloud Security Professional) certification.
A Guide to NDAs for Startups and Entrepreneurs
Nobody wants to sign your NDA. VCs, software engineers, freelancers — will all likely throw some shade your way when you bring up “non-disclosure agreement.” But if you’re an entrepreneur, you still need to protect your confidential information in certain circumstances.
In this post, we will cover why you need an NDA, who you should expect to use one with, what should be in it, how to draft the document, the proper timing for signature requests, and how to enforce a non-disclosure agreement.
Here we go.
What is an NDA?

An NDA is a legal document that is intended to set up a confidential relationship between two or more parties, made up of a party disclosing information and a party receiving information. The non-disclosure agreement stipulates that information shared between parties should be used only for the purpose of that specific partnership, so as to protect the market position and the competitive advantage of the disclosing party.
Basically, the two parties agree to share information in order to help each other — while promising not to use that information outside of the relationship in such a way that could damage the other party’s interests.
NDAs can be written as a section of an employment contract or separately drawn up. A non-disclosure agreement can also be referred to as: Confidentiality Agreement, a Confidential Disclosure Agreement, a Proprietary Information Agreement, a Secrecy Agreement, a Proprietary Information and Inventions Agreement, or for that matter, any other arrangement of words indicating confidentiality that a disclosing party might prefer.
Why Do You Need an NDA?
If you are building a business, presumably there is certain information you wouldn’t want getting into the hands of potential competitors. Here are some of the main assets businesses seek to protect through an NDA.
Intellectual Property
Because of the incremental but speedy nature of software development, Intellectual Property Rights (IPR) patents are quickly becoming irrelevant in the industry. Most developers working on new projects are free to use code from open source libraries like ReactJS or AngularJS, which means the wheel is hardly ever reinvented for new software.
In most cases, it would be counterproductive to file a patent for code that would be outdated by the time said patent was delivered. Instead, companies can protect their software innovation by including a work-for-hire clause that requires that the rights to the code and products developed by employees and freelancers are automatically transferred to the company.
This can be included as a clause within the NDA, or for those who are really concerned their pot of gold will be pilfered, a separate Intellectual Property Rights Agreement like this one can be used. However, this may feel excessive to some and can be taken as an insult to one’s professional integrity. In fact, legal experts suggest that common law will usually be enough to uphold an employer’s rights to all of the creative works developed by employees in their service. However, this is not true of independent contractors, who will retain rights to their work unless otherwise agreed upon. Therefore, entrepreneurs should take care to include a work-for-hire or transfer of rights clause in an NDA or contract when working with freelancers.
Proprietary Information and Trade Secrets
There is a slight distinction between proprietary information and trade secrets, and a business may reasonably want to protect both. Proprietary information is any unique information that a business uses to operate, including:
- Suppliers
- Manufacturing agreements
- Marketing strategy
- Development processes
- Pricing
- Customer lists/client info
- Research & data
- Formulas and algorithms
- Unique code
- Test results
- Product development plans
The list goes on. Not all proprietary information is, or needs to be, confidential. The business must decide what proprietary information they want to mark as confidential, thereby making it a trade secret. The Uniform Trade Secrets Act defines a trade secret as:
(i) information that derives independent economic value, actual or potential, from not being generally known to, and not being readily ascertainable by proper means by, other persons who can obtain economic value from its disclosure or use, and (ii) is the subject of efforts that are reasonable under the circumstances to maintain its secrecy.
Basically, this is your “secret sauce.” Information that helps you make a profit and is not readily available to others — the stuff that you wouldn’t want your competitors to have.
The most important reason for using an NDA is to guard against future legal expenses. You can hopefully avoid future litigation by protecting your trade secrets and insisting on ownership of the intellectual property developed at your business.
The NDA should be designed to provide a measure of protection against having to sue someone who has improperly used your information and, likewise, avert the risk of being sued for rights or royalties by a former employee or freelancer who wants to claim rights to products they helped develop.
What’s in an NDA?
This section will go over the eight clauses of an NDA, two of which are optional and should be carefully considered if written in.
Definition and Scope
Non-use
Non-compete
Representative Provision
Duration
Return Clause
Arbitration Clause
Attorney Provision Fee

1. Definition and Scope
The definition and scope of what will be considered confidential are the most important parts of the NDA. It’s best to be specific when designating what proprietary information will be a trade secret. Without further clarification, terms like “proprietary information” or “business practices” are vague, and will likely not be enforceable if put to a legal test. Plus, under such broad terms, all information exchanged could be considered confidential. In a one-way NDA, the receiving party would be wise to walk away.
Whether it be your codebase, algorithms, client lists, product roadmap, or any other valuable proprietary information, it should be specified as confidential in the NDA. Future communications or documentation including these confidential items should also be marked as such with a “confidential footer.”
2. Non-use
As we’ve mentioned in an earlier section of this article, the whole purpose of an NDA is to formally agree that the information exchanged is only to be used for the parties entering into partnership. Therefore, your NDA will need to have a non-use clause. In addition to agreeing not to disclose your confidential information, the non-use clause also prohibits the receiving party from making use of the information in such a way that would be damaging to the vital business interests of the disclosing party.
The non-use clause is intended to prevent:
- Formation of new businesses in direct competition to the disclosing party
- Receiving parties from using confidential proprietary information as a bargaining chip for personal gain or new job opportunities
- Existing competitors from soliciting current employees or freelancers for the knowledge they have of your business secrets
The non-use clause should not prevent:
- The receiving party from using new skills learned in the future
- The receiving party from working on projects with similar but technically different applications in the future
? To make the non-use clause more acceptable to the receiving party, consider making the restriction only as long as the duration of the project or employment contract
3. Non-compete
The jury is out on whether or not it’s appropriate to use a non-compete clause in your NDA. Any developer worth their salt is probably not going to sign anything that restricts their future employment options.
Freelancers will be especially sensitive to any non-compete language. If you must have a non-compete clause, it should only be designed to prevent the employee or freelance developer from taking your technology and business model to a direct competitor or soliciting your employees to start a competing business venture. It typically should notprevent them from working in the same industry or location, for any period of time.
In truth, both of these objectives can be achieved with the non-use clause. Another reason to tread lightly when it comes to non-compete is that many state courts deem non-compete restrictions a barrier to free trade and seldom enforce this part of an NDA anyway.
4. Representative Provision
To provide your partners with more flexibility and freedom to complete the project as they see fit, you should consider including a representative provision. The representative provision permits confidential information to be shared with associates of the receiving party for the purpose of completing the project. Once information is shared with a representative, he or she will be bound by terms of the NDA as well.
This clause should define who may be considered a “representative,” and can also require that the recipient party inform the disclosing party of any additional associates who will be collaborating on the project.
5. Duration
When drawing up an NDA, you will want to define a reasonable length of time for the agreement to remain in force. Too short, and you expose yourself to the risk of competitors learning your trade secrets before you’re able to establish a firm competitive edge. Too long, and skilled developers will not want to work with you. Most experts suggest anywhere from two to five years as a fair term of obligation, after which the agreement will automatically terminate.
6. Return Clause
Throughout the course of a project, you will have likely transferred a lot of files, instructions, data, communications, and other materials containing your business’s confidential information. Upon termination or completion of the project, you will want the return or destruction of the most sensitive of those documents. This clause stipulates that upon the written request of the disclosing party, the recipient of confidential information returns or destroys the material in their possession.
Just like confidential information should be specifically defined, what must be returned or destroyed should also be specified. Unless you are a government defense contractor, it won’t be necessary to ask someone to delete every single email or file they have received from you — just protect the key ingredients of your secret sauce!
7. Arbitration Clause
Should things go awry, having a mutual understanding of how to handle a dispute can save you money and hassle. Lawyering-up and going to court to file a lawsuit is very, very expensive. This should be considered a last resort. the arbitration clause is the place to outline alternatives to official litigation.
Your preferred path should be good faith mediation between parties. This is essentially a discussion facilitated by a moderator to air grievances and explore solutions. If informal mediation fails to resolve differences, you can opt for a binding (or non-binding) arbitration committee. This like a mini-trial outside of the official judicial system. Arbitration committees can deliver decisions, which are typically a good indicator of how an actual court proceeding would go. Your last and most resource draining option is to bring your dispute to trial.
Lastly, your arbitration clause should identify the territory whose laws will be used to govern the agreement, including any disputes.
8. Attorney Provision Fee
An attorney provision fee requires that the “losing” party of a lawsuit pay the legal fees of the prevailing party. Of course, this will help to ease the burden of litigation, but it also conflicts with mediation and arbitration for that reason. When passions are inflamed and both sides believe they are in the right, removing the threat of financial punishment will mean that parties are less likely to cooperate. With that in mind, you may choose to include or not include an attorney provision fee in your NDA.
What’s Not in an NDA?

Public knowledge. As mentioned earlier in this article, most software applications today are developed using snippets of open source code. If the codebase used to develop your project is publically available, it cannot be included as part of your confidential information. That being said, new changes made to source code may become part of your business advantage, and can be protected under the NDA.
Prior knowledge and independently developed knowledge. Rights to knowledge or innovations credited to the freelancer prior to the partnership will be retained by the freelancer developer. The same goes for knowledge developed independently of the project, even if it occurred during the time of the partnership. Freelancers would be wise make an itemized list of any valuable knowledge or previous inventions to be covered under this clause.
Third Party Information. Freelance software developers often work with various clients, and they may have more than one non-disclosure agreement in force concurrently. The NDA should specifically note that information obtained by a third party is not confidential. This protects the freelancer from being unfairly sued for breach of contract in the case that information disclosed from various parties overlaps.
Now you know what is and isn’t in an NDA, who should you get to sign your NDA and when? Should you ask for signatures from freelancers or VCs? When should you lawyer up and how does one enforce an NDA? Make sure to read the Guide to NDAs for Startups and Entrepreneurs for answers.
Cloud Computing Journey – Part 2
Cloud service provider questionnaire
In my previous post I gave you a short introduction to cloud computing.
When engaging with cloud service provider, it is important to evaluate the provider’s maturity level by asking the provider, as many questions as possible to allow you the comfort level to sign a contract.
Below is a sample questionnaire I recommend you to ask the cloud service provider.
Privacy related questions:
- Does the cloud service provider has an official privacy policy?
- Where are the cloud service provider data centers located around the world?
- Are the cloud service provider data centers compliant with the EU Directive 95/46/EC?
- Are the cloud service provider data centers compliant with the General Data Protection Regulation (GDPR)?
Availability related questions:
- What is the SLA of the cloud service provider? (Please elaborate)
- Does the cloud service provider publish information about system issues or outages?
- What compensation does the cloud service provider offer in case of potential financial loss due to lack of availability?
- Does the cloud service provider sync data between more than one data center on the same region?
- How many data centers does the cloud service provider has in the same region?
- Does the cloud service provider have business continuity processes and procedures? (Please elaborate)
- What is the cloud service provider’s RTO?
- What is the cloud service provider’s RPO?
- What is the cloud service provider disaster recovery strategy?
- Does the cloud service provider have change management processes? (Please elaborate)
- Does the cloud service provider have backup processes? (Please elaborate)
Interoperability related questions:
- Does the cloud service provider support security event monitoring using an API? (Please elaborate)
- Does the cloud service provider support infrastructure related event monitoring using an API? (Please elaborate)
Security related questions:
- What is the cloud service provider’s audit trail process for my organizational data stored or processed? (Please elaborate)
- What logical controls does the cloud service provider use for my organizational data stored or processed? (Please elaborate)
- What physical controls does the cloud service provider use for my organizational data stored or processed? (Please elaborate)
- Does the cloud service provider encrypt data at transit? (Please elaborate)
- Does the cloud service provider encrypt data at rest? (Please elaborate)
- What encryption algorithm is been used?
- What encryption key size is been used?
- Where are the encryption keys stored?
- At what interval does the cloud service provider rotate the encryption keys?
- Does the cloud service provider support BYOK (Bring your own keys)?
- Does the cloud service provider support HYOK (Hold your own keys):
- At what level does the data at rest been encrypted? (Storage, database, application, etc.)
- What security controls are been used by the cloud service provider to protect the cloud service itself?
- Is there an on-going process for Firewall rule review been done by the cloud service provider? (Please elaborate)
- Are all cloud service provider’s platform (Operating system, database, middleware, etc.) been hardened according to best practices? (Please elaborate)
- Does the cloud service provider perform an on-going patch management process for all hardware and software? (Please elaborate)
- What security controls are been used by the cloud service provider to protect against data leakage in a multi-tenant environment?
- How does the cloud service provider perform access management process? (Please elaborate)
- Does the cloud service provider enforce 2-factor authentication for accessing all management interfaces?
- Is the authentication to the cloud service based on standard protocols such as SAML, OAuth, OpenID?
- How many employees at the cloud service provider will have access to my organizational data? (Infrastructure and database level)
- Is there an access to the cloud service provider’s 3rd party suppliers to my organizational data?
- Does the cloud service provider enforce separation between production and development/test environments? (Please elaborate)
- What is the cloud service provider’s password policy (Operating system, database, network components, etc.) for systems that store or process my organizational data?
- Is it possible to schedule security survey and penetration test on the systems that stored my organizational data?
- Does the cloud service provider have incident response processes and procedures? (Please elaborate)
- What are the escalation processes in case of security incident related to my organizational data? (Please elaborate)
- What are the cloud service provider’s processes and controls against distributed denial-of-service? (Please elaborate)
- Does the cloud service provider have vulnerability management processes? (Please elaborate)
- Does the cloud service provider have secure development lifecycle (SDLC) process? (Please elaborate)
Compliance related questions:
- Is the cloud service provider compliant with certifications or standards? (Please elaborate)
- What is the level of compliance with the Cloud Security Alliance Matrix (https://cloudsecurityalliance.org/research/ccm)?
- Is it possible to receive a copy of internal audit report performed on the cloud service in the last 12 months?
- Is it possible to receive a copy of external audit report performed on the cloud service in the last 12 months?
- Is it possible to perform an on site audit on the cloud service provider’s data center and activity?
Contract termination related questions:
- What are the cloud service provider’s contract termination options?
- What options does the cloud service provider allow me to export my organizational data stored on the cloud?
- Is there a process for data deletion in case of contract termination?
- What standard does the cloud service provider use for data deletion?
Stay tuned for my next article.
Here are some recommended articles:
Separation Anxiety: A Tutorial for Isolating Your System with Linux Namespaces
With the advent of tools like Docker, Linux Containers, and others, it has become super easy to isolate Linux processes into their own little system environments. This makes it possible to run a whole range of applications on a single real Linux machine and ensure no two of them can interfere with each other, without having to resort to using virtual machines. These tools have been a huge boon to PaaS providers. But what exactly happens under the hood?
These tools rely on a number of features and components of the Linux kernel. Some of these features were introduced fairly recently, while others still require you to patch the kernel itself. But one of the key components, using Linux namespaces, has been a feature of Linux since version 2.6.24 was released in 2008.
Anyone familiar with chroot already has a basic idea of what Linux namespaces can do and how to use namespace generally. Just as chroot allows processes to see any arbitrary directory as the root of the system (independent of the rest of the processes), Linux namespaces allow other aspects of the operating system to be independently modified as well. This includes the process tree, networking interfaces, mount points, inter-process communication resources and more.
Why Use Namespaces for Process Isolation?
In a single-user computer, a single system environment may be fine. But on a server, where you want to run multiple services, it is essential to security and stability that the services are as isolated from each other as possible. Imagine a server running multiple services, one of which gets compromised by an intruder. In such a case, the intruder may be able to exploit that service and work his way to the other services, and may even be able compromise the entire server. Namespace isolation can provide a secure environment to eliminate this risk.
For example, using namespacing, it is possible to safely execute arbitrary or unknown programs on your server. Recently, there has been a growing number of programming contest and “hackathon” platforms, such as HackerRank, TopCoder, Codeforces, and many more. A lot of them utilize automated pipelines to run and validate programs that are submitted by the contestants. It is often impossible to know in advance the true nature of contestants’ programs, and some may even contain malicious elements. By running these programs namespaced in complete isolation from the rest of the system, the software can be tested and validated without putting the rest of the machine at risk. Similarly, online continuous integration services, such as Drone.io, automatically fetch your code repository and execute the test scripts on their own servers. Again, namespace isolation is what makes it possible to provide these services safely.
Namespacing tools like Docker also allow better control over processes’ use of system resources, making such tools extremely popular for use by PaaS providers. Services like Heroku and Google App Engine use such tools to isolate and run multiple web server applications on the same real hardware. These tools allow them to run each application (which may have been deployed by any of a number of different users) without worrying about one of them using too many system resources, or interfering and/or conflicting with other deployed services on the same machine. With such process isolation, it is even possible to have entirely different stacks of dependency softwares (and versions) for each isolated environment!
If you’ve used tools like Docker, you already know that these tools are capable of isolating processes in small “containers”. Running processes in Docker containers is like running them in virtual machines, only these containers are significantly lighter than virtual machines. A virtual machine typically emulates a hardware layer on top of your operating system, and then runs another operating system on top of that. This allows you to run processes inside a virtual machine, in complete isolation from your real operating system. But virtual machines are heavy! Docker containers, on the other hand, use some key features of your real operating system, including namespaces, and ensure a similar level of isolation, but without emulating the hardware and running yet another operating system on the same machine. This makes them very lightweight.
Process Namespace
Historically, the Linux kernel has maintained a single process tree. The tree contains a reference to every process currently running in a parent-child hierarchy. A process, given it has sufficient privileges and satisfies certain conditions, can inspect another process by attaching a tracer to it or may even be able to kill it.
With the introduction of Linux namespaces, it became possible to have multiple “nested” process trees. Each process tree can have an entirely isolated set of processes. This can ensure that processes belonging to one process tree cannot inspect or kill – in fact cannot even know of the existence of – processes in other sibling or parent process trees.
Every time a computer with Linux boots up, it starts with just one process, with process identifier (PID) 1. This process is the root of the process tree, and it initiates the rest of the system by performing the appropriate maintenance work and starting the correct daemons/services. All the other processes start below this process in the tree. The PID namespace allows one to spin off a new tree, with its own PID 1 process. The process that does this remains in the parent namespace, in the original tree, but makes the child the root of its own process tree.
With PID namespace isolation, processes in the child namespace have no way of knowing of the parent process’s existence. However, processes in the parent namespace have a complete view of processes in the child namespace, as if they were any other process in the parent namespace.
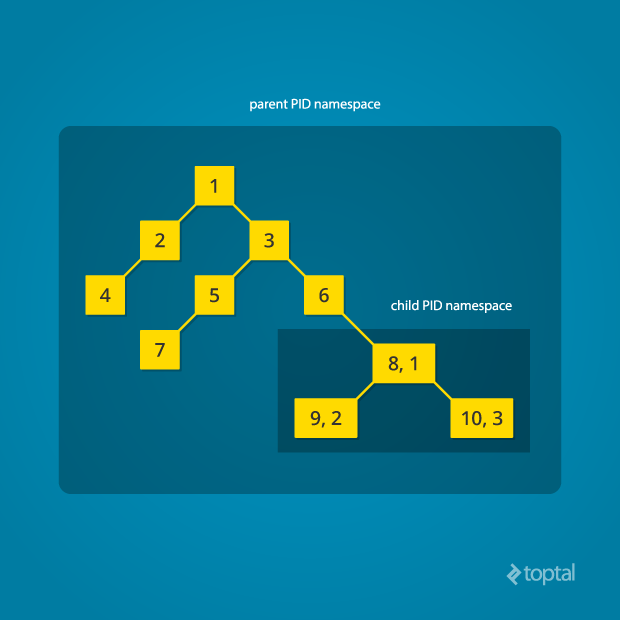
It is possible to create a nested set of child namespaces: one process starts a child process in a new PID namespace, and that child process spawns yet another process in a new PID namespace, and so on.
With the introduction of PID namespaces, a single process can now have multiple PIDs associated with it, one for each namespace it falls under. In the Linux source code, we can see that a struct named pid, which used to keep track of just a single PID, now tracks multiple PIDs through the use of a struct named upid:
struct upid {
  int nr;                     // the PID value
  struct pid_namespace *ns;   // namespace where this PID is relevant
  // ...
};

struct pid {
  // ...
  int level;                  // number of upids
  struct upid numbers[0];     // array of upids
};
To create a new PID namespace, one must call the clone() system call with a special flag CLONE_NEWPID. (C provides a wrapper to expose this system call, and so do many other popular languages.) Whereas the other namespaces discussed below can also be created using the unshare() system call, a PID namespace can only be created at the time a new process is spawned using clone(). Once clone() is called with this flag, the new process immediately starts in a new PID namespace, under a new process tree. This can be demonstrated with a simple C program:
#define _GNU_SOURCE
#include <sched.h>
#include <stdio.h>
#include <stdlib.h>
#include <sys/wait.h>
#include <unistd.h>

static char child_stack[1048576];

static int child_fn() {
  printf("PID: %ld\n", (long)getpid());
  return 0;
}

int main() {
  pid_t child_pid = clone(child_fn, child_stack+1048576, CLONE_NEWPID | SIGCHLD, NULL);
  printf("clone() = %ld\n", (long)child_pid);

  waitpid(child_pid, NULL, 0);
  return 0;
}
Compile and run this program with root privileges and you will notice an output that resembles this:
clone() = 5304
PID: 1
The PID, as printed from within the child_fn, will be 1.
Even though this namespace tutorial code above is not much longer than “Hello, world” in some languages, a lot has happened behind the scenes. The clone() function, as you would expect, has created a new process by cloning the current one and started execution at the beginning of the child_fn() function. However, while doing so, it detached the new process from the original process tree and created a separate process tree for the new process.
Try replacing the static int child_fn() function with the following, to print the parent PID from the isolated process’s perspective:
static int child_fn() {
  printf("Parent PID: %ld\n", (long)getppid());
  return 0;
}
Running the program this time yields the following output:
clone() = 11449
Parent PID: 0
Notice how the parent PID from the isolated process’s perspective is 0, indicating no parent. Try running the same program again, but this time, remove the CLONE_NEWPID flag from within the clone() function call:
pid_t child_pid = clone(child_fn, child_stack+1048576, SIGCHLD, NULL);
This time, you will notice that the parent PID is no longer 0:
clone() = 11561
Parent PID: 11560
However, this is just the first step in our tutorial. These processes still have unrestricted access to other common or shared resources. For example, the networking interface: if the child process created above were to listen on port 80, it would prevent every other process on the system from being able to listen on it.
Linux Network Namespace
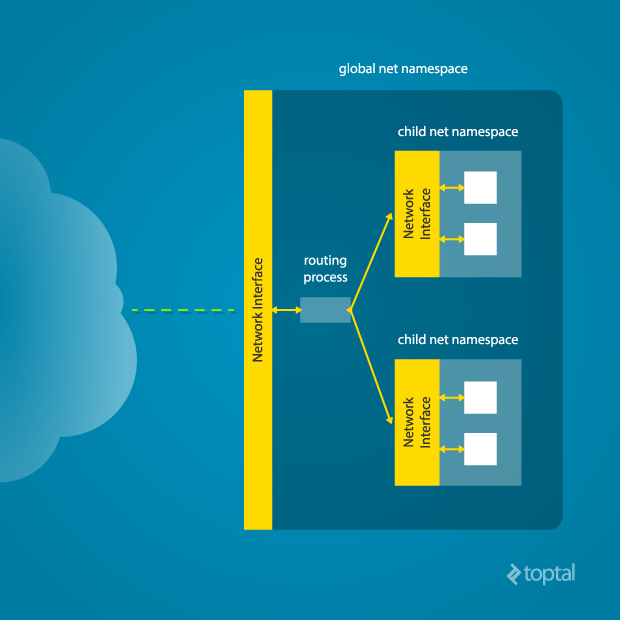
This is where a network namespace becomes useful. A network namespace allows each of these processes to see an entirely different set of networking interfaces. Even the loopback interface is different for each network namespace.
Isolating a process into its own network namespace involves introducing another flag to the clone() function call: CLONE_NEWNET;
#define _GNU_SOURCE
#include <sched.h>
#include <stdio.h>
#include <stdlib.h>
#include <sys/wait.h>
#include <unistd.h>


static char child_stack[1048576];

static int child_fn() {
  printf("New `net` Namespace:\n");
  system("ip link");
  printf("\n\n");
  return 0;
}

int main() {
  printf("Original `net` Namespace:\n");
  system("ip link");
  printf("\n\n");

  pid_t child_pid = clone(child_fn, child_stack+1048576, CLONE_NEWPID | CLONE_NEWNET | SIGCHLD, NULL);

  waitpid(child_pid, NULL, 0);
  return 0;
}
Output:
Original `net` Namespace:
1: lo: <LOOPBACK,UP,LOWER_UP> mtu 65536 qdisc noqueue state UNKNOWN mode DEFAULT group default
    link/loopback 00:00:00:00:00:00 brd 00:00:00:00:00:00
2: enp4s0: <BROADCAST,MULTICAST,UP,LOWER_UP> mtu 1500 qdisc pfifo_fast state UP mode DEFAULT group default qlen 1000
    link/ether 00:24:8c:a1:ac:e7 brd ff:ff:ff:ff:ff:ff


New `net` Namespace:
1: lo: <LOOPBACK> mtu 65536 qdisc noop state DOWN mode DEFAULT group default
    link/loopback 00:00:00:00:00:00 brd 00:00:00:00:00:00
What’s going on here? The physical ethernet device enp4s0 belongs to the global network namespace, as indicated by the “ip” tool run from this namespace. However, the physical interface is not available in the new network namespace. Moreover, the loopback device is active in the original network namespace, but is “down” in the child network namespace.
In order to provide a usable network interface in the child namespace, it is necessary to set up additional “virtual” network interfaces which span multiple namespaces. Once that is done, it is then possible to create Ethernet bridges, and even route packets between the namespaces. Finally, to make the whole thing work, a “routing process” must be running in the global network namespace to receive traffic from the physical interface, and route it through the appropriate virtual interfaces to to the correct child network namespaces. Maybe you can see why tools like Docker, which do all this heavy lifting for you, are so popular!
To do this by hand, you can create a pair of virtual Ethernet connections between a parent and a child namespace by running a single command from the parent namespace:
ip link add name veth0 type veth peer name veth1 netns <pid>
Here, <pid> should be replaced by the process ID of the process in the child namespace as observed by the parent. Running this command establishes a pipe-like connection between these two namespaces. The parent namespace retains the veth0 device, and passes the veth1 device to the child namespace. Anything that enters one of the ends, comes out through the other end, just as you would expect from a real Ethernet connection between two real nodes. Accordingly, both sides of this virtual Ethernet connection must be assigned IP addresses.
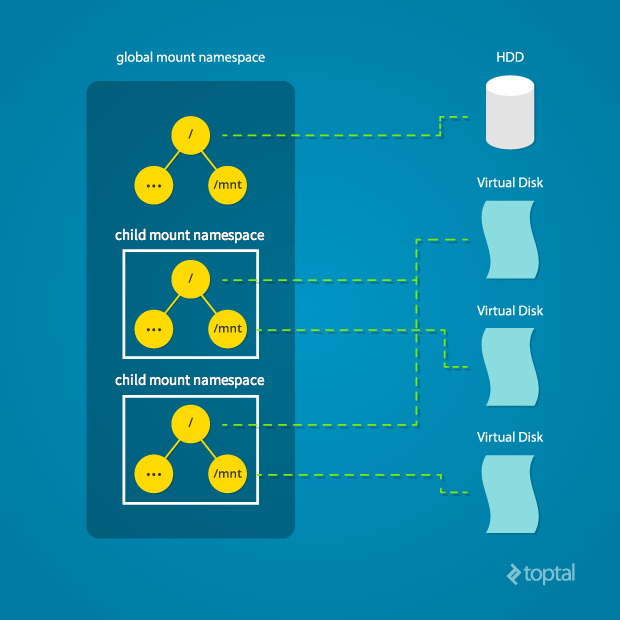
Mount Namespace
Linux also maintains a data structure for all the mountpoints of the system. It includes information like what disk partitions are mounted, where they are mounted, whether they are readonly, et cetera. With Linux namespaces, one can have this data structure cloned, so that processes under different namespaces can change the mountpoints without affecting each other.
Creating separate mount namespace has an effect similar to doing a chroot(). chroot() is good, but it does not provide complete isolation, and its effects are restricted to the root mountpoint only. Creating a separate mount namespace allows each of these isolated processes to have a completely different view of the entire system’s mountpoint structure from the original one. This allows you to have a different root for each isolated process, as well as other mountpoints that are specific to those processes. Used with care per this tutorial, you can avoid exposing any information about the underlying system.
The clone() flag required to achieve this is CLONE_NEWNS:
clone(child_fn, child_stack+1048576, CLONE_NEWPID | CLONE_NEWNET | CLONE_NEWNS | SIGCHLD, NULL)
Initially, the child process sees the exact same mountpoints as its parent process would. However, being under a new mount namespace, the child process can mount or unmount whatever endpoints it wants to, and the change will affect neither its parent’s namespace, nor any other mount namespace in the entire system. For example, if the parent process has a particular disk partition mounted at root, the isolated process will see the exact same disk partition mounted at the root in the beginning. But the benefit of isolating the mount namespace is apparent when the isolated process tries to change the root partition to something else, as the change will only affect the isolated mount namespace.
Interestingly, this actually makes it a bad idea to spawn the target child process directly with the CLONE_NEWNS flag. A better approach is to start a special “init” process with the CLONE_NEWNS flag, have that “init” process change the “/”, “/proc”, “/dev” or other mountpoints as desired, and then start the target process. This is discussed in a little more detail near the end of this namespace tutorial.
Other Namespaces
There are other namespaces that these processes can be isolated into, namely user, IPC, and UTS. The user namespace allows a process to have root privileges within the namespace, without giving it that access to processes outside of the namespace. Isolating a process by the IPC namespace gives it its own interprocess communication resources, for example, System V IPC and POSIX messages. The UTS namespace isolates two specific identifiers of the system: nodename and domainname.
A quick example to show how UTS namespace is isolated is shown below:
#define _GNU_SOURCE
#include <sched.h>
#include <stdio.h>
#include <stdlib.h>
#include <sys/utsname.h>
#include <sys/wait.h>
#include <unistd.h>


static char child_stack[1048576];

static void print_nodename() {
  struct utsname utsname;
  uname(&utsname);
  printf("%s\n", utsname.nodename);
}

static int child_fn() {
  printf("New UTS namespace nodename: ");
  print_nodename();

  printf("Changing nodename inside new UTS namespace\n");
  sethostname("GLaDOS", 6);

  printf("New UTS namespace nodename: ");
  print_nodename();
  return 0;
}

int main() {
  printf("Original UTS namespace nodename: ");
  print_nodename();

  pid_t child_pid = clone(child_fn, child_stack+1048576, CLONE_NEWUTS | SIGCHLD, NULL);

  sleep(1);

  printf("Original UTS namespace nodename: ");
  print_nodename();

  waitpid(child_pid, NULL, 0);

  return 0;
}
This program yields the following output:
Original UTS namespace nodename: XT
New UTS namespace nodename: XT
Changing nodename inside new UTS namespace
New UTS namespace nodename: GLaDOS
Original UTS namespace nodename: XT
Here, child_fn() prints the nodename, changes it to something else, and prints it again. Naturally, the change happens only inside the new UTS namespace.
More information on what all of the namespaces provide and isolate can be found in the tutorial here
Cross-Namespace Communication
Often it is necessary to establish some sort of communication between the parent and the child namespace. This might be for doing configuration work within an isolated environment, or it can simply be to retain the ability to peek into the condition of that environment from outside. One way of doing that is to keep an SSH daemon running within that environment. You can have a separate SSH daemon inside each network namespace. However, having multiple SSH daemons running uses a lot of valuable resources like memory. This is where having a special “init” process proves to be a good idea again.
The “init” process can establish a communication channel between the parent namespace and the child namespace. This channel can be based on UNIX sockets or can even use TCP. To create a UNIX socket that spans two different mount namespaces, you need to first create the child process, then create the UNIX socket, and then isolate the child into a separate mount namespace. But how can we create the process first, and isolate it later? Linux provides unshare(). This special system call allows a process to isolate itself from the original namespace, instead of having the parent isolate the child in the first place. For example, the following code has the exact same effect as the code previously mentioned in the network namespace section:
#define _GNU_SOURCE
#include <sched.h>
#include <stdio.h>
#include <stdlib.h>
#include <sys/wait.h>
#include <unistd.h>


static char child_stack[1048576];

static int child_fn() {
  // calling unshare() from inside the init process lets you create a new namespace after a new process has been spawned
  unshare(CLONE_NEWNET);

  printf("New `net` Namespace:\n");
  system("ip link");
  printf("\n\n");
  return 0;
}

int main() {
  printf("Original `net` Namespace:\n");
  system("ip link");
  printf("\n\n");

  pid_t child_pid = clone(child_fn, child_stack+1048576, CLONE_NEWPID | SIGCHLD, NULL);

  waitpid(child_pid, NULL, 0);
  return 0;
}
And since the “init” process is something you have devised, you can make it do all the necessary work first, and then isolate itself from the rest of the system before executing the target child.
Conclusion
This tutorial is just an overview of how to use namespaces in Linux. It should give you a basic idea of how a Linux developer might start to implement system isolation, an integral part of the architecture of tools like Docker or Linux Containers. In most cases, it would be best to simply use one of these existing tools, which are already well-known and tested. But in some cases, it might make sense to have your very own, customized process isolation mechanism, and in that case, this namespace tutorial will help you out tremendously.
There is a lot more going on under the hood than I’ve covered in this article, and there are more ways you might want to limit your target processes for added safety and isolation. But, hopefully, this can serve as a useful starting point for someone who is interested in knowing more about how namespace isolation with Linux really works.
Originally from Toptal
Cloud Computing Journey – Part 1
So, you decided to migrate a system to the cloud. It may be business or IT initiative, but what does it really mean switching between on premise and the cloud?
For ages, we used to manage our IT infrastructure by ourselves, on our own data centers (or network communication cabinets, for small companies…), using our purchased hardware, while maintaining and troubleshooting every software/hardware/network problem.
In the cloud, things change. In the cloud, we are one of the many customers sharing compute resources in multi-tenant environment. We have no control of the hardware or the chosen platform technology (from the servers’ hardware vendor to the storage vendor), we barely control the virtualization layer, and don’t even get me started talking about troubleshooting the network layer.
There are 3 cloud service models:
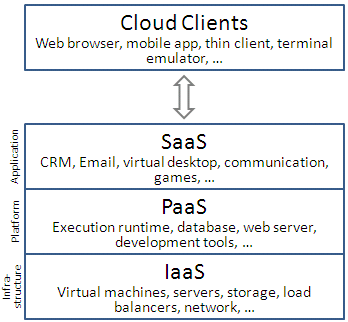
- IaaS (Infrastructure as a service) – In this service model, the customer controls (almost) everything from the virtual servers operating system, through the application layer, up until the data itself.
- PaaS (Platform as a service) – In this service model, the customer controls the application layer, up until the data itself.
- SaaS (Software as a service) – In this service model, the customer has access to a close application, but the customer is the data owner and can control permissions (and auditing) of the data.
Once we understood those basic rules, let’s analyze what does it really means migrating to the cloud.
The word that differentiates a mature cloud service provider from a rookie is transparency.
Mature cloud service provider won’t hesitate to answer tough questions such as “Can I have a copy of your last external audit report?”, “Do you have a business continuity plan?”, “Do you have an SDLC (Software development lifecycle) process?”, etc.
When engaging with cloud service provider, it is important to know as much details about the provider as you can, until you are comfortable enough to sign a contract.
A solid contract will give you assurance about the cloud service provider’s ability to fulfill his obligations and will higher the chances of project success.
In the next couple of articles, I will try to pinpoint important tips for a successful cloud project.
Stay tuned for my next article.
Here are some recommended articles:
JSON Web Token Tutorial: An Example in Laravel and AngularJS
With the rising popularity of single page applications, mobile applications, and RESTful API services, the way web developers write back-end code has changed significantly. With technologies like AngularJS and BackboneJS, we are no longer spending much time building markup, instead we are building APIs that our front-end applications consume. Our back-end is more about business logic and data, while presentation logic is moved exclusively to the front-end or mobile applications. These changes have led to new ways of implementing authentication in modern applications.
Authentication is one of the most important parts of any web application. For decades, cookies and server-based authentication were the easiest solution. However, handling authentication in modern Mobile and Single Page Applications can be tricky, and demand a better approach. The best known solutions to authentication problems for APIs are the OAuth 2.0 and the JSON Web Token (JWT).
What is a JSON Web Token?
A JSON Web Token, or JWT, is used to send information that can be verified and trusted by means of a digital signature. It comprises a compact and URL-safe JSON object, which is cryptographically signed to verify its authenticity, and which can also be encrypted if the payload contains sensitive information.
Because of it’s compact structure, JWT is usually used in HTTP Authorization headers or URL query parameters.
Structure of a JSON Web Token
A JWT is represented as a sequence of base64url encoded values that are separated by period characters.

JSON Web Token example:
eyJhbGciOiJIUzI1NiIsInR5cCI6IkpXVCJ9.
eyJpc3MiOiJ0b3B0YWwuY29tIiwiZXhwIjoxNDI2NDIwODAwLCJodHRwOi8vdG9wdGFsLmNvbS9qd3RfY2xhaW1zL2lzX2FkbWluIjp0cnVlLCJjb21wYW55IjoiVG9wdGFsIiwiYXdlc29tZSI6dHJ1ZX0.
yRQYnWzskCZUxPwaQupWkiUzKELZ49eM7oWxAQK_ZXw
Header
The header contains the metadata for the token and it minimally contains the type of signature and the encryption algorithm.
Example Header
{
  “alg”: “HS256”,
  “typ”: “JWT”
}
This JWT Header declares that the encoded object is a JSON Web Token, and that it is signed using the HMAC SHA-256 algorithm.
Once this is base64 encoded, we have the first part of our JWT.
eyJhbGciOiJIUzI1NiIsInR5cCI6IkpXVCJ9Payload (Claims)
In the context of JWT, a claim can be defined as a statement about an entity (typically, the user), as well as additional meta data about the token itself. The claim contains the information we want to transmit, and that the server can use to properly handle authentication. There are multiple claims we can provide; these include registered claim names, public claim names and private claim names.
Registered Claims
These are the claims that are registered in the IANA JSON Web Token Claims registry. These claims are not intended to be mandatory but rather to provide a starting point for a set of useful, interoperable claims.
These include:
- iss: The issuer of the token
- sub: The subject of the token
- aud: The audience of the token
- exp: Token expiration time defined in Unix time
- nbf: “Not before” time that identifies the time before which the JWT must not be accepted for processing
- iat: “Issued at” time, in Unix time, at which the token was issued
- jti: JWT ID claim provides a unique identifier for the JWT
Public Claims
Public claims need to have collision-resistant names. By making the name a URI or URN naming collisions are avoided for JWTs where the sender and receiver are not part of a closed network.
An example of a public claim name could be: https://www.toptal.com/jwt_claims/is_admin, and the best practice is to place a file at that location describing the claim so that it can be dereferenced for documentation.
Private Claims
Private claim-names may be used in places where JWTs are only exchanged in a closed environment between known systems, such as inside an enterprise. These are claims that we can define ourselves, like user IDs, user roles, or any other information.
Using claim-names that might have conflicting semantic meanings outside of a closed or private system are subject to collision, so use them with caution.
It is important to note that we want to keep a web token as small as possible, so use only necessary data inside public and private claims.
Example Payload
{
  “iss”: “toptal.com”,
  “exp”: 1426420800,
  “https://www.toptal.com/jwt_claims/is_admin”: true,
  “company”: “Toptal”,
  “awesome”: true
}
This example payload has two registered claims, one public claim and two private claims. Once it is base64 encoded, we have the second part of our JWT.
eyJpc3MiOiJ0b3B0YWwuY29tIiwiZXhwIjoxNDI2NDIwODAwLCJodHRwOi8vdG9wdGFsLmNvbS9qd3RfY2xhaW1zL2lzX2FkbWluIjp0cnVlLCJjb21wYW55IjoiVG9wdGFsIiwiYXdlc29tZSI6dHJ1ZX0Signature
The JWT standard follows the JSON Web Signature (JWS) specification to generate the final signed token. It is generated by combining the encoded JWT Header and the encoded JWT Payload, and signing it using a strong encryption algorithm, such as HMAC SHA-256. The signature’s secret key is held by the server so it will be able to verify existing tokens and sign new ones.
$encodedContent = base64UrlEncode(header) + “.” + base64UrlEncode(payload);
$signature = hashHmacSHA256($encodedContent);
This gives us the final part of our JWT.
yRQYnWzskCZUxPwaQupWkiUzKELZ49eM7oWxAQK_ZXwSecurity and Encryption with JWT
It is critical to use TLS/SSL in conjunction with JWT, to prevent man-in-the-middle attacks. In most cases, this will be sufficient to encrypt the JWT payload if it contains sensitive information. However, if we want to add an additional layer of protection, we can encrypt the JWT payload itself using the JSON Web Encryption (JWE) specification.
Of course, if we want to avoid the additional overhead of using JWE, another option is to simply keep sensitive information in our database, and use our token for additional API calls to the server whenever we need to access sensitive data.
Why the need for Web Tokens?
Before we can see all the benefits of using token authentication, we have to look at the way authentication has been done in the past.
Server-Based Authentication

Because the HTTP protocol is stateless, there needs to be a mechanism for storing user information and a way to authenticate the user on every subsequent request after login. Most websites use cookies for storing user’s session ID.
How it Works
The browser makes a POST request to the server that contains the user’s identification and password. The server responds with a cookie, which is set on the user’s browser, and includes a session ID to identify the user.
On every subsequent request, the server needs to find that session and deserialize it, because user data is stored on the server.
Drawbacks of Server-Based Authentication
- Hard to scale: The server needs to create a session for a user and persist it somewhere on the server. This can be done in memory or in a database. If we have a distributed system, we have to make sure that we use a separate session storage that is not coupled to the application server.
- Cross-origin request sharing (CORS): When using AJAX calls to fetch a resource from another domain (cross-origin) we could run into problems with forbidden requests because, by default, HTTP requests don’t include cookies on cross-origin requests.
- Coupling with the web framework: When using server-based authentication we are tied to our framework’s authentication scheme. It is really hard, or even impossible, to share session data between different web frameworks written in different programming languages.
Token-Based Authentication

Token based authentication is stateless, so there is no need to store user information in the session. This gives us the ability to scale our application without worrying where the user has logged in. We can easily use the same token for fetching a secure resource from a domain other than the one we are logged in to.
How JSON Web Tokens Work
A browser or mobile client makes a request to the authentication server containing user login information. The authentication server generates a new JWT access token and returns it to the client. On every request to a restricted resource, the client sends the access token in the query string or Authorization header. The server then validates the token and, if it’s valid, returns the secure resource to the client.
The authentication server can sign the token using any secure signature method. For example, a symmetric key algorithm such as HMAC SHA-256 can be used if there is a secure channel to share the secret key among all parties. Alternatively, an asymmetric, public-key system, such as RSA, can be used as well, eliminating the need for further key-sharing.
Advantages of Token-Based Authentication
Stateless, easier to scale: The token contains all the information to identify the user, eliminating the need for the session state. If we use a load balancer, we can pass the user to any server, instead of being bound to the same server we logged in on.
Reusability: We can have many separate servers, running on multiple platforms and domains, reusing the same token for authenticating the user. It is easy to build an application that shares permissions with another application.
Security: Since we are not using cookies, we don’t have to protect against cross-site request forgery (CSRF) attacks. We should still encrypt our tokens using JWE if we have to put any sensitive information in them, and transmit our tokens over HTTPS to prevent man-in-the-middle attacks.
Performance: There is no server side lookup to find and deserialize the session on each request. The only thing we have to do is calculate the HMAC SHA-256 to validate the token and parse its content.
A JSON Web Token Example using Laravel 5 and AngularJS
In this tutorial I am going to demonstrate how to implement the basic authentication using JSON Web Tokens in two popular web technologies: Laravel 5 for the backend code and AngularJS for the frontend Single Page Application (SPA) example. (You can find the entire demo here, and the source code in this GitHub repositoryso that you can follow along with the tutorial.)
This JSON web token example will not use any kind of encryption to ensure the confidentiality of the information transmitted in the claims. In practice this is often okay, because TLS/SSL encrypts the request. However, if the token is going to contain sensitive information, such as the user’s social security number, it should also be encrypted using JWE.
Laravel Backend Example
We will use Laravel to handle user registration, persisting user data to a database and providing some restricted data that needs authentication for the Angular app to consume. We will create an example API subdomain to simulate Cross-origin resource sharing (CORS) as well.
Installation and Project Bootstrapping
In order to use Laravel, we have to install the Composer package manager on our machine. When developing in Laravel I recommend using the Laravel Homestead pre-packaged “box” of Vagrant. It provides us with a complete development environment regardless of our operating system.
The easiest way to bootstrap our Laravel application is to use a Composer package Laravel Installer.
composer global require "laravel/installer=~1.1"
Now we are all ready to create a new Laravel project by running laravel new jwt.
For any questions about this process please refer to the official Laravel documentation.
After we have created the basic Laravel 5 application, we need to set up our Homestead.yaml, which will configure folder mappings and domains configuration for our local environment.
Example of a Homestead.yaml file:
---
ip: "192.168.10.10"
memory: 2048
cpus: 1

authorize: /Users/ttkalec/.ssh/public.psk

keys:
    - /Users/ttkalec/.ssh/private.ppk
folders:
    - map: /coding/jwt
      to: /home/vagrant/coding/jwt
sites:
    - map: jwt.dev
      to: /home/vagrant/coding/jwt/public
    - map: api.jwt.dev
      to: /home/vagrant/coding/jwt/public
variables:
    - key: APP_ENV
      value: local
After we’ve booted up our Vagrant box with the vagrant up command and logged into it using vagrant ssh, we navigate to the previously defined project directory. In the example above this would be /home/vagrant/coding/jwt. We can now run php artisan migrate command in order to create the necessary user tables in our database.
Installing Composer Dependencies
Fortunately, there is a community of developers working on Laravel and maintaining many great packages that we can reuse and extend our application with. In this example we will use tymon/jwt-auth, by Sean Tymon, for handling tokens on the server side, and barryvdh/laravel-cors, by Barry vd. Heuvel, for handling CORS.
jwt-auth
Require the tymon/jwt-auth package in our composer.json and update our dependencies.
composer require tymon/jwt-auth 0.5.*
Add the JWTAuthServiceProvider to our app/config/app.php providers array.
'Tymon\JWTAuth\Providers\JWTAuthServiceProvider'
Next, in app/config/app.php file, under the aliases array, we add the JWTAuth facade.
'JWTAuth' => 'Tymon\JWTAuth\Facades\JWTAuth'
Finally, we will want to publish the package config using the following command: php artisan config:publish tymon/jwt-auth
JSON Web tokens are encrypted using a secret key. We can generate that key using the php artisan jwt:generate command. It will be placed inside our config/jwt.php file. In the production environment, however, we never want to have our passwords or API keys inside configuration files. Instead, we should place them inside server environment variables and reference them in the configuration file with the env function. For example:
'secret' => env('JWT_SECRET')
We can find out more about this package and all of it’s config settings on Github.
laravel-cors
Require the barryvdh/laravel-cors package in our composer.json and update our dependencies.
composer require barryvdh/laravel-cors 0.4.x@dev
Add the CorsServiceProvider to our app/config/app.php providers array.
'Barryvdh\Cors\CorsServiceProvider'
Then add the middleware to our app/Http/Kernel.php.
'Barryvdh\Cors\Middleware\HandleCors'
Publish the configuration to a local config/cors.php file by using the php artisan vendor:publish command.
Example of a cors.php file configuration:
return [
   'defaults' => [
       'supportsCredentials' => false,
       'allowedOrigins' => [],
       'allowedHeaders' => [],
       'allowedMethods' => [],
       'exposedHeaders' => [],
       'maxAge' => 0,
       'hosts' => [],
   ],

   'paths' => [
       'v1/*' => [
           'allowedOrigins' => ['*'],
           'allowedHeaders' => ['*'],
           'allowedMethods' => ['*'],
           'maxAge' => 3600,
       ],
   ],
];
Routing and Handling HTTP Requests
For the sake of brevity, I will put all my code inside the routes.php file that is responsible for Laravel routing and delegating requests to controllers. We would usually create dedicated controllers for handling all our HTTP requests and keep our code modular and clean.
We will load our AngularJS SPA view using
Route::get('/', function () {
   return view('spa');
});
User Registration
When we make a POST request to /signup with a username and password, we will try to create a new user and save it to the database. After the user has been created, a JWT is created and returned via JSON response.
Route::post('/signup', function () {
   $credentials = Input::only('email', 'password');

   try {
       $user = User::create($credentials);
   } catch (Exception $e) {
       return Response::json(['error' => 'User already exists.'], HttpResponse::HTTP_CONFLICT);
   }

   $token = JWTAuth::fromUser($user);

   return Response::json(compact('token'));
});
User Sign In
When we make a POST request to /signin with a username and password, we verify that the user exists and returns a JWT via the JSON response.
Route::post('/signin', function () {
   $credentials = Input::only('email', 'password');

   if ( ! $token = JWTAuth::attempt($credentials)) {
       return Response::json(false, HttpResponse::HTTP_UNAUTHORIZED);
   }

   return Response::json(compact('token'));
});
Fetching a Restricted Resource on the Same Domain
Once the user is signed in, we can fetch the restricted resource. I’ve created a route /restricted that simulates a resource that needs an authenticated user. In order to do this, the request Authorization header or query string needs to provide the JWT for the backend to verify.
Route::get('/restricted', [
   'before' => 'jwt-auth',
   function () {
       $token = JWTAuth::getToken();
       $user = JWTAuth::toUser($token);

       return Response::json([
           'data' => [
               'email' => $user->email,
               'registered_at' => $user->created_at->toDateTimeString()
           ]
       ]);
   }
]);
In this example, I’m using jwt-auth middleware provided in the jwt-auth package using 'before' => 'jwt-auth'. This middleware is used to filter the request and validate the JWT token. If the token is invalid, not present, or expired, the middleware will throw an exception that we can catch.
In Laravel 5, we can catch exceptions using the app/Exceptions/Handler.php file. Using the render function we can create HTTP responses based on the thrown exception.
public function render($request, Exception $e)
{
  if ($e instanceof \Tymon\JWTAuth\Exceptions\TokenInvalidException)
  {
     return response(['Token is invalid'], 401);
  }
  if ($e instanceof \Tymon\JWTAuth\Exceptions\TokenExpiredException)
  {
     return response(['Token has expired'], 401);
  }

  return parent::render($request, $e);
}
If the user is authenticated and the token is valid, we can safely return the restricted data to the frontend via JSON.
Fetching Restricted Resources from the API Subdomain
In the next JSON web token example, we’ll take a different approach for token validation. Instead of using jwt-auth middleware, we will handle exceptions manually. When we make a POST request to an API server api.jwt.dev/v1/restricted, we are making a cross-origin request, and have to enable CORS on the backend. Fortunately, we have already configured CORS in the config/cors.php file.
Route::group(['domain' => 'api.jwt.dev', 'prefix' => 'v1'], function () {
   Route::get('/restricted', function () {
       try {
           JWTAuth::parseToken()->toUser();
       } catch (Exception $e) {
           return Response::json(['error' => $e->getMessage()], HttpResponse::HTTP_UNAUTHORIZED);
       }

       return ['data' => 'This has come from a dedicated API subdomain with restricted access.'];
   });
});
AngularJS Frontend Example
We are using AngularJS as a front-end, relying on the API calls to the Laravel back-end authentication server for user authentication and sample data, plus the API server for cross-origin example data. Once we go to the homepage of our project, the backend will serve the resources/views/spa.blade.php view that will bootstrap the Angular application.
Here is the folder structure of the Angular app:
public/
  |-- css/
      `-- bootstrap.superhero.min.css
  |-- lib/
      |-- loading-bar.css
      |-- loading-bar.js
      `-- ngStorage.js
  |-- partials/
      |-- home.html
      |-- restricted.html
      |-- signin.html
      `-- signup.html
  `-- scripts/
      |-- app.js
      |-- controllers.js
      `-- services.js
Bootstrapping the Angular Application
spa.blade.php contains the bare essentials needed to run the application. We’ll use Twitter Bootstrap for styling, along with a custom theme from Bootswatch. To have some visual feedback when making an AJAX call, we’ll use the angular-loading-bar script, which intercepts XHR requests and creates a loading bar. In the header section, we have the following stylesheets:
<link rel="stylesheet" href="//maxcdn.bootstrapcdn.com/bootstrap/3.2.0/css/bootstrap.min.css">
<link rel="stylesheet" href="/css/bootstrap.superhero.min.css">
<link rel="stylesheet" href="/lib/loading-bar.css">
The footer of our markup contains references to libraries, as well as our custom scripts for Angular modules, controllers and services.
<script src="http://cdnjs.cloudflare.com/ajax/libs/jquery/2.1.1/jquery.min.js"></script>
<script src="http://maxcdn.bootstrapcdn.com/bootstrap/3.3.2/js/bootstrap.min.js"></script>
<script src="http://cdnjs.cloudflare.com/ajax/libs/angular.js/1.3.14/angular.min.js"></script>
<script src="http://cdnjs.cloudflare.com/ajax/libs/angular.js/1.3.14/angular-route.min.js"></script>
<script src="/lib/ngStorage.js"></script>
<script src="/lib/loading-bar.js"></script>
<script src="/scripts/app.js"></script>
<script src="/scripts/controllers.js"></script>
<script src="/scripts/services.js"></script>
</body>
We are using ngStorage library for AngularJS, to save tokens into the browser’s local storage, so that we can send it on each request via the Authorization header.
In the production environment, of course, we would minify and combine all our script files and stylesheets in order to improve performance.
I’ve created a navigation bar using Bootstrap that will change the visibility of appropriate links, depending on the sign-in status of the user. The sign-in status is determined by the presence of a token variable in the controller’s scope.
<div class="navbar-header">
   <button type="button" class="navbar-toggle collapsed" data-toggle="collapse" data-target=".navbar-collapse">
       <span class="sr-only">Toggle navigation</span>
       <span class="icon-bar"></span>
       <span class="icon-bar"></span>
       <span class="icon-bar"></span>
   </button>
   <a class="navbar-brand" href="#">JWT Angular example</a>
</div>
<div class="navbar-collapse collapse">
   <ul class="nav navbar-nav navbar-right">
       <li data-ng-show="token"><a ng-href="#/restricted">Restricted area</a></li>
       <li data-ng-hide="token"><a ng-href="#/signin">Sign in</a></li>
       <li data-ng-hide="token"><a ng-href="#/signup">Sign up</a></li>
       <li data-ng-show="token"><a ng-click="logout()">Logout</a></li>
   </ul>
</div>
Routing
We have a file named app.js which is responsible for configuring all our front end routes.
angular.module('app', [
   'ngStorage',
   'ngRoute',
   'angular-loading-bar'
])
   .constant('urls', {
       BASE: 'http://jwt.dev:8000',
       BASE_API: 'http://api.jwt.dev:8000/v1'
   })
   .config(['$routeProvider', '$httpProvider', function ($routeProvider, $httpProvider) {
       $routeProvider.
           when('/', {
               templateUrl: 'partials/home.html',
               controller: 'HomeController'
           }).
           when('/signin', {
               templateUrl: 'partials/signin.html',
               controller: 'HomeController'
           }).
           when('/signup', {
               templateUrl: 'partials/signup.html',
               controller: 'HomeController'
           }).
           when('/restricted', {
               templateUrl: 'partials/restricted.html',
               controller: 'RestrictedController'
           }).
           otherwise({
               redirectTo: '/'
           });
Here we can see that we have defined four routes that are handled by either HomeController or RestrictedController. Every route corresponds to a partial HTML view. We have also defined two constants that contain URLs for our HTTP requests to the backend.
Request Interceptor
The $http service of AngularJS allows us to communicate with the backend and make HTTP requests. In our case we want to intercept every HTTP request and inject it with an Authorization header containing our JWT if the user is authenticated. We can also use an interceptor to create a global HTTP error handler. Here is an example of our interceptor that injects a token if it’s available in browser’s local storage.
$httpProvider.interceptors.push(['$q', '$location', '$localStorage', function ($q, $location, $localStorage) {
   return {
       'request': function (config) {
           config.headers = config.headers || {};
           if ($localStorage.token) {
               config.headers.Authorization = 'Bearer ' + $localStorage.token;
           }
           return config;
       },
       'responseError': function (response) {
           if (response.status === 401 || response.status === 403) {
               $location.path('/signin');
           }
           return $q.reject(response);
       }
   };
}]);
Controllers
In the controllers.js file, we have defined two controllers for our application: HomeController and RestrictedController. HomeController handles sign-in, sign-up and logout functionality. It passes the username and password data from the sign-in and sign-up forms to the Auth service, which sends HTTP requests to the backend. It then saves the token to local storage, or shows an error message, depending on the response from the backend.
angular.module('app')
   .controller('HomeController', ['$rootScope', '$scope', '$location', '$localStorage', 'Auth',
       function ($rootScope, $scope, $location, $localStorage, Auth) {
           function successAuth(res) {
               $localStorage.token = res.token;
               window.location = "/";
           }

           $scope.signin = function () {
               var formData = {
                   email: $scope.email,
                   password: $scope.password
               };

               Auth.signin(formData, successAuth, function () {
                   $rootScope.error = 'Invalid credentials.';
               })
           };

           $scope.signup = function () {
               var formData = {
                   email: $scope.email,
                   password: $scope.password
               };

               Auth.signup(formData, successAuth, function () {
                   $rootScope.error = 'Failed to signup';
               })
           };

           $scope.logout = function () {
               Auth.logout(function () {
                   window.location = "/"
               });
           };
           $scope.token = $localStorage.token;
           $scope.tokenClaims = Auth.getTokenClaims();
       }])
RestrictedController behaves the same way, only it fetches the data by using the getRestrictedData and getApiData functions on the Data service.
   .controller('RestrictedController', ['$rootScope', '$scope', 'Data', function ($rootScope, $scope, Data) {
       Data.getRestrictedData(function (res) {
           $scope.data = res.data;
       }, function () {
           $rootScope.error = 'Failed to fetch restricted content.';
       });
       Data.getApiData(function (res) {
           $scope.api = res.data;
       }, function () {
           $rootScope.error = 'Failed to fetch restricted API content.';
       });
   }]);
The backend is responsible for serving the restricted data only if the user is authenticated. This means that in order to respond with the restricted data, the request for that data needs to contain a valid JWT inside its Authorization header or query string. If that is not the case, the server will respond with a 401 Unauthorized error status code.
Auth Service
The Auth service is responsible for making the sign in and sign up HTTP requests to the backend. If the request is successful, the response contains the signed token, which is then base64 decoded, and the enclosed token claims information is saved into a tokenClaims variable. This is passed to the controller via thegetTokenClaims function.
angular.module('app')
   .factory('Auth', ['$http', '$localStorage', 'urls', function ($http, $localStorage, urls) {
       function urlBase64Decode(str) {
           var output = str.replace('-', '+').replace('_', '/');
           switch (output.length % 4) {
               case 0:
                   break;
               case 2:
                   output += '==';
                   break;
               case 3:
                   output += '=';
                   break;
               default:
                   throw 'Illegal base64url string!';
           }
           return window.atob(output);
       }

       function getClaimsFromToken() {
           var token = $localStorage.token;
           var user = {};
           if (typeof token !== 'undefined') {
               var encoded = token.split('.')[1];
               user = JSON.parse(urlBase64Decode(encoded));
           }
           return user;
       }

       var tokenClaims = getClaimsFromToken();

       return {
           signup: function (data, success, error) {
               $http.post(urls.BASE + '/signup', data).success(success).error(error)
           },
           signin: function (data, success, error) {
               $http.post(urls.BASE + '/signin', data).success(success).error(error)
           },
           logout: function (success) {
               tokenClaims = {};
               delete $localStorage.token;
               success();
           },
           getTokenClaims: function () {
               return tokenClaims;
           }
       };
   }
   ]);
Data Service
This is a simple service that makes requests to the authentication server as well as the API server for some dummy restricted data. It makes the request, and delegates success and error callbacks to the controller.
angular.module('app')
   .factory('Data', ['$http', 'urls', function ($http, urls) {

       return {
           getRestrictedData: function (success, error) {
               $http.get(urls.BASE + '/restricted').success(success).error(error)
           },
           getApiData: function (success, error) {
               $http.get(urls.BASE_API + '/restricted').success(success).error(error)
           }
       };
   }
   ]);
Conclusion
Token-based authentication enables us to construct decoupled systems that are not tied to a particular authentication scheme. The token might be generated anywhere and consumed on any system that uses the same secret key for signing the token. They are mobile ready, and do not require us to use cookies.
JSON Web Tokens work across all popular programming languages and are quickly gaining in popularity. They are backed by companies like Google, Microsoft and Zendesk. Their standard specification by Internet Engineering Task Force (IETF) is still in the draft version and may change slightly in the future.
There is still a lot to cover about JWTs, such with how to handle the security details, and refreshing tokens when they expire, but the examples above should demonstrate the basic usage and, more importantly, advantages of using JSON Web Tokens.
Getting the Most Out of Your PHP Log Files: A Practical Guide
It could rightfully be said that logs are one of the most underestimated and underutilized tools at a freelance php developer’s disposal. Despite the wealth of information they can offer, it is not uncommon for logs to be the last place a developer looks when trying to resolve a problem.
In truth, PHP log files should in many cases be the first place to look for clues when problems occur. Often, the information they contain could significantly reduce the amount of time spent pulling out your hair trying to track down a gnarly bug.
But perhaps even more importantly, with a bit of creativity and forethought, your logs files can be leveraged to serve as a valuable source of usage information and analytics. Creative use of log files can help answer questions such as: What browsers are most commonly being used to visit my site? What’s the average response time from my server? What was the percentage of requests to the site root? How has usage changed since we deployed the latest updates? And much, much more.

This article provides a number of tips on how to configure your log files, as well as how to process the information that they contain, in order to maximize the benefit that they provide.
Although this article focuses technically on logging for PHP developers, much of the information presented herein is fairly “technology agnostic” and is relevant to other languages and technology stacks as well.
Note: This article presumes basic familiarity with the Unix shell. For those lacking this knowledge, an Appendix is provided that introduces some of the commands needed for accessing and reading log files on a Unix system.
Our PHP Log File Example Project
As an example project for discussion purposes in this article, we will take Symfony Standard as a working project and we’ll set it up on Debian 7 Wheezy with rsyslogd, nginx, and PHP-FPM.
composer create-project symfony/framework-standard-edition my "2.6.*"
This quickly gives us a working test project with a nice UI.
Tips for Configuring Your Log Files
Here are some pointers on how to configure your log files to help maximize their value.
Error Log Confguration
Error logs represent the most basic form of logging; i.e., capturing additional information and detail when problems occur. So, in an ideal world, you would want there to be no errors and for your error logs to be empty. But when problems do occur (as they invariably do), your error logs should be one of the first stops you make on your debugging trail.
Error logs are typically quite easy to configure.
For one thing, all error and crash messages can be logged in the error log in exactly the same format in which they would otherwise be presented to a user. With some simple configuration, the end user will never need to see those ugly error traces on your site, while devops will be still able to monitor the system and review these error messages in all their gory detail. Here’s how to setup this kind of logging in PHP:
log_errors = On
error_reporting = E_ALL
error_log = /path/to/my/error/log
Another two lines that are important to include in a log file for a live site, to preclude gory levels of error detail from being to presented to users, are:
display_errors = Off
display_startup_errors = Off
System Log (syslog) Confguration
There are many generally compatible implementations of the syslog daemon in the open source world including:
syslogdandsysklogd– most often seen on BSD family systems, CentOS, Mac OS X, and otherssyslog-ng– default for modern Gentoo and SuSE buildsrsyslogd– widely used on the Debian and Fedora families of operating systems
(Note: In this article, we’ll be using rsyslogd for our examples.)
The basic syslog configuration is generally adequate for capturing your log messages in a system-wide log file (normally /var/log/syslog; might also be /var/log/messages or /var/log/system.log depending on the distro you’re using).
The system log provides several log facilities, eight of which (LOG_LOCAL0 through LOG_LOCAL7) are reserved for user-deployed projects. Here, for example, is how you might setup LOG_LOCAL0 to write to 4 separate log files, based on logging level (i.e., error, warning, info, debug):
# /etc/rsyslog.d/my.conf

local0.err      /var/log/my/err.log
local0.warning  /var/log/my/warning.log
local0.info     -/var/log/my/info.log
local0.debug    -/var/log/my/debug.log
Now, whenever you write a log message to LOG_LOCAL0 facility, the error messages will go to /var/log/my/err.log, warning messages will go to /var/log/my/warning.log, and so on. Note, though, that the syslog daemon filters messages for each file based on the rule of “this level and higher”. So, in the example above, all error messages will appear in all four configured files, warning messages will appear in all but the error log, info messages will appear in the info and debug logs, and debug messages will only go to debug.log.
One additional important note; The - signs before the info and debug level files in the above configuration file example indicate that writes to those files should be perfomed asynchronously (since these operations are non-blocking). This is typically fine (and even recommended in most situations) for info and debug logs, but it’s best to have writes to the error log (and most prpobably the warning log as well) be synchronous.
In order to shut down a less important level of logging (e.g., on a production server), you may simply redirect related messages to /dev/null (i.e., to nowhere):
local0.debug /dev/null # -/var/log/my/debug.log
One specific customization that is useful, especially to support some of the PHP log file parsing we’ll be discussing later in this article, is to use tab as the delimiter character in log messages. This can easily be done by adding the following file in /etc/rsyslog.d:
# /etc/rsyslog.d/fixtab.conf

$EscapeControlCharactersOnReceive off
And finally, don’t forget to restart the syslog daemon after you make any configuration changes in order for them to take effect:
service rsyslog restart
Server Log Confguration
Unlike application logs and error logs that you can write to, server logs are exclusively written to by the corresponding server daemons (e.g., web server, database server, etc.) on each request. The only “control” you have over these logs is to the extent that the server allows you to configure its logging functionality. Though there can be a lot to sift through in these files, they are often the only way to get a clear sense of what’s going on “under the hood” with your server.
Let’s deploy our Symfony Standard example application on nginx environment with MySQL storage backend. Here’s the nginx host config we will be using:
server {
    server_name my.log-sandbox;
    root /var/www/my/web;

    location / {
        # try to serve file directly, fallback to app.php
        try_files $uri /app.php$is_args$args;
    }
    # DEV
    # This rule should only be placed on your development environment
    # In production, don't include this and don't deploy app_dev.php or config.php
    location ~ ^/(app_dev|config)\.php(/|$) {
        fastcgi_pass unix:/var/run/php5-fpm.sock;
        fastcgi_split_path_info ^(.+\.php)(/.*)$;
        include fastcgi_params;
        fastcgi_param SCRIPT_FILENAME $document_root$fastcgi_script_name;
        fastcgi_param HTTPS off;
    }
    # PROD
    location ~ ^/app\.php(/|$) {
        fastcgi_pass unix:/var/run/php5-fpm.sock;
        fastcgi_split_path_info ^(.+\.php)(/.*)$;
        include fastcgi_params;
        fastcgi_param SCRIPT_FILENAME $document_root$fastcgi_script_name;
        fastcgi_param HTTPS off;
        # Prevents URIs that include the front controller. This will 404:
        # http://domain.tld/app.php/some-path
        # Remove the internal directive to allow URIs like this
        internal;
    }

    error_log /var/log/nginx/my_error.log;
    access_log /var/log/nginx/my_access.log;
}
With regard to the last two directives above: access_log represents the general requests log, while error_log is for errors, and, as with application error logs, it’s worth setting up extra monitoring to be alerted to problems so you can react quickly.
Note: This is an intentionally oversimplified nginx config file that is provided for example purposes only. It pays almost no attention to security and performance and shouldn’t be used as-is in any “real” environment.
This is what we get in /var/log/nginx/my_access.log after typing http://my.log-sandbox/app_dev.php/ in browser and hitting Enter.
192.168.56.1 - - [26/Apr/2015:16:13:28 +0300] "GET /app_dev.php/ HTTP/1.1" 200 6715 "-" "Mozilla/5.0 (Macintosh; Intel Mac OS X 10_10_3) AppleWebKit/537.36 (KHTML, like Gecko) Chrome/42.0.2311.90 Safari/537.36"
192.168.56.1 - - [26/Apr/2015:16:13:28 +0300] "GET /bundles/framework/css/body.css HTTP/1.1" 200 6657 "http://my.log-sandbox/app_dev.php/" "Mozilla/5.0 (Macintosh; Intel Mac OS X 10_10_3) AppleWebKit/537.36 (KHTML, like Gecko) Chrome/42.0.2311.90 Safari/537.36"
192.168.56.1 - - [26/Apr/2015:16:13:28 +0300] "GET /bundles/framework/css/structure.css HTTP/1.1" 200 1191 "http://my.log-sandbox/app_dev.php/" "Mozilla/5.0 (Macintosh; Intel Mac OS X 10_10_3) AppleWebKit/537.36 (KHTML, like Gecko) Chrome/42.0.2311.90 Safari/537.36"
192.168.56.1 - - [26/Apr/2015:16:13:28 +0300] "GET /bundles/acmedemo/css/demo.css HTTP/1.1" 200 2204 "http://my.log-sandbox/app_dev.php/" "Mozilla/5.0 (Macintosh; Intel Mac OS X 10_10_3) AppleWebKit/537.36 (KHTML, like Gecko) Chrome/42.0.2311.90 Safari/537.36"
192.168.56.1 - - [26/Apr/2015:16:13:28 +0300] "GET /bundles/acmedemo/images/welcome-quick-tour.gif HTTP/1.1" 200 4770 "http://my.log-sandbox/app_dev.php/" "Mozilla/5.0 (Macintosh; Intel Mac OS X 10_10_3) AppleWebKit/537.36 (KHTML, like Gecko) Chrome/42.0.2311.90 Safari/537.36"
192.168.56.1 - - [26/Apr/2015:16:13:28 +0300] "GET /bundles/acmedemo/images/welcome-demo.gif HTTP/1.1" 200 4053 "http://my.log-sandbox/app_dev.php/" "Mozilla/5.0 (Macintosh; Intel Mac OS X 10_10_3) AppleWebKit/537.36 (KHTML, like Gecko) Chrome/42.0.2311.90 Safari/537.36"
192.168.56.1 - - [26/Apr/2015:16:13:28 +0300] "GET /bundles/acmedemo/images/welcome-configure.gif HTTP/1.1" 200 3530 "http://my.log-sandbox/app_dev.php/" "Mozilla/5.0 (Macintosh; Intel Mac OS X 10_10_3) AppleWebKit/537.36 (KHTML, like Gecko) Chrome/42.0.2311.90 Safari/537.36"
192.168.56.1 - - [26/Apr/2015:16:13:28 +0300] "GET /favicon.ico HTTP/1.1" 200 6518 "http://my.log-sandbox/app_dev.php/" "Mozilla/5.0 (Macintosh; Intel Mac OS X 10_10_3) AppleWebKit/537.36 (KHTML, like Gecko) Chrome/42.0.2311.90 Safari/537.36"
192.168.56.1 - - [26/Apr/2015:16:13:30 +0300] "GET /app_dev.php/_wdt/e50d73 HTTP/1.1" 200 13265 "http://my.log-sandbox/app_dev.php/" "Mozilla/5.0 (Macintosh; Intel Mac OS X 10_10_3) AppleWebKit/537.36 (KHTML, like Gecko) Chrome/42.0.2311.90 Safari/537.36"
This shows that, for serving one page, the browser actually performs 9 HTTP calls. 7 of those, however, are requests to static content, which are plain and lightweight. However, they still take network resources and this is what can be optimized by using various sprites and minification techniques.
While those optimisations are to be discussed in another article, what’s relavant here is that we can log requests to static contents separately by using another location directive for them:
location ~ \.(jpg|jpeg|gif|png|ico|css|zip|tgz|gz|rar|bz2|pdf|txt|tar|wav|bmp|rtf|js)$ {
    access_log /var/log/nginx/my_access-static.log;
}
Remember that nginx location performs simple regular expression matching, so you can include as many static contents extensions as you expect to dispatch on your site.
Parsing such logs is no different than parsing application logs.
Other Logs Worth Mentioning
Two other PHP logs worth mentioning are the debug log and data storage log.
The Debug Log
Another convenient thing about nginx logs is the debug log. We can turn it on by replacing the error_log line of the config with the following (requires that the nginx debug module be installed):
error_log /var/log/nginx/my_error.log debug;
The same setting applies for Apache or whatever other webserver you use.
And incidentally, debug logs are not related to error logs, even though they are configured in the error_logdirective.
Although the debug log can indeed be verbose (a single nginx request, for example, generated 127KB of log data!), it can still be very useful. Wading through a log file may be cumbersome and tedious, but it can often quickly provide clues and information that greatly help accelerate the debugging process.
In particular, the debug log can really help with debugging nginx configurations, especially the most complicated parts, like location matching and rewrite chains.
Of course, debug logs should never be enabled in a production environment. The amount of space they use also and the amount of information that they store means a lot of I/O load on your server, which can degrade the whole system’s performance significantly.
Data Storage Logs
Another type of server log (useful for debugging) is data storage logs. In MySQL, you can turn them on by adding these lines:
[mysqld]
general_log = 1
general_log_file = /var/log/mysql/query.log
These logs simply contain a list of queries run by the system while serving database requests in chronological order, which can be helpful for various debugging and tracing needs. However, they should not stay enabled on production systems, since they will generate extra unnecessary I/O load, which affects performance.
Writing to Your Log Files
PHP itself provides functions for opening, writing to, and closing log files (openlog(), syslog(), and closelog(), respectively).
There are also numerous logging libraries for the PHP developer, such as Monolog (popular among Symfonyand Laravel users), as well as various framework-specific implementations, such as the logging capabilities incorporated into CakePHP. Generally, libraries like Monolog not only wrap syslog() calls, but also allow using other backend functionality and tools.
Here’s a simple example of how to write to the log:
<?php

openlog(uniqid(), LOG_ODELAY, LOG_LOCAL0);
syslog(LOG_INFO, 'It works!');
Our call here to openlog:
- configures PHP to prepend a unique identifier to each system log message within the script’s lifetime
- sets it to delay opening the syslog connection until the first
syslog()call has occurred - sets
LOG_LOCAL0as the default logging facility
Here’s what the contents of the log file would look like after running the above code:
# cat /var/log/my/info.log
Mar  2 00:23:29 log-sandbox 54f39161a2e55: It works!
Maximizing the Value of Your PHP Log Files
Now that we’re all good with theory and basics, let’s see how much we can get from logs making as few changes as possible to our sample Symfony Standard project.
First, let’s create the scripts src/log-begin.php (to properly open and configure our logs) and src/log-end.php(to log information about successful completion). Note that, for simplicity, we’ll just write all messages to the info log.
# src/log-begin.php

<?php

define('START_TIME', microtime(true));
openlog(uniqid(), LOG_ODELAY, LOG_LOCAL0);
syslog(LOG_INFO, 'BEGIN');
syslog(LOG_INFO, "URI\t{$_SERVER['REQUEST_URI']}");
$browserHash = substr(md5($_SERVER['HTTP_USER_AGENT']), 0, 7);
syslog(LOG_INFO, "CLIENT\t{$_SERVER['REMOTE_ADDR']}\t{$browserHash}"); <br />

# src/log-end.php

<?php

syslog(LOG_INFO, "DISPATCH TIME\t" . round(microtime(true) - START_TIME, 2));
syslog(LOG_INFO, 'END');
And let’s require these scripts in app.php:
<?php

require_once(dirname(__DIR__) . '/src/log-begin.php');
syslog(LOG_INFO, "MODE\tPROD");

# original app.php contents

require_once(dirname(__DIR__) . '/src/log-end.php');
For the development environment, we want to require these scripts in app_dev.php as well. The code to do so would be the same as above, except we would set the MODE to DEV rather than PROD.
We also want to track what controllers are being invoked, so let’s add one more line in Acme\DemoBundle\EventListener\ControllerListener, right at the beginning of the ControllerListener::onKernelController() method:
syslog(LOG_INFO, "CONTROLLER\t" . get_class($event->getController()[0]));
Note that these changes total a mere 15 extra lines of code, but can collectively yield a wealth of information.
Analyzing the Data in Your Log Files
For starters, let’s see how many HTTP requests are required to serve each page load.
Here’s the info in the logs for one request, based on the way we’ve configured our logging:
Mar  3 12:04:20 log-sandbox 54f58724b1ccc: BEGIN
Mar  3 12:04:20 log-sandbox 54f58724b1ccc: URI    /app_dev.php/
Mar  3 12:04:20 log-sandbox 54f58724b1ccc: CLIENT 192.168.56.1    1b101cd
Mar  3 12:04:20 log-sandbox 54f58724b1ccc: MODE   DEV
Mar  3 12:04:23 log-sandbox 54f58724b1ccc: CONTROLLER Acme\DemoBundle\Controller\WelcomeController
Mar  3 12:04:25 log-sandbox 54f58724b1ccc: DISPATCH TIME  4.51
Mar  3 12:04:25 log-sandbox 54f58724b1ccc: END
Mar  3 12:04:25 log-sandbox 54f5872967dea: BEGIN
Mar  3 12:04:25 log-sandbox 54f5872967dea: URI    /app_dev.php/_wdt/59b8b6
Mar  3 12:04:25 log-sandbox 54f5872967dea: CLIENT 192.168.56.1    1b101cd
Mar  3 12:04:25 log-sandbox 54f5872967dea: MODE   DEV
Mar  3 12:04:28 log-sandbox 54f5872967dea: CONTROLLER Symfony\Bundle\WebProfilerBundle\Controller\ProfilerController
Mar  3 12:04:29 log-sandbox 54f5872967dea: DISPATCH TIME  4.17
Mar  3 12:04:29 log-sandbox 54f5872967dea: END
So now we know that each page load is actually served with two HTTP requests.
Actually there are two points worth mentioning here. First, the two requests per page load is for using Symfony in dev mode (which I have done throughout this article). You can identify dev mode calls by searching for /app-dev.php/ URL chunks. Second, let’s say each page load is served with two subsequent requests to the Symfony app. As we saw earlier in the nginx access logs, there are actually more HTTP calls, some of which are for static content.
OK, now let’s surf a bit on the demo site (to build up the data in the log files) and let’s see what else we can learn from these logs.
How many requests were served in total since the beginning of the logfile?
# grep -c BEGIN info.log
10
Did any of them fail (did the script shut down without reaching the end)?
# grep -c END info.log
10
We see that the number of BEGIN and END records match, so this tells us that all of the calls were successful. (If the PHP script had not completed successfully, it would not have reached execution of the src/log-end.phpscript.)
What was the percentage of requests to the site root?
# `grep -cE "\s/app_dev.php/$" info.log`
2
This tells us that there were 2 page loads of the site root. Since we previously learned that (a) there are 2 requests to the app per page load and (b) there were a total of 10 HTTP requests, the percentage of requests to the site root was 40% (i.e., 2×2/10).
Which controller class is responsible for serving requests to site root?
# grep -E "\s/$|\s/app_dev.php/$" info.log | head -n1
Mar  3 12:04:20 log-sandbox 54f58724b1ccc: URI  /app_dev.php/

# grep 54f58724b1ccc info.log | grep CONTROLLER
Mar  3 12:04:23 log-sandbox 54f58724b1ccc: CONTROLLER   Acme\DemoBundle\Controller\WelcomeController
Here we used the unique ID of a request to check all log messages related to that single request. We thereby were able to determine that the controller class responsible for serving requests to site root is Acme\DemoBundle\Controller\WelcomeController.
Which clients with IPs of subnet
192.168.0.0/16have accessed the site?
# grep CLIENT info.log | cut -d":" -f4 | cut -f2 | sort | uniq
192.168.56.1
As expected in this simple test case, only my host computer has accessed the site. This is of course a very simplistic example, but the capability that it demonstrates (of being able to analyse the sources of the traffic to your site) is obviously quite powerful and important.
How much of the traffic to my site has been from FireFox?
Having 1b101cd as the hash of my Firefox User-Agent, I can answer this question as follows:
# grep -c 1b101cd info.log
8
# grep -c CLIENT info.log
10
Answer: 80% (i.e., 8/10)
What is the percentage of requests that yielded a “slow” response?
For purposes of this example, we’ll define “slow” as taking more than 5 seconds to provide a response. Accordingly:
# grep "DISPATCH TIME" info.log | grep -cE "\s[0-9]{2,}\.|\s[5-9]\."
2
Answer: 20% (i.e., 2/10)
Did anyone ever supply GET parameters?
# grep URI info.log | grep \?
No, Symfony standard uses only URL slugs, so this also tells us here that no one has attempted to hack the site.
These are just a handful of relatively rudimentary examples of the ways in which logs files can be creatively leveraged to yield valuable usage information and even basic analytics.
Other Things to Keep in Mind
Keeping Things Secure
Another heads-up is for security. You might think that logging requests is a good idea, in most cases it indeed is. However, it’s important to be extremely careful about removing any potentially sensitive user information before storing it in the log.
Fighting Log File Bloat
Since log files are text files to which you always append information, they are constantly growing. Since this is a well-known issue, there are some fairly standard approaches to controlling log file growth.
The easiest is to rotate the logs. Rotating logs means:
- Periodically replacing the log with a new empty file for further writing
- Storing the old file for history
- Removing files that have “aged” sufficiently to free up disk space
- Making sure the application can write to the logs uniterrupted when these file changes occur
The most common solution for this is logrotate, which ships pre-installed with most *nix distributions. Let’s see a simple configuration file for rotating our logs:
/var/log/my/debug.log
/var/log/my/info.log
/var/log/my/warning.log
/var/log/my/error.log
{
    rotate 7
    daily
    missingok
    notifempty
    delaycompress
    compress
    sharedscripts
    postrotate
        invoke-rc.d rsyslog rotate > /dev/null
    endscript
}
Another, more advanced approach is to make rsyslogd itself write messages into files, dynamically created based on current date and time. This would still require a custom solution for removal of older files, but lets devops manage timeframes for each log file precisely. For our example:
$template DynaLocal0Err,        "/var/log/my/error-%$NOW%-%$HOUR%.log"
$template DynaLocal0Info,       "/var/log/my/info-%$NOW%-%$HOUR%.log"
$template DynaLocal0Warning,    "/var/log/my/warning-%$NOW%-%$HOUR%.log"
$template DynaLocal0Debug,      "/var/log/my/debug-%$NOW%-%$HOUR%.log"
local1.err      -?DynaLocal0Err
local1.info     -?DynaLocal0Info
local1.warning  -?DynaLocal0Warning
local1.debug    -?DynaLocal0Debug
This way, rsyslog will create an individual log file each hour, and there won’t be any need for rotating them and restarting the daemon. Here’s how log files older than 5 days can be removed to accomplish this solution:
find /var/log/my/ -mtime +5 -print0 | xargs -0 rm
Remote Logs
As the project grows, parsing information from logs gets more and more resource hungry. This not only means creating extra server load; it also means creating peak load on the CPU and disk drives at the times when you parse logs, which can degrade server response time for users (or in a worst case can even bring the site down).
To solve this, consider setting up a centralized logging server. All you need for this is another box with UDP port 514 (default) open. To make rsyslogd listen to connections, add the following line to its config file:
$UDPServerRun 514
Having this, setting up the client is then as easy as:
*.* @HOSTNAME:514
(where HOSTNAME is the host name of your remote logging server).
Conclusion
While this article has demonstrated some of the creative ways in which log files can offer way more valuable information than you may have previously imagined, it’s important to emphasize that we’ve only scratched the surface of what’s possible. The extent, scope, and format of what you can log is almost limitless. This means that – if there’s usage or analytics data you want to extract from your logs – you simply need to log it in a way that will make it easy to subsequently parse and analyze. Moreover, that analysis can often be performed with standard Linux command line tools like grep, sed, or awk.
Indeed, PHP log files are a most powerful tool that can be of tremendous benefit.
Resources
Code on GitHub: https://github.com/isanosyan/toptal-blog-logs-post-example
Appendix: Reading and Manipulating Log Files in the Unix Shell
Here is a brief intro to some of the more common *nix command line tools that you’ll want to be familiar with for reading and manipulating your log files.
catis perhaps the most simple one. It prints the whole file to the output stream. For example, the following command will printlogfile1to the console:cat logfile1>character allows user to redirect output, for example into another file. Opens target stream in write mode (which means wiping target contents). Here’s how we replace contents oftmpfilewith contents oflogfile1:cat logfile1 > tmpfile>>redirects output and opens target stream in append mode. Current contents of target file will be preserved, new lines will be added to the bottom. This will appendlogfile1contents totmpfile:cat logfile1 >> tmpfilegrepfilters file by some pattern and prints only matching lines. Command below will only print lines oflogfile1containingBingomessage:grep Bingo logfile1cutprints contents of a single column (by number starting from 1). By default searches for tab characters as delimiters between column. For example, if you have file full of timestamps in formatYYYY-MM-DD HH:MM:SS, this will allow you to print only years:cut -d"-" -f1 logfile1headdisplays only the first lines of a filetaildisplays only the last lines of a filesortsorts lines in the outputuniqfilters out duplicate lineswccounts words (or lines when used with the-lflag)|(i.e., the “pipe” symbol) supplies output from one command as input to the next. Pipe is very convenient for combining commands. For example, here’s how we can find months of 2014 that occur within a set of timestamps:grep -E "^2014" logfile1 | cut -d"-" -f2 | sort | uniq
Here we first match lines against regular expression “starts with 2014”, then cut months. Finally, we use combination of sort and uniq to print occurrences only once.
How to Use E-mail PGP Encryption
Every day internet users send more than 200 billion emails and this statistics makes anonymous e-mail a number one feature to use in day-to-day communication.
Below here is a step by step guide to set up PGP encryption and communicate securely online. The tutorial is developed using Privatoria E-mail service, though one can use any e-mail client supporting this feature. The device used in this installation wizard is MacBook Air, OS X Yosemite. Pay attention that you can set up PGP on any device, regardless of OS.
Step 1
Please login to your Control Panel and go to Services /Anonymous E-Mail / Go to your inbox. You will be redirected to your mail inbox.
Step 2
Go to Settings section in the right top corner of your page. Click Open PGP – Enable OpenPGP – Save.
To start sending encrypted emails you need to first of all generate a KEY and send it to the recipient.
Click on Generate new key. It is recommended to set own password on this step and use it each and every time you want to send/receive encrypted emails. It provides additional security meaning that your PGP email can never be decrypted and/or your signature is really yours! Please note that this password cannot be reset, but you can create a new one in case you forget it 🙂
Click Generate and wait for about half a minute until it is being generated. Once ready, you will see the following screen
To send an encrypted email you will need to use Public Key. Click View and then choose Send.
Step 3
You will be redirected to email interface ready to send your email. Send this email to the recipient first and wait until they send you their key. Once received click Import. Now, once the key is received you can proceed with sending the actual both-end encrypted email. Type in the recipient’s email, add subject and body of your email.
To finalize the encryption click on PGP Sign/Encrypt and proceed further. You will receive a message “OpenPGP supports plain text only. Click OK to remove all the formatting and continue.” Click OK.
NB! Private key is your own key that encrypts the data and is being generated for you only.
Email recipient should use any email client supporting PGP encryption function.
Cold War Tech: It’s Still Here, And Still Being Used
I’m a Cold War kid. I grew up watching news of Pershing II and SS-20 deployments in Europe, the Soviet war in Afghanistan, with some Terminator and Top Gun VHS action on the side. Yugoslavia was trying to play both sides, and for a while it worked like a charm. It all crashed a couple of years after the Berlin Wall came tumbling down, rendering our unaligned prowess pointless.
I admit this is an odd intro for a tech blog, but bear with me; it will start to make sense. Unlike most Europeans, we had good relations with both blocs. We sold tanks to Kuwait and rocket artillery to Saddam, we bought cheap fuel and MiGs from the Soviets, and in return we exported some stuff they couldn’t get directly from the West. I know people who would stay in East Berlin hotels because they were cheaper, then cross the border into West Berlin to work, play and shop, only to cross back via virtually unused border crossings like Checkpoint Charlie, all in a matter of hours.
On one such trip, my dad got me a Commodore C64, which was pressed into service as our Cold War gaming machine. Most 80s video games, and indeed a lot of music and films, were inspired by countless proxy wars and the threat of a nuclear apocalypse. As the Wall came down, a lot of people assumed that would be the end of runaway defence spending and that the world would be a safer place. It didn’t exactly work out that way, did it?
However, the long-term effect of the Cold War on science and technology is more profound than Nena’s 99 Luftbalons, or any Oliver Stone Vietnam flick.
Minuteman: A Cold War Tech Case Study
If you are reading this, you’re already using a technology developed for cold warriors; The Internet. That’s not all. A lot of tech and infrastructure we take for granted was developed, or at least conceived, during these tumultuous decades.
That constellation of GPS satellites orbiting Earth? It wasn’t put up there to geotag selfies or get an Uber ride; it was designed to help the US Strategic Air Command deliver hundreds of megatons worth of instant sunshine on Soviet targets with pinpoint accuracy. Integrated circuits, transistors, solid-state computing? Yep, all developed for the armed forces and paid for by the US taxpayer.
Here is just one example: the sleek and unfathomably deadly LGM-30 Minuteman intercontinental ballistic missile (ICBM). It wasn’t the first ICBM out there, but when it appeared, it was revolutionary. It was a solid fuel missile, which meant it could respond to a threat and launch in a minute without having to be fuelled, hence the name. But solid fuel was only part of the story: Solid-state was a lot more interesting from a geek perspective. Prior to Minuteman, ICBMs relied on analogue computers with mechanical gyros and primitive sensors. Since they were wired to a specific target, the target package could not be changed easily. Minuteman was the first mass implementation of a general purpose digital computer; it integrated an autopilot and missile guidance system in one package, with reliable storage that could take the stress of a silo launch. The computer was also capable of storing multiple targets, and was reprogrammable.
Transistors were nothing new at that point; they were developed years before by Bell Labs. Yes, these primitive transistors were almost exclusively reserved for the military-industrial complex. Uncle Sam was the sole customer for virtually all early computers and chips, burning heaps of money. These early transistors offered a quantum leap over vacuum tubes, but they weren’t perfect. By today’s standards, they were rubbish. The reliability simply wasn’t there, and if you needed to launch a few hundred thermonuclear warheads halfway across the planet, you sort of needed a guidance system that wouldn’t fail as soon as the candle was lit.
So what do you do when you come across a technical problem you can’t solve with money? Simple: You throw more money at it, and that’s exactly what the US Air Force did. They burned millions to make the damn things reliable enough to be used in harsh environments and survive the stress of a high-G ascent to space. This was known as the Minuteman High Reliability (Hi-Rel) programme.

It worked, but the USAF got a bit more than they bargained for. In trying to improve a single weapons system, the USAF ended up giving a huge boost to the tech industry in general. Eventually, the Minuteman was upgraded to include a new microchip-based guidance system, with a primitive form of solid-state storage. This Cold War relic has been in service since the Kennedy administration, and the current incarnation has been around for 45 years, receiving multiple hardware and software updates over the years.
So, in outlining the development and evolution of a single strategic weapon delivery system, I have touched on a number of vital technologies we take for granted: reliable transistors, chips, solid-state storage, mass-produced programmable computers and so on. The Minuteman was also the first mobile digital computer.
Some may argue that the legacy of such weapons is that Mutually Assured Destruction (MAD), guaranteed by the nuclear triad, kept superpowers from going to all-out war. It probably did, but in doing so, it also allowed engineers around the world to develop technologies and concepts applicable in various industries and fields of study.
Their real legacy lies in every integrated circuit on the planet.
Capitalist Pioneers Try To Cash In
What could be more capitalist than monetizing instruments of mass murder? The taxpayers paid for their development, not venture capitalists!
Joking aside, it can be argued that the Red Scare of the fifties created Silicon Valley. Most of the money really did come from taxpayers, and most companies that got lucrative defence contracts were quick to make a buck on dual-use technology developed for the military. Remember Bell Labs? A few of their brightest people went on to co-found Fairchild Semiconductor, and eventually created Intel a decade later. The updated Minuteman guidance computer was based on chips from another semiconductor giant: Texas Instruments.
I am not disputing the brilliance of people like Intel co-founders Robert Noyce and Gordon Moore. I have no doubt they would have made their mark on the tech industry even without the biggest arms race in history, but it’s also hard to dispute that the tech industry wouldn’t have developed at nearly the same pace had there been no government funding. Yes, the taxpayers effectively subsidised the tech industry for decades, but in the long run, they’re probably better off. Westinghouse did not need subsidies to develop washing machines and refrigerators, because consumer demand was strong, but in the early days of computing, there was virtually no consumer demand. That’s why governments had to step in.
But what did the taxpayer get?

The space and arms race spawned a number of technologies that in turn created countless business opportunities. Even primitive computers had a profound impact on industry. They made energy grids and transportation infrastructure more efficient, helped improve safety in industrial facilities, including sensitive chemical and nuclear facilities, they changed the face of banking, communications, entertainment and so on.
Best of all, we somehow managed not to blow ourselves up with the weapons these technologies made possible, yet at the same time, we turned swords into ploughshares. Back in the fifties, the US and USSR launched initiatives designed to examine civilian uses of nuclear power (including civil engineering nuclear explosives schemes, which went terribly wrong), but they amounted to nothing. It wasn’t the might of the atom that changed the world, it was the humble microchip and ancillary technologies developed for countless defence programmes.
Before they made their mark in science and beat Gary Kasparov at the chess table, supercomputers and their analogue predecessors were used to simulate physical processes vital in the development of thermonuclear weapons. An advantage in sheer computing power could yield advances in countless fields. Computer simulations allowed western navies to develop quieter submarines with new screws, digitally optimised to avoid cavitation. Digital signal processors (DSPs) made sonars far more sensitive, and a couple of decades later, advanced DSPs made music sound better. Computer aided design wasn’t just used to reduce the radar cross-section of airplanes, it also made our buildings and cars cheaper, safer and more energy efficient.
Some of these efforts resulted in a technological dead-end, but most did not. One of my favourite tech duds was Blue Peacock, a British nuclear landmine (yes, landmine, not bomb), weighing in at 7.2 tons. Since it relied on early 50s technology and had to be buried in the German countryside, the engineers quickly realised the cold could kill the electronics inside, so they tried to figure out how to keep circuits warm. Their solution was so outlandish that it was mistaken for an April Fool’s Day joke when the design was declassified on April 1, 2004.

A chicken was to be sealed inside the casing, with enough food and water to stay alive for a week. Its body heat would keep the bomb’s electronics operational.
As civilian industries started implementing these cutting edge technologies en masse, our quality of life and productivity shot up exponentially. Our TVs, cars, phones, the clothes we wear, and just about any consumer product we buy: They’re all better thanks to the biggest waste of money in history. Granted, we all have trace amounts of Strontium 90 in our bones, but in the big scheme of things, it’s a small price to pay for the high-tech world we enjoy so much.
Oh yes, we also got video games out of it. Loads and loads of video games.
Kickstarting Game Development
Video games were pioneered on the earliest digital computers (and some analogue ones as well). In fact,Tennis for Two, arguably the first game to use a graphical display, was developed for an analogue computer in 1958. However, not even Bond villains had computers at that point, so the rise of the video game industry had to wait for hardware to mature.
By the mid to late seventies, microchips became cheap enough for mass market applications. Now that we had the hardware, we just needed some software developers and a use-case for cheap chips. Since the average consumer was not interested in expensive and complicated computers that were designed for big business, attention shifted to gaming; arcades, game consoles and inexpensive computers like the ZX and C64.
These humble machines brought programmable computers to millions of households, hooking a generation of kids on digital entertainment, and creating opportunities for game developers. Consoles and cheap computers brought the arcade to the living room, ushering in a new era of video gaming, and creating countless jobs in the industry. Even the Soviets got in on it with Tetris, the first game from behind the iron curtain.

It wasn’t just entertainment. Unlike consoles, the ZX and C64 were proper computers, and geeky kids quickly found new uses for them. They started making demos, they started coding. Chances are you know a lot of these kids, and if you’re reading this, you probably work with some of them.
If you’re interested in the development of early video games, and what the Cold War had to do with them, I suggest you check out Nuclear Fruit; a new documentary that’s a must see for all geeks and gamers born in the 70s and early 80s.
These guys and gals went on to develop a new breed of video games, build successful online businesses, create new technologies and revolutionise the digital world, all in the space of a decade. A generation that grew up with the constant threat of nuclear war, enjoying dystopian science fiction, helped make the world a better place. They didn’t develop Skynet, they developed millions of mobile and web apps instead.
So, no Terminators. At least, not yet.
Cold War 2.0 And The Emergence Of New Threats
This is not a geopolitical blog, but if you happen to follow the news, you probably know the world is a messed up place. No, the end of the Cold War didn’t bring an era of peace and stability, and there’s already talk of a “Second Cold War,” or worse, a “hot” war. While most of these worries are nothing more than hype and sensationalism, a number of serious threats remain. The threat of nuclear annihilation is all but gone, but the technology we love so much has created a host of potential threats and issues, ranging from privacy and security, to ethical concerns.
Thankfully, we aren’t likely to see an arms race to rival the one we witnessed in the 20th Century, but we don’t have to. The same technology that makes our lives easier and more productive can also be used against us. The digital infrastructure we rely on for work and play is fragile and can be targeted by criminals, foreign governments, non-state actors, and even lone nutjobs with a grudge.
These new threats include, but are not limited to:
- Cybercrime
- State-sponsored cyber warfare
- Misuse of autonomous vehicle technology
- Privacy breaches
- Mass surveillance abuses
- Use of secure communications for criminal/terrorist activities
All pose a serious challenge and the industry is having trouble keeping up. My argument is simple: We no longer have to develop ground-breaking technology to get an edge in geopolitical struggles, but we will continue to develop technologies and methods of tackling new threats and problems. It’s a vicious circle since these new threats are made possible by our reliance on digital communications and the wide availability of various technologies that can be employed by hostile organisations and individuals.

Cybercrime is usually associated with identity theft and credit card fraud, but it’s no longer limited to these fields. The advent of secure communication channels has allowed criminals to expand into new niches. The scene has come a long way since the romanticised exploits of phone phreaks like Steve Wozniak. Some offer hacking for hire, others are willing to host all sorts of illicit content, no questions asked. Some groups specialise in money laundering, darknet drug bazaars, and so on. The biggest threat with this new generation of cybercrime is that you no longer have to possess many skills to get involved. As cybercrime matures, different groups specialise in different activities, and they can be hired.
State-sponsored cyberwarfare poses a serious threat to infrastructure, financial systems, and national security. However, there is really not much an individual can do in the face of these threats, so there’s no point in wasting time on them in this post. Another form of economic warfare could be to deprive a nation or region of Internet access. It has happened before, sometimes by accident, sometimes by government decree and enemy action.
Commercial drones don’t have much in common with their military counterparts. Their range and payload are very limited, and while a military drone can usually loiter over an area for hours on end, the endurance of hobbyist drones is limited to minutes rather than hours. This does not mean they cannot be used for crime; they can still invade someone’s privacy, smuggle drugs across a border, or even carry explosives. Autonomous cars are still in their infancy, so I don’t feel the need to discuss the myriad of questions they will raise.
Privacy remains one of the biggest Internet-related concerns expressed by the average person. This is understandable; we have moved so much of our daily lives to the digital sphere, placing our privacy at risk. People don’t even have to be specifically targeted to have their privacy and personal integrity compromised. Most data that makes its way online is released in the form of massive dumps following a security breach affecting many, if not all, users of a particular online service. People will continue to demand more privacy, and in turn clients will demand more security from software engineers (who aren’t miracle workers and can’t guarantee absolute security and privacy).
Mass surveillance is usually performed by governments and should not represent a threat to the average citizen or business. However, it’s still a potential threat as it can be abused by disgruntled workers, foreign governments, or by way of data breaches. The other problem is the sheer cost to the taxpayer; mass surveillance doesn’t come cheap and we will continue to see more of it.
Most governments wouldn’t bother with mass surveillance and metadata programmes if they weren’t facing very real threats. The same technology developed to keep our communications and online activities private can be abused by all sorts of individuals we wouldn’t like to meet in a dark alley. The list includes multinational crime syndicates, terrorists and insurgents. However, not all of this communication needs to be encrypted and secure. The point of propaganda is to make it widely available to anyone, and the Internet has given every crackpot with a smartphone the biggest megaphone in history, with global reach, free of charge. You can use the Internet to rally a million people around a good cause in a matter of days, but the same principles can be applied to a bad cause. If the target audience is people willing to join a death cult with a penchant for black flags, you don’t need a million people; you just need a few dozen.
The Difference Between Science And Science Fiction
For all their brilliance, the science fiction authors who helped shape popular culture in the 20th Century didn’t see the real future coming. They didn’t exactly envision the Internet, let alone its profound impact on society.
Sorry to burst your bubble, but Terminators and Artificial Intelligence (AI) aren’t a threat yet, and won’t be anytime soon. The real threats are more down to earth, but that does not mean we can afford to ignore them. You don’t need a Terminator to create havoc, all you need is a few lines of really nasty code that can disrupt the infrastructure, causing all sorts of problems. You don’t need a super-intelligent automaton from the future to cause damage. Since eBay doesn’t carry Terminators, it’s a lot easier to use an off-the-shelf drone, programmed to deliver a payload to a specific target: drugs to a trafficker, or an explosive charge to a VIP.
But these aren’t the biggest threats, they’re just potential threats: something for a Hollywood script, not a tech blog.
The real threats are criminal in nature, but they tend to stay in the cyber realm. You don’t have to physically move anything to move dirty money and information online. Law enforcement is already having a hard time keeping up with cybercrime, which seems to be getting worse. While it’s true that the crime rate in developed countries is going down, these statistics don’t paint the full picture. A few weeks ago, the British Office for National Statistics (ONS) reported a twofold increase in the crime rate for England and Wales, totalling more than 11.6 million offences. The traditional crime rate continued to fall, but the statistics included 5.1 million online fraud incidents.
The cost of physical crime is going down, but the cost of cybercrime is starting to catch up. I strongly believe the industry will have to do more to bolster security, and governments will have to invest in online security and crime prevention as well.
Just in case you are into dystopian fiction and don’t find criminal threats exciting, another frightening development would be data monopolisation: A process in which industry giants would command such a competitive lead, made possible by their vast user base, as to render competition pointless, thus stifling innovation.
Yes, I am aware that Terminators would make for a more eventful future and interesting blog post, but we’re not there yet.
Source: Toptal
