Archive for the ‘Authentication’ Category
Identity and Access Management in Multi-Cloud Environments

IAM (Identity and Access Management) is a crucial part of any cloud environment.
As organizations evolve, they may look at multi-cloud as a solution to consume cloud services in different cloud providers’ technologies (such as AI/ML, data analytics, and more), to have the benefit of using different pricing models, or to decrease the risk of vendor lock-in.
Before we begin the discussion about IAM, we need to understand the following fundamental concepts:
- Identity – An account represents a persona (human) or service (non-interactive account)
- Authentication – The act where an identity proves himself against a system (such as providing username and password, certificate, API key, and more)
- Authorization – The act of validating granting an identity’s privileges to take actions on a system (such as view configuration, read database content, upload a file to object storage, and more)
- Access Management – The entire lifecycle of IAM – from account provisioning, granting access, and validating privileges until account or privilege revocation.
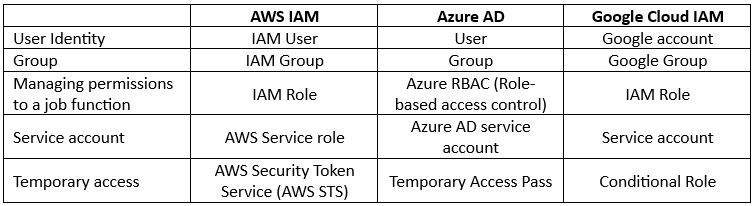
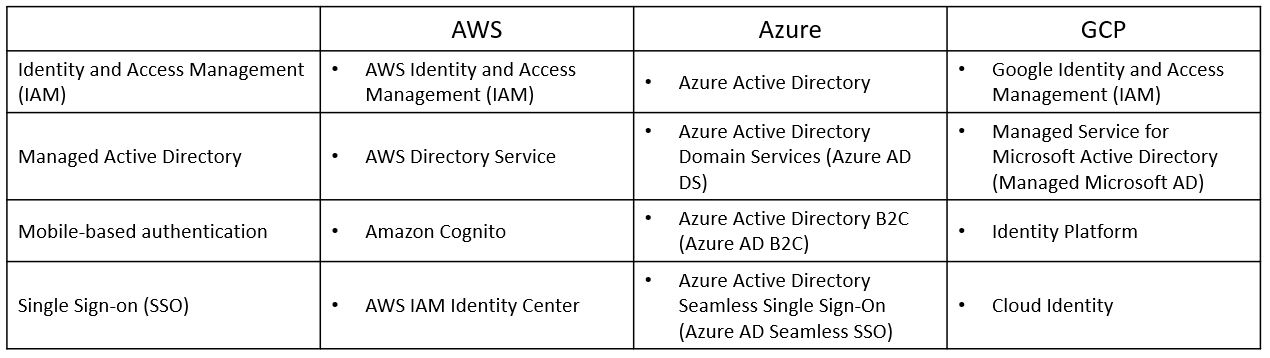
Identity and Access Management Terminology
Authorization in the Cloud
Although all cloud providers have the same concept of identities, when we deep dive into the concept of authorization or access management to resources/services, we need to understand the differences between cloud providers.
Authorization in AWS
AWS has two concepts for managing permissions to resources:
- IAM Role – Permissions assigned to an identity temporarily.
- IAM Policy – A document defines a set of permissions assigned to an IAM role.
Permissions in AWS can be assigned to:
- Identity – A policy attached to a user, group, or role.
- Resource – A policy attached to a resource (such as Amazon S3 bucket).
Authorization in Azure
Permissions in Azure AD are controlled by roles.
A role defines the permissions an identity has over an Azure resource.
Within Azure AD, you control permissions using RBAC (Role-based access control).
Azure AD supports the following types of roles:
- Built-in roles – A pre-defined role according to job function (as you can read on the link).
- Custom roles – A role that we create ourselves to match the principle of least privilege.
Authorization in Google Cloud
Permissions in Google Cloud IAM are controlled by IAM roles.
Google Cloud IAM supports the following types of IAM roles:
- Basic roles – The most permissive type of roles (Owner, Editor, and Viewer).
- Predefined roles – Roles managed by Google, which provides granular access to specific services (as you can read on the link).
- Custom roles – User-specific roles, which provide the most granular access to resources.
Authorization – Default behavior
As we can see below each cloud provider takes a different approach to default permissions:
- AWS – By default, new IAM users have no permission to access any resource in AWS.
To allow access to resources or take actions, you need to manually assign the user an IAM role. - Azure – By default, all Azure AD users are granted a set of default permissions (such as listing all users, reading all properties of users and groups, registering new applications, and more).
- Google Cloud – By default, a new service account is granted the Editor role on the project level.
Identity Federation
When we are talking about identity federation, there are two concepts:
- Service Provider (SP) – Provide access to resources
- Identity Provider (IdP) – Authenticate the identities
Identities (user accounts, service accounts, groups, etc.) are managed by an Identity Provider (IdP).
An IdP can exist in the local data center (such as Microsoft Active Directory) or the public cloud (such as AWS IAM, Azure AD, Google Cloud IAM, etc.)
Federation is the act of creating trust between separate IdP’s.
Federation allows us to keep identity in one repository (i.e., Identity Provider).
Once we set up an identity federation, we can grant an identity privilege to consume resources in a remote repository.
Example: a worker with an account in Microsoft Active Directory, reading a file from object storage in Azure, once a federation trust was established between Microsoft Active Directory and Azure Active Directory.
When federating between the on-premise and cloud environments, we need to recall the use of different protocols.
On-premise environments are using legacy authentication protocols such as Kerberos or LDAP.
In the public cloud, the common authentication protocols are SAML 2.0, Open ID Connect (OIDC), and OAuth 2.0
Each cloud provider has a list of supported external third-party identity providers to federate with, as you can read in the list below:
- Integrating third-party SAML solution providers with AWS
- Azure AD Identity Provider Compatibility Docs
- Google Cloud IAM – Configure workforce identity federation
Single Sign-On
The concept behind SSO is to allow identities (usually end-users) access to resources in the cloud while having to sign (to an identity provider) once.
Over the past couple of years, the concept of SSO was extended and now it is possible to allow a single identity (who authenticated to a specific identity provider), access to resources over federated login to an external (mostly SAML) identity provider.
Each cloud provider has its own SSO service, supporting federation with external identity providers:
- AWS IAM Identity Center
- Azure Active Directory single sign-on
- Google Cloud Workload identity federation
Steps for creating a federation between cloud providers
The process below explains (at a high level) the steps require to set up identity federation between different cloud providers:
- Choose an IdP (where identities will be created and authenticated to).
- Create a SAML identity provider.
- Configure roles for your third-party identity provider.
- Assign roles to the target users.
- Create trust between SP and IdP.
- Test the ability to authenticate and identify (user) to a resource in a remote/external cloud provider.
Additional References:
- AWS IAM Identity Center and Azure AD as IdP
- How to set up IAM federation using Google Workspace
- Azure AD SSO integration with AWS IAM Identity Center
- Azure AD SSO integration with Google Cloud / G Suite Connector by Microsoft
- Federating Google Cloud with Azure Active Directory
- Configure Google workload identity federation with AWS or Azure
Summary
In this blog post, we had a deep dive into identity and access management in the cloud, comparing different aspects of IAM in AWS, Azure, and GCP.
After we have reviewed how authentication and authorization work for each of the three cloud providers, we have explained how federation and SSO work in a multi-cloud environment.
Important to keep in mind:
When we are building systems in the cloud, whether they are publicly exposed or even internal, we need to follow some basic rules:
- All-access to resources/systems/applications must be authenticated
- Permissions must follow the principle of least privileged and business requirements
- All access must be audited (for future analysis, investigation purposes, etc.)
Cloud Native Applications – Part 2: Security

In chapter 1 of this series about cloud-native applications, we have introduced the key characteristics of cloud-native applications.
In this chapter, we will review how to secure cloud-native applications.
Securing the CI/CD pipeline
Due to the dynamic nature of the cloud-native application, we need to begin securing our application stack from the initial steps of the CI/CD pipeline.
Since I have already written posts on how to secure DevOps processes, automation, and supply chain, I will highlight the following:
- Run code analysis using automated tools (SAST – Static application security tools, DAST – Dynamic application security tools)
- Run SCA (Software composition analysis) tool to detect known vulnerabilities in open-source binaries and libraries
- Sign your software package before storing them in a repository
- Store all your sources (code, container images, libraries) in a private repository, protected by strong authorization mechanisms
- Invest in security training for developers, DevOps, and IT personnel
- Make sure no human access is allowed to production environments (use Break Glass accounts for emergency purposes)
Additional references:
- Integrate security aspects in a DevOps process
- Securing the Software Supply Chain in the Cloud
- Cloud Native Security Map
Securing infrastructure build process
As I have mentioned in the previous chapter of this series, one of the characteristics of cloud-native applications is the fact that it is built using Infrastructure as Code.
Each cloud provider has its own IaC scripting language, and naturally, there is cloud agnostic (or multi-cloud…) – HashiCorp Terraform.
Since this is code, we need to store the code in a private repository and scan the code for security vulnerabilities, but we need an additional layer of protection for Infrastructure as Code.
This is referred to as Policy as Code, where we can define a set of controls, from enforcing encryption at transit and rest, enabling resource provisioning on specific regions, or prohibiting the creation of instances with public IP.
The next thing in terms of the policy as code is called OPA – Open Policy Agent. It supports all major cloud providers and has built-in integration with Terraform, Kubernetes, and more.
OPA has its declarative language called Rego and it can integrate inside an existing CI/CD pipeline.
Additional references:
- Introduction to Policy as Code
- Automation as key to cloud adoption success
- Open Policy Agent
- Terraform OPA policies examples
Securing Containers / Kubernetes
Containers are one of the most common ways to package and deploy modern applications, and as a result, we need to secure the containerized environment.
It begins with a minimum number of binaries and libraries inside a container image.
We must make sure we scan our container images for vulnerable binaries or open-source libraries, and eventually, we need to store our container images inside a private container registry.
In most cases, when using Kubernetes as an orchestrator, we should choose a managed Kubernetes service (offered by each of the major cloud providers).
Using a Kubernetes control plane based on a managed service shifts the responsibility for securing and maintaining the Kubernetes control plane on the cloud provider.
One thing to keep in mind – we should always create private clusters, and make sure the control plane is never accessible outside our private subnets, to reduce the attack surface on our Kubernetes cluster.
In terms of authorization, we should follow the principle of least privilege and use RBAC (Role-based access control), to allow our application to function and our developers or support team the minimum number of required permissions to do their job.
In terms of network connectivity to and between pods, we should use one of the service mesh solutions (such as Istio), and set network policies that clearly define which pod can communicate with which pod, and who can access the API server.
In terms of secrets management that the containers need access to, we need to make sure all sensitive data (secrets, credentials, API keys, etc.) are stored in a secured location (such as AWS Secrets Manager, Azure Key Vault, Google Secret Manager, Oracle Cloud Infrastructure Vault or HashiCorp Vault), where all requests to pull a secret are authorized and audited, and secrets can automatically rotate.
Additional references:
- Kubernetes security
- Overview of Cloud Native Security
- OWASP – Kubernetes Security Cheat Sheet
- CIS Benchmark for Kubernetes
- The Istio service mesh
Securing APIs
As we have mentioned in the previous chapter, communication between containers is done using APIs. Also, when communicating with applications deployed inside pods as part of the Kubernetes cluster, all communication is done through the Kubernetes API server.
Not to mention that modern applications, websites and naturally mobile applications are exposing APIs to customers from the public internet (unless your application is meant for private use only…).
Below are the main best practices for securing APIs:
- Authentication – make sure all your APIs require authentication. Regardless if your API is supposed to share public stock exchange data, a retail book catalog, or weather statistics, all requests to pull data from an exposed API must be authenticated.
- Authorization – make sure you set strict access control on each API request, whether it is read data from a database, update records, or privileged actions such as deleting data. Keep in mind the principle of least privilege.
- Encryption – all traffic to an exposed API must be encrypted at transit using the most up-to-date encryption protocol (for example TLS 1.2 or above). Encryption keeps the data confidential and proves the identity of your API (or server) to your customers.
- Auditing – make sure all actions done on your APIs are auditing and all logs are sent to a central logging system (or SIEM) for further archive and analysis (to find out if someone is trying to take actions they are not supposed to).
- Input validation – make sure all input coming to your APIs is been validated, before storing it in a backend database. It will allow you to limit the chance of injection attacks.
- DDoS and web-related attacks – make sure all your exposed APIs are protected behind anti-DDoS and behind a web application firewall. If it will not block 100% of the attacks, at least you will be able to block the well-known and signature-based attacks and decrease the amount of unwanted traffic against your APIs.
- Code review – API is a piece of code. Before pushing new changes to any API, make sure you run static and dynamic code analysis, to locate security vulnerabilities embed in your code.
- Throttling – make sure you enforce a throttling mechanism, in case someone tries to access your API multiple times from the same source, to avoid a situation where your API is unavailable for all your customers.
Additional reference:
Authorization
Authorization in a cloud-native application can be challenging.
On legacy applications all components were built as part of a single monolith, users had to log in from a single-entry point, and once we have authenticated and authorized them, they were to access data and with proper permissions to make changes to data as well.
Since modern applications are built upon micro-service architecture, we need to think not just about end users communicating with our application, but also about how each component in our architecture is going to communicate with other components (such as pod-to-pod communication required authorization).
If every component in our entire application is developed by a separate team, we need to think about a central authorization mechanism.
But central authorization mechanism is not enough.
We need to integrate our authorization mechanism with a central IAM (Identity and Access Management) system.
I would not recommend to re-invent the wheel – try to use the IAM service from your cloud provider of choice. Cloud-native IAM systems have built-in integration with the cloud eco-system, including auditing capabilities – this way you will be able to consume the service, without maintaining the underlining infrastructure.
Checking the end-users’ privileges at login time might not be sufficient. We need to think about fine-grain permissions – is a generic “Reader user” enough? Do the user needs read access to all data stored in our data store? Perhaps he only needs read access to a specific line of business customers database and nothing more. Always keep in mind the principle of least privilege.
Our authorization mechanism needs to be dynamic according to each request and data the user is trying to access, be verified constantly and allow us to easily revoke permissions in case of suspicious activity, when permissions are no longer needed or if data confidentially has changed over time.
We need to make sure our authorization mechanism can be easily integrated and consumed by each of the various development groups, as a standard authorization mechanism.
Additional references:
Summary
In this post, we have reviewed various topics we need to take into consideration when talking about how to secure cloud-native applications.
We have reviewed the highlights of securing the build process, the infrastructure provisioning, Kubernetes (as an orchestrator engine to run our applications), and not forgetting topics that are part of the secure development lifecycle (securing APIs and authorization mechanism).
Naturally, we have just covered some of the highlights of security in cloud-native applications.
I strongly recommend you to deep dive into each topic, read the references and search for additional information that will allow any developer, DevOps, DevSecOps, architect, or security professional, to better secure cloud-native applications.
Additional References:
Securing the software supply chain in the cloud

The software supply chain is considered one of the common threats in today’s modern cloud-native development, which poses a high risk to any organization.
It is about consuming software packages, source code, or even APIs from a third-party or untrusted source.
The last thing we wish to do is to block developers from building new applications, but we need to understand the threats to the software supply chain.
What are the common threats?
There are a couple of common threats that can arise from a software supply chain attack:
- Ransomware – An example is the NotPetya malware and Maersk
- Data breach – An example is the Okta Hack
- Backdoor – An example is the SolarWinds backdoor
- Access to private data – An example is the GitHub OAuth tokens attack
- API vulnerabilities – An example is the BOLA (Broken Object Level Authorization)
As we can see, most supply chain attacks begin with a download of an untrusted piece of code, which leads to malware infection, or pulling data from an external API, which inserts unverified data into a backend system.
Steps to mitigate the risk of supply chain attacks
The modern development lifecycle is based on CI/CD (Continuous Integration / Continuous Deployment or Delivery), we can embed security gates at various stages of the CI/CD pipeline, as explained below.
Source Code
- Scan for software vulnerabilities (such as binaries and open-source libraries), before storing components/code/libraries inside VM or container images inside an image repository.
Example of services:
- Amazon Inspector – Vulnerability scanner for Amazon EC2, container images (inside Amazon ECR), and Lambda functions
- Microsoft Defender for Containers – Vulnerability scanner for containers
- Google Container Analysis – Vulnerability scanner for containers
- Scan your code stored in your repositories, to make sure it does not contain sensitive data (such as secrets, API keys, credentials, etc.)
Example of tools:
- git-secrets
- Gitleaks
- SecretScanner
- Run static code analysis on any developed or imported code, to search for vulnerabilities.
Example of tools:
- Snyk – Scan for open-source, code, container, and Infrastructure-as-Code vulnerabilities
- Trivy – Scan for open-source, code, container, and Infrastructure-as-Code vulnerabilities
- Chekov – Scan for open-source and Infrastructure-as-Code vulnerabilities
- KICS – Scan for Infrastructure-as-Code vulnerabilities
- Terrascan – Scan for Infrastructure-as-Code vulnerabilities
- Kubescape – Scan for Kubernetes vulnerabilities
- Scan your binaries to verify their trustworthiness – especially important when you import binaries from an external source.
Example of services:
Repositories
- Create a private repository for storing source code, VM images, or container images
- Enforce authentication and authorization for who can access and make changes to the repository
- Sign all source code/images stored in the repository
- Audit access to the repositories
Example of services for storing source code:
Example of services for storing VM images:
Example of services for storing container images:
Example of service for storing serverless code:
Authentication & Authorization
- Configure authentication and authorization process (who has written permissions to the repository), and enforce the use of MFA.
Example of services:
- AWS Identity and Access Management (IAM)
- Azure Active Directory (Azure AD)
- Google Cloud Identity and Access Management (IAM)
- Store all sensitive data (such as secrets, credentials, API keys, etc.) in a secured vault, enforce key rotation, and access management to keys.
Example of services:
Handling data from external APIs
There are many cases where we rely on data from external third parties, exposed using APIs.
Since we cannot verify the trustworthiness of external data, we must follow the following guidelines:
- Never rely on unauthenticated APIs – always make sure the connectivity to the external APIs requires proper authentication (such as certificates, rotated API key, etc.) and proper
- Always make sure the remote API enforces proper authorization mechanism – if the remote API allows admin or even write access to anyone on the Internet, the data it provides is not considered trusted anymore
- Always make sure data is encrypted at transit – it allows to keep data confidentiality and provides a high degree of trust in the remote endpoint
- Always perform input validation and proper escaping, before storing data from an external source into any backend database
For further reading, see:
Summary
In the post, we have reviewed threats as a result of software supply chain vulnerabilities, and various tools and services that can assist us in securing the modern development process of cloud-native applications.
It is possible to mitigate the risks coming from the software supply chain, whether it is code that we develop in-house or code/binaries/libraries that we import from a third-party source, but we must always follow the concept of “Trust but verify”.
References
- Build your secure software supply chains on AWS
- Supply Chain Security on Amazon Elastic Kubernetes Service (Amazon EKS) using AWS Key Management Service (AWS KMS), Kyverno, and Cosign
- Best practices for a secure software supply chain
- Monitoring the Software Supply Chain with Azure Sentinel
- Software supply chain security
- Perspectives on Security – Securing Software Supply Chains
- NIST – Defending Against Software Supply Chain Attacks
- CNCF Software Supply Chain Best Practices
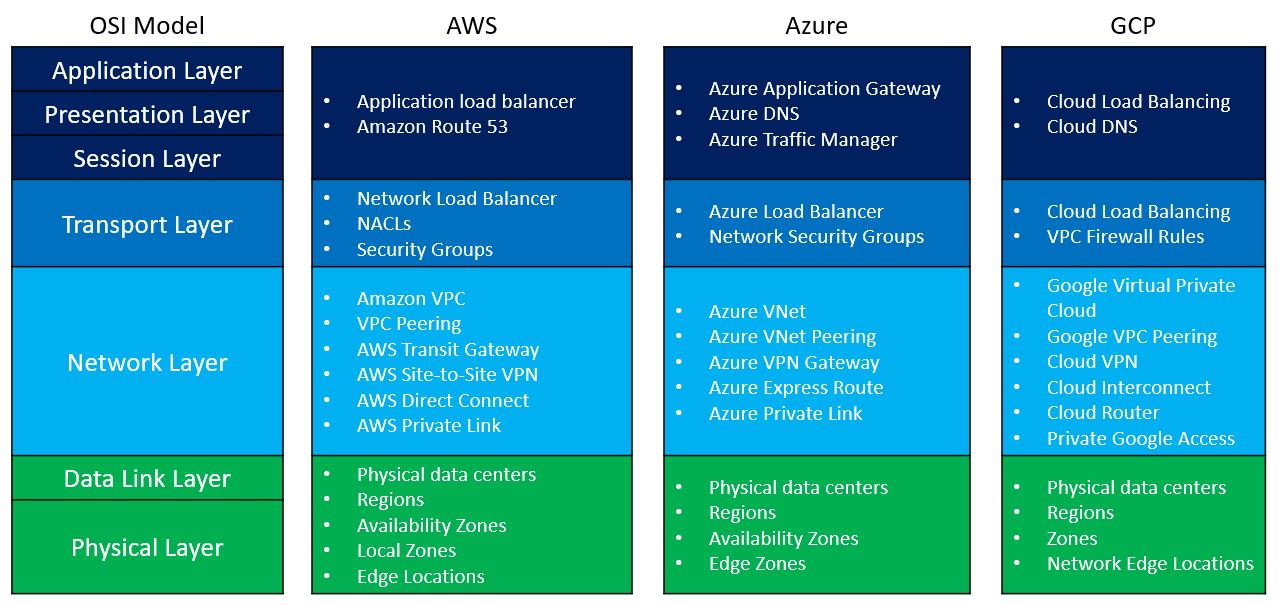
Where is the OSI model in the public cloud?

When talking about the public cloud, I always like the analogy to the OSI model.
“The Open Systems Interconnection model (OSI model) is a conceptual model. Communications between a computing system are split into seven different abstraction layers: Physical, Data Link, Network, Transport, Session, Presentation, and Application” (Wikipedia)
A similar and shorter model of the OSI model is the TCP/IP model.
Here is a comparison of the two models:

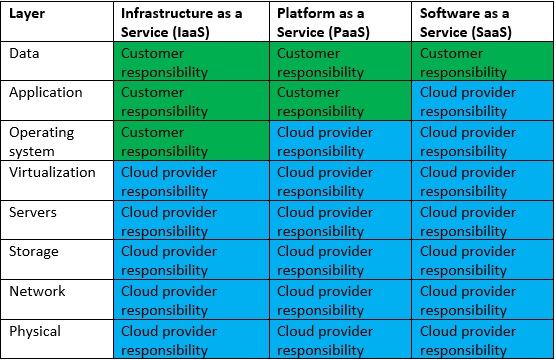
In the public cloud, we find a similar concept when talking about the shared responsibility model, where we draw the line of responsibility between the public cloud provider and the customers, in the different cloud service models, usually in terms of security, as we can see in the diagram below:
Where do public cloud services fit in the OSI model?
There are many networks related services in each of the major public cloud providers.
To make things easy to understand, I have prepared the following diagram, comparing common network-related services to the various OSI model layers:
Encryption / Cryptography and the OSI Model
Layer 6 of the OSI model is the presentation layer.
Among the things, we can find in this layer is data encryption.
Encryption in this context is about encryption at rest – from object storage, block storage, file storage, and various data services.
Encryption includes symmetric and asymmetric encryption keys, secrets, passwords, API keys, certificates, etc.
The process includes the generation, storage, retrieval, and rotation of encryption keys.
Here are the most common encryption /cryptography-related services:
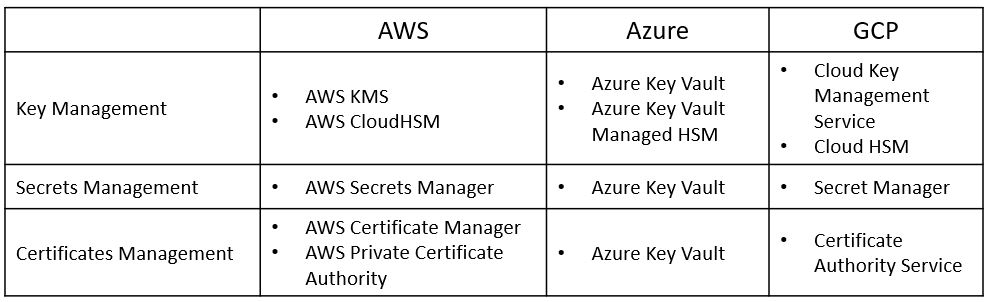
Identity Management and the OSI Model
Layer 7 of the OSI model is the application layer.
Among the things we can find in this layer are related to authentication and authorization, or the entire identity management.
Identity management is about managing the entire lifecycle of identity – from an end user, service account, computer accounts, etc.
The process includes account provisioning, password management (and MFA), permission management (role assignments), and finally account de-provisioning.
Here are the most common identity-related services:
How does everything come together?
When reviewing a cloud architecture, I like to compare the various services in the architecture to the different layers of the OSI model, from the bottom up:
- Network connectivity and traffic flow
- Encryption (according to data sensitivity)
- Authentication and Authorization (according to the least privilege principle)
The OSI model analogy, assist me to make sure I do not forget any important aspect when reviewing an architecture for a cloud workload.
Best Practices for Deploying New Environments in the Cloud for the First Time

When organizations take their first steps to use public cloud services, they tend to look at a specific target.
My recommendation – think scale!
Plan a couple of steps ahead instead of looking at single server that serves just a few customers. Think about a large environment comprised of hundreds or thousands of servers, serving 10,000 customers concurrently.
Planning will allow you to manage the environment (infrastructure, information security and budget) when you do reach a scale of thousands of concurrent customers. The more we plan the deployment of new environments in advance, according to their business purposes and required resources required for each environment, it will be easier to plan to scale up, while maintaining high level security, budget and change management control and more.
In this three-part blog series, we will review some of the most important topics that will help avoid mistakes while building new cloud environments for the first time.
Resource allocation planning
The first step in resources allocation planning is to decide how to divide resources based on an organizational structure (sales, HR, infrastructure, etc.) or based on environments (production, Dev, testing, etc.)
In-order to avoid mixing resources (or access rights) between various environments, the best practice is to separate the environments as follows:
- Share resource account (security products, auditing, billing management, etc.)
- Development environment account (consider creating separate account for test environment purposes)
- Production environment account
Separating different accounts or environments can be done using:
- Azure Subscriptions or Azure Resource Groups
- AWS Accounts
- GCP Projects
- Oracle Cloud Infrastructure Compartments
Tagging resources
Even when deploying a single server inside a network environment (AWS VPC, Azure Resource Group, GCP VPC), it is important to tag resources. This allows identifying which resources belong to which projects / departments / environments, for billing purposes.
Common tagging examples:
- Project
- Department
- Environment (Prod, Dev, Test)
Beyond tagging, it is recommended to add a description to resources that support this kind of meta-data, in-order to locate resources by their target use.
Authentication, Authorization and Password Policy
In-order to ease the management of working with accounts in the cloud (and in the future, multiple accounts according to the various environments), the best practice is to follow the rules below:
- Central authentication – In case the organization isn’t using Active Directory for central account management and access rights, the alternative is to use managed services such as AWS IAM, Google Cloud IAM, Azure AD, Oracle Cloud IAM, etc.
If managed IAM service is chosen, it is critical to set password policy according to the organization’s password policy (minimum password length, password complexity, password history, etc.)
- If the central directory service is used by the organization, it is recommended to connect and sync the managed IAM service in the cloud to the organizational center directory service on premise (federated authentication).
- It is crucial to protect privileged accounts in the cloud environment (such as AWS Root Account, Azure Global Admin, Azure Subscription Owner, GCP Project Owner, Oracle Cloud Service Administrator, etc.), among others, by limiting the use of privileged accounts to the minimum required, enforcing complex passwords, and password rotation every few months. This enables multi-factor authentication and auditing on privileged accounts, etc.
- Access to resources should be defined according to the least privilege principle.
- Access to resources should be set to groups instead of specific users.
- Access to resources should be based on roles in AWS, Azure, GCP, Oracle Cloud, etc.
Audit Trail
It is important to enable auditing in all cloud environments, in-order to gain insights on access to resources, actions performed in the cloud environment and by whom. This is both security and change management reasons.
Common managed audit trail services:
- AWS CloudTrail – It is recommended to enable auditing on all regions and forward the audit logs to a central S3 bucket in a central AWS account (which will be accessible only for a limited amount of user accounts).
- Working with Azure, it is recommended to enable the use of Azure Monitor for the first phase, in-order to audit all access to resources and actions done inside the subscription. Later on, when the environment expands, you may consider using services such as Azure Security Center and Azure Sentinel for auditing purposes.
- Google Cloud Logging – It is recommended to enable auditing on all GCP projects and forward the audit logs to the central GCP project (which will be accessible only for a limited amount of user accounts).
- Oracle Cloud Infrastructure Audit service – It is recommended to enable auditing on all compartments and forward the audit logs to the Root compartment account (which will be accessible only for a limited amount of user accounts).
Budget Control
It is crucial to set a budget and budget alerts for any account in the cloud at in the early stages of working with in cloud environment. This is important in order to avoid scenarios in which high resource consumption happens due to human error, such as purchasing or consuming expensive resources, or of Denial of Wallet scenarios, where external attackers breach an organization’s cloud account and deploys servers for Bitcoin mining.
Common examples of budget control management for various cloud providers:
- AWS Consolidated Billing – Configure central account among all the AWS account in the organization, in-order to forward billing data (which will be accessible only for a limited amount of user accounts).
- GCP Cloud Billing Account – Central repository for storing all billing data from all GCP projects.
- Azure Cost Management – An interface for configuring budget and budget alerts for all Azure subscriptions in the organization. It is possible to consolidate multiple Azure subscriptions to Management Groups in-order to centrally control budgets for all subscriptions.
- Budget on Oracle Cloud Infrastructure – An interface for configuring budget and budget alerts for all compartments.
Secure access to cloud environments
In order to avoid inbound access from the Internet to resources in cloud environments (virtual servers, databases, storage, etc.), it is highly recommended to deploy a bastion host, which will be accessible from the Internet (SSH or RDP traffic) and will allow access and management of resources inside the cloud environment.
Common guidelines for deploying Bastion Host:
- Linux Bastion Hosts on AWS
- Create an Azure Bastion host using the portal
- Securely connecting to VM instances on GCP
- Setting Up the Basic Infrastructure for a Cloud Environment, based on Oracle Cloud
The more we expand the usage of cloud environments, we can consider deploying a VPN tunnel from the corporate network (Site-to-site VPN) or allow client VPN access from the Internet to the cloud environment (such as AWS Client VPN endpoint, Azure Point-to-Site VPN, Oracle Cloud SSL VPN).
Managing compute resources (Virtual Machines and Containers)
When selecting to deploy virtual machines in cloud environment, it is highly recommended to follow the following guidelines:
- Choose an existing image from a pre-defined list in the cloud providers’ marketplace (operating system flavor, operating system build, and sometimes an image that includes additional software inside the base image).
- Configure the image according to organizational or application demands.
- Update all software versions inside the image.
- Store an up-to-date version of the image (“Golden Image”) inside the central image repository in the cloud environment (for reuse).
- In case the information inside the virtual machines is critical, consider using managed backup services (such as AWS Backup or Azure Backup).
- When deploying Windows servers, it is crucial to set complex passwords for the local Administrator’s account, and when possible, join the Windows machine to the corporate domain.
- When deploying Linux servers, it is crucial to use SSH Key authentication and store the private key(s) in a secure location.
- Whenever possible, encrypt data at rest for all block volumes (the server’s hard drives / volumes).
- It is highly recommended to connect the servers to a managed vulnerability assessment service, in order to detect software vulnerabilities (services such as Amazon Inspector or Azure Security Center).
- It is highly recommended to connect the servers to a managed patch management service in-order to ease the work of patch management (services such as AWS Systems Manager Patch Manager, Azure Automation Update Management or Google OS Patch Management).
When selecting to deploy containers in the cloud environment, it is highly recommended to follow the following guidelines:
- Use a Container image from a well know container repository.
- Update all binaries and all dependencies inside the Container image.
- Store all Container images inside a managed container repository inside the cloud environment (services such as Amazon ECR, Azure Container Registry, GCP Container Registry, Oracle Cloud Container Registry, etc.)
- Avoid using Root account inside the Containers.
- Avoid storing data (such as session IDs) inside the Container – make sure the container is stateless.
- It is highly recommended to connect the CI/CD process and the container update process to a managed vulnerability assessment service, in-order to detect software vulnerabilities (services such as Amazon ECR Image scanning, Azure Container Registry, GCP Container Analysis, etc.)
Storing sensitive information
It is highly recommended to avoid storing sensitive information, such as credentials, encryption keys, secrets, API keys, etc., in clear text inside virtual machines, containers, text files or on the local desktop.
Sensitive information should be stored inside managed vault services such as:
- AWS KMS or AWS Secrets Manager
- Azure Key Vault
- Google Cloud KMS or Google Secret Manager
- Oracle Cloud Infrastructure Key Management
- HashiCorp Vault
Object Storage
When using Object Storage, it is recommended to follow the following guidelines:
- Avoid allowing public access to services such as Amazon S3, Azure Blob Storage, Google Cloud Storage, Oracle Cloud Object Storage, etc.
- Enable audit access on Object Storage and store the access logs in a central account in the cloud environment (which will be accessible only for a limited amount of user accounts).
- It is highly recommended to encrypt data at rest on all data inside Object Storage and when there is a business or regulatory requirement, and encrypt data using customer managed keys.
- It is highly recommended to enforce HTTPS/TLS for access to object storage (users, computers and applications).
- Avoid creating object storage bucket names with sensitive information, since object storage bucket names are unique and saved inside the DNS servers worldwide.
Networking
- Make sure access to all resources is protected by access lists (such as AWS Security Groups, Azure Network Security Groups, GCP Firewall Rules, Oracle Cloud Network Security Groups, etc.)
- Avoid allowing inbound access to cloud environments using protocols such as SSH or RDP (in case remote access is needed, use Bastion host or VPN connections).
- As much as possible, it is recommended to avoid outbound traffic from the cloud environment to the Internet. If needed, use a NAT Gateway (such as Amazon NAT Gateway, Azure NAT Gateway, GCP Cloud NAT, Oracle Cloud NAT Gateway, etc.)
- As much as possible, use DNS names to access resources instead of static IPs.
- When developing cloud environments, and subnets inside new environments, avoid IP overlapping between subnets in order to allow peering between cloud environments.
Advanced use of cloud environments
- Prefer to use managed services instead of manually managing virtual machines (services such as Amazon RDS, Azure SQL Database, Google Cloud SQL, etc.)
It allows consumption of services, rather than maintaining servers, operating systems, updates/patches, backup and availability, assuming managed services in cluster or replica mode is chosen.
- Use Infrastructure as a Code (IoC) in-order to ease environment deployments, lower human errors and standardize deployment on multiple environments (Prod, Dev, Test).
Common Infrastructure as a Code alternatives:
Summary
To sum up:
Plan. Know what you need. Think scale.
If you use the best practices outlined here, taking off to the cloud for the first time will be an easier, safer and smoother ride then you might expect.
Additional references
Integrate security aspects in a DevOps process
A diagram of a common DevOps lifecycle:
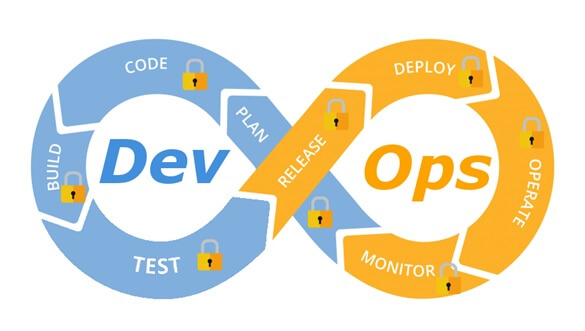
The DevOps world meant to provide complementary solution for both quick development (such as Agile) and a solution for cloud environments, where IT personnel become integral part of the development process. In the DevOps world, managing large number of development environments manually is practically infeasible. Monitoring mixed environments become a complex solution and deploying large number of different builds is becoming extremely fast and sensitive to changes.
The idea behind any DevOps solution is to provide a solution for deploying an entire CI/CD process, which means supporting constant changes and immediate deployment of builds/versions.
For the security department, this kind of process is at first look a nightmare – dozen builds, partial tests, no human control for any change, etc.
For this reason, it is crucial for the security department to embrace DevOps attitude, which means, embedding security in any part of the development lifecycle, software deployment or environment change.
It is important to understand that there are no constant stages as we used to have in waterfall development lifecycle, and most of the stages are parallel – in the CI/CD world everything changes quickly, components can be part of different stages, and for this reason it is important to confer the processes, methods and tools in all developments and DevOps teams.
In-order to better understand how to embed security into the DevOps lifecycle, we need to review the different stages in the development lifecycle:
Planning phase
This stage in the development process is about gathering business requirements.
At this stage, it is important to embed the following aspects:
- Gather information security requirements (such as authentication, authorization, auditing, encryptions, etc.)
- Conduct threat modeling in-order to detect possible code weaknesses
- Training / awareness programs for developers and DevOps personnel about secure coding
Creation / Code writing phase
This stage in the development process is about the code writing itself.
At this stage, it is important to embed the following aspects:
- Connect the development environments (IDE) to a static code analysis products
- Review the solution architecture by a security expert or a security champion on his behalf
- Review open source components embedded inside the code
Verification / Testing phase
This stage in the development process is about testing, conducted mostly by QA personnel.
At this stage, it is important to embed the following aspects:
- Run SAST (Static application security tools) on the code itself (pre-compiled stage)
- Run DAST (Dynamic application security tools) on the binary code (post-compile stage)
- Run IAST (Interactive application security tools) against the application itself
- Run SCA (Software composition analysis) tools in-order to detect known vulnerabilities in open source components or 3rd party components
Software packaging and pre-production phase
This stage in the development process is about software packaging of the developed code before deployment/distribution phase.
At this stage, it is important to embed the following aspects:
- Run IAST (Interactive application security tools) against the application itself
- Run fuzzing tools in-order to detect buffer overflow vulnerabilities – this can be done automatically as part of the build environment by embedding security tests for functional testing / negative testing
- Perform code signing to detect future changes (such as malwares)
Software packaging release phase
This stage is between the packaging and deployment stages.
At this stage, it is important to embed the following aspects:
- Compare code signature with the original signature from the software packaging stage
- Conduct integrity checks to the software package
- Deploy the software package to a development environment and conduct automate or stress tests
- Deploy the software package in a green/blue methodology for software quality and further security quality tests
Software deployment phase
At this stage, the software package (such as mobile application code, docker container, etc.) is moving to the deployment stage.
At this stage, it is important to embed the following aspects:
- Review permissions on destination folder (in case of code deployment for web servers)
- Review permissions for Docker registry
- Review permissions for further services in a cloud environment (such as storage, database, application, etc.) and fine-tune the service role for running the code
Configure / operate / Tune phase
At this stage, the development is in the production phase and passes modifications (according to business requirements) and on-going maintenance.
At this stage, it is important to embed the following aspects:
- Patch management processes or configuration management processes using tools such as Chef, Ansible, etc.
- Scanning process for detecting vulnerabilities using vulnerability assessment tools
- Deleting and re-deployment of vulnerable environments with an up-to-date environments (if possible)
On-going monitoring phase
At this stage, constant application monitoring is being conducted by the infrastructure or monitoring teams.
At this stage, it is important to embed the following aspects:
- Run RASP (Runtime application self-production) tools
- Implement defense at the application layer using WAF (Web application firewall) products
- Implement products for defending the application from Botnet attacks
- Implement products for defending the application from DoS / DDoS attacks
- Conduct penetration testing
- Implement monitoring solution using automated rules such as automated recovery of sensitive changes (tools such as GuardRails)
Security recommendations for developments based on CI/CD / DevOps process
- It is highly recommended to perform on-going training for the development and DevOps teams on security aspects and secure development
- It is highly recommended to nominate a security champion among the development and DevOps teams in-order to allow them to conduct threat modeling at early stages of the development lifecycle and in-order to embed security aspects as soon as possible in the development lifecycle
- Use automated tools for deploying environments in a simple and standard form.
Tools such as Puppet require root privileges for folders it has access to. In-order to lower the risk, it is recommended to enable folder access auditing. - Avoid storing passwords and access keys, hard-coded inside scripts and code.
- It is highly recommended to store credentials (SSH keys, privileged credentials, API keys, etc.) in a vault (Solutions such as HashiCorp vault or CyberArk).
- It is highly recommended to limit privilege access based on role (Role based access control) using least privileged.
- It is recommended to perform network separation between production environment and Dev/Test environments.
- Restrict all developer teams’ access to production environments, and allow only DevOps team’s access to production environments.
- Enable auditing and access control for all development environments and identify access attempts anomalies (such as developers access attempt to a production environment)
- Make sure sensitive data (such as customer data, credentials, etc.) doesn’t pass in clear text at transit. In-case there is a business requirement for passing sensitive data at transit, make sure the data is passed over encrypted protocols (such as SSH v2, TLS 1.2, etc.), while using strong cipher suites.
- It is recommended to follow OWASP organization recommendations (such as OWASP Top10, OWASP ASVS, etc.)
- When using Containers, it is recommended to use well-known and signed repositories.
- When using Containers, it is recommended not to rely on open source libraries inside the containers, and to conduct scanning to detect vulnerable versions (including dependencies) during the build creation process.
- When using Containers, it is recommended to perform hardening using guidelines such as CIS Docker Benchmark or CIS Kubernetes Benchmark.
- It is recommended to deploy automated tools for on-going tasks, starting from build deployments, code review for detecting vulnerabilities in the code and open source code, and patch management processes that will be embedded inside the development and build process.
- It is recommended to perform scanning to detect security weaknesses, using vulnerability management tools during the entire system lifetime.
- It is recommended to deploy configuration management tools, in-order to detect and automatically remediate configuration anomalies from the original configuration.
Additional reading sources:
- 20 Ways to Make Application Security Move at the Speed of DevOps
- The DevOps Security Checklist
- Making AppSec Testing Work in CI/CD
- Value driven threat modeling
- Automated Security Testing
- Security at the Speed of DevOps
- DevOps Security Best Practices
- The integration of DevOps and security
- When DevOps met Security - DevSecOps in a nutshell
- Grappling with DevOps Security
- Minimizing Risk and Improving Security in DevOps
- Security In A DevOps World
- Application Security in Devops
- Five Security Defenses Every Containerized Application Needs
- 5 ways to find and fix open source vulnerabilities
This article was written by Eyal Estrin, cloud security architect and Vitaly Unic, application security architect.
Best practices for using AWS access keys
AWS access keys enable us to use programmatic or AWS CLI services in a manner similar to using a username and password.
AWS access keys have account privileges – for better and for worse.
For example, if you save access keys (credentials) of a root account inside code, anyone who uses this code can totally damage your AWS account.
Many stories have been published about security breaches due to access key exposure, especially combined with open source version control systems such as GitHub and GitLab.
In order to avoid security breaches, here is a list of best practices for securing your environment when using access keys:
- Avoid using access keys for the root account. In case you already created access keys, delete them.
https://docs.aws.amazon.com/IAM/latest/UserGuide/best-practices.html#remove-credentials - Use minimum privileges when creating account roles.
https://docs.aws.amazon.com/IAM/latest/UserGuide/access_controlling.html - Use AWS IAM roles instead of using access keys, for resources such as Amazon EC2 instance.
https://docs.aws.amazon.com/IAM/latest/UserGuide/id_roles_use_switch-role-ec2.html - Use different access keys for each application, in-order to minimize the risk of credential exposure.
https://docs.aws.amazon.com/IAM/latest/UserGuide/id_credentials_access-keys.html - Protect access keys by storing them on encrypted machines or encrypted volumes, and avoid sending access keys via email or any other insecure medium.
https://docs.aws.amazon.com/kms/latest/developerguide/services-s3.html - Rotate (change) access keys on a regular basis, to avoid reuse of credentials.
https://aws.amazon.com/blogs/security/how-to-rotate-access-keys-for-iam-users/ - Remove unused access keys, to avoid unnecessary access.
https://docs.aws.amazon.com/cli/latest/reference/iam/delete-access-key.html - Use MFA (Multi-factor authentication) for privileged operations/accounts.
https://docs.aws.amazon.com/IAM/latest/UserGuide/id_credentials_mfa.html - Configure billing alerts using Amazon CloudWatch, to get notifications about anomaly operations in your AWS account.
https://docs.aws.amazon.com/awsaccountbilling/latest/aboutv2/monitor-charges.html - Use AWS CloudTrail auditing to review when was an access key was last used.
https://aws.amazon.com/blogs/security/new-in-iam-quickly-identify-when-an-access-key-was-last-used/ - Use open source tools such as git-secrets to avoid storing passwords and sensitive information inside a GIT repository.
https://github.com/awslabs/git-secrets - Work according to GitHub recommendations and avoid using sensitive information in a public repository.
https://help.github.com/articles/removing-sensitive-data-from-a-repository/
JSON Web Token Tutorial: An Example in Laravel and AngularJS
With the rising popularity of single page applications, mobile applications, and RESTful API services, the way web developers write back-end code has changed significantly. With technologies like AngularJS and BackboneJS, we are no longer spending much time building markup, instead we are building APIs that our front-end applications consume. Our back-end is more about business logic and data, while presentation logic is moved exclusively to the front-end or mobile applications. These changes have led to new ways of implementing authentication in modern applications.
Authentication is one of the most important parts of any web application. For decades, cookies and server-based authentication were the easiest solution. However, handling authentication in modern Mobile and Single Page Applications can be tricky, and demand a better approach. The best known solutions to authentication problems for APIs are the OAuth 2.0 and the JSON Web Token (JWT).
What is a JSON Web Token?
A JSON Web Token, or JWT, is used to send information that can be verified and trusted by means of a digital signature. It comprises a compact and URL-safe JSON object, which is cryptographically signed to verify its authenticity, and which can also be encrypted if the payload contains sensitive information.
Because of it’s compact structure, JWT is usually used in HTTP Authorization headers or URL query parameters.
Structure of a JSON Web Token
A JWT is represented as a sequence of base64url encoded values that are separated by period characters.

JSON Web Token example:
eyJhbGciOiJIUzI1NiIsInR5cCI6IkpXVCJ9.
eyJpc3MiOiJ0b3B0YWwuY29tIiwiZXhwIjoxNDI2NDIwODAwLCJodHRwOi8vdG9wdGFsLmNvbS9qd3RfY2xhaW1zL2lzX2FkbWluIjp0cnVlLCJjb21wYW55IjoiVG9wdGFsIiwiYXdlc29tZSI6dHJ1ZX0.
yRQYnWzskCZUxPwaQupWkiUzKELZ49eM7oWxAQK_ZXw
Header
The header contains the metadata for the token and it minimally contains the type of signature and the encryption algorithm.
Example Header
{
  “alg”: “HS256”,
  “typ”: “JWT”
}
This JWT Header declares that the encoded object is a JSON Web Token, and that it is signed using the HMAC SHA-256 algorithm.
Once this is base64 encoded, we have the first part of our JWT.
eyJhbGciOiJIUzI1NiIsInR5cCI6IkpXVCJ9Payload (Claims)
In the context of JWT, a claim can be defined as a statement about an entity (typically, the user), as well as additional meta data about the token itself. The claim contains the information we want to transmit, and that the server can use to properly handle authentication. There are multiple claims we can provide; these include registered claim names, public claim names and private claim names.
Registered Claims
These are the claims that are registered in the IANA JSON Web Token Claims registry. These claims are not intended to be mandatory but rather to provide a starting point for a set of useful, interoperable claims.
These include:
- iss: The issuer of the token
- sub: The subject of the token
- aud: The audience of the token
- exp: Token expiration time defined in Unix time
- nbf: “Not before” time that identifies the time before which the JWT must not be accepted for processing
- iat: “Issued at” time, in Unix time, at which the token was issued
- jti: JWT ID claim provides a unique identifier for the JWT
Public Claims
Public claims need to have collision-resistant names. By making the name a URI or URN naming collisions are avoided for JWTs where the sender and receiver are not part of a closed network.
An example of a public claim name could be: https://www.toptal.com/jwt_claims/is_admin, and the best practice is to place a file at that location describing the claim so that it can be dereferenced for documentation.
Private Claims
Private claim-names may be used in places where JWTs are only exchanged in a closed environment between known systems, such as inside an enterprise. These are claims that we can define ourselves, like user IDs, user roles, or any other information.
Using claim-names that might have conflicting semantic meanings outside of a closed or private system are subject to collision, so use them with caution.
It is important to note that we want to keep a web token as small as possible, so use only necessary data inside public and private claims.
Example Payload
{
  “iss”: “toptal.com”,
  “exp”: 1426420800,
  “https://www.toptal.com/jwt_claims/is_admin”: true,
  “company”: “Toptal”,
  “awesome”: true
}
This example payload has two registered claims, one public claim and two private claims. Once it is base64 encoded, we have the second part of our JWT.
eyJpc3MiOiJ0b3B0YWwuY29tIiwiZXhwIjoxNDI2NDIwODAwLCJodHRwOi8vdG9wdGFsLmNvbS9qd3RfY2xhaW1zL2lzX2FkbWluIjp0cnVlLCJjb21wYW55IjoiVG9wdGFsIiwiYXdlc29tZSI6dHJ1ZX0Signature
The JWT standard follows the JSON Web Signature (JWS) specification to generate the final signed token. It is generated by combining the encoded JWT Header and the encoded JWT Payload, and signing it using a strong encryption algorithm, such as HMAC SHA-256. The signature’s secret key is held by the server so it will be able to verify existing tokens and sign new ones.
$encodedContent = base64UrlEncode(header) + “.” + base64UrlEncode(payload);
$signature = hashHmacSHA256($encodedContent);
This gives us the final part of our JWT.
yRQYnWzskCZUxPwaQupWkiUzKELZ49eM7oWxAQK_ZXwSecurity and Encryption with JWT
It is critical to use TLS/SSL in conjunction with JWT, to prevent man-in-the-middle attacks. In most cases, this will be sufficient to encrypt the JWT payload if it contains sensitive information. However, if we want to add an additional layer of protection, we can encrypt the JWT payload itself using the JSON Web Encryption (JWE) specification.
Of course, if we want to avoid the additional overhead of using JWE, another option is to simply keep sensitive information in our database, and use our token for additional API calls to the server whenever we need to access sensitive data.
Why the need for Web Tokens?
Before we can see all the benefits of using token authentication, we have to look at the way authentication has been done in the past.
Server-Based Authentication

Because the HTTP protocol is stateless, there needs to be a mechanism for storing user information and a way to authenticate the user on every subsequent request after login. Most websites use cookies for storing user’s session ID.
How it Works
The browser makes a POST request to the server that contains the user’s identification and password. The server responds with a cookie, which is set on the user’s browser, and includes a session ID to identify the user.
On every subsequent request, the server needs to find that session and deserialize it, because user data is stored on the server.
Drawbacks of Server-Based Authentication
- Hard to scale: The server needs to create a session for a user and persist it somewhere on the server. This can be done in memory or in a database. If we have a distributed system, we have to make sure that we use a separate session storage that is not coupled to the application server.
- Cross-origin request sharing (CORS): When using AJAX calls to fetch a resource from another domain (cross-origin) we could run into problems with forbidden requests because, by default, HTTP requests don’t include cookies on cross-origin requests.
- Coupling with the web framework: When using server-based authentication we are tied to our framework’s authentication scheme. It is really hard, or even impossible, to share session data between different web frameworks written in different programming languages.
Token-Based Authentication

Token based authentication is stateless, so there is no need to store user information in the session. This gives us the ability to scale our application without worrying where the user has logged in. We can easily use the same token for fetching a secure resource from a domain other than the one we are logged in to.
How JSON Web Tokens Work
A browser or mobile client makes a request to the authentication server containing user login information. The authentication server generates a new JWT access token and returns it to the client. On every request to a restricted resource, the client sends the access token in the query string or Authorization header. The server then validates the token and, if it’s valid, returns the secure resource to the client.
The authentication server can sign the token using any secure signature method. For example, a symmetric key algorithm such as HMAC SHA-256 can be used if there is a secure channel to share the secret key among all parties. Alternatively, an asymmetric, public-key system, such as RSA, can be used as well, eliminating the need for further key-sharing.
Advantages of Token-Based Authentication
Stateless, easier to scale: The token contains all the information to identify the user, eliminating the need for the session state. If we use a load balancer, we can pass the user to any server, instead of being bound to the same server we logged in on.
Reusability: We can have many separate servers, running on multiple platforms and domains, reusing the same token for authenticating the user. It is easy to build an application that shares permissions with another application.
Security: Since we are not using cookies, we don’t have to protect against cross-site request forgery (CSRF) attacks. We should still encrypt our tokens using JWE if we have to put any sensitive information in them, and transmit our tokens over HTTPS to prevent man-in-the-middle attacks.
Performance: There is no server side lookup to find and deserialize the session on each request. The only thing we have to do is calculate the HMAC SHA-256 to validate the token and parse its content.
A JSON Web Token Example using Laravel 5 and AngularJS
In this tutorial I am going to demonstrate how to implement the basic authentication using JSON Web Tokens in two popular web technologies: Laravel 5 for the backend code and AngularJS for the frontend Single Page Application (SPA) example. (You can find the entire demo here, and the source code in this GitHub repositoryso that you can follow along with the tutorial.)
This JSON web token example will not use any kind of encryption to ensure the confidentiality of the information transmitted in the claims. In practice this is often okay, because TLS/SSL encrypts the request. However, if the token is going to contain sensitive information, such as the user’s social security number, it should also be encrypted using JWE.
Laravel Backend Example
We will use Laravel to handle user registration, persisting user data to a database and providing some restricted data that needs authentication for the Angular app to consume. We will create an example API subdomain to simulate Cross-origin resource sharing (CORS) as well.
Installation and Project Bootstrapping
In order to use Laravel, we have to install the Composer package manager on our machine. When developing in Laravel I recommend using the Laravel Homestead pre-packaged “box” of Vagrant. It provides us with a complete development environment regardless of our operating system.
The easiest way to bootstrap our Laravel application is to use a Composer package Laravel Installer.
composer global require "laravel/installer=~1.1"
Now we are all ready to create a new Laravel project by running laravel new jwt.
For any questions about this process please refer to the official Laravel documentation.
After we have created the basic Laravel 5 application, we need to set up our Homestead.yaml, which will configure folder mappings and domains configuration for our local environment.
Example of a Homestead.yaml file:
---
ip: "192.168.10.10"
memory: 2048
cpus: 1

authorize: /Users/ttkalec/.ssh/public.psk

keys:
    - /Users/ttkalec/.ssh/private.ppk
folders:
    - map: /coding/jwt
      to: /home/vagrant/coding/jwt
sites:
    - map: jwt.dev
      to: /home/vagrant/coding/jwt/public
    - map: api.jwt.dev
      to: /home/vagrant/coding/jwt/public
variables:
    - key: APP_ENV
      value: local
After we’ve booted up our Vagrant box with the vagrant up command and logged into it using vagrant ssh, we navigate to the previously defined project directory. In the example above this would be /home/vagrant/coding/jwt. We can now run php artisan migrate command in order to create the necessary user tables in our database.
Installing Composer Dependencies
Fortunately, there is a community of developers working on Laravel and maintaining many great packages that we can reuse and extend our application with. In this example we will use tymon/jwt-auth, by Sean Tymon, for handling tokens on the server side, and barryvdh/laravel-cors, by Barry vd. Heuvel, for handling CORS.
jwt-auth
Require the tymon/jwt-auth package in our composer.json and update our dependencies.
composer require tymon/jwt-auth 0.5.*
Add the JWTAuthServiceProvider to our app/config/app.php providers array.
'Tymon\JWTAuth\Providers\JWTAuthServiceProvider'
Next, in app/config/app.php file, under the aliases array, we add the JWTAuth facade.
'JWTAuth' => 'Tymon\JWTAuth\Facades\JWTAuth'
Finally, we will want to publish the package config using the following command: php artisan config:publish tymon/jwt-auth
JSON Web tokens are encrypted using a secret key. We can generate that key using the php artisan jwt:generate command. It will be placed inside our config/jwt.php file. In the production environment, however, we never want to have our passwords or API keys inside configuration files. Instead, we should place them inside server environment variables and reference them in the configuration file with the env function. For example:
'secret' => env('JWT_SECRET')
We can find out more about this package and all of it’s config settings on Github.
laravel-cors
Require the barryvdh/laravel-cors package in our composer.json and update our dependencies.
composer require barryvdh/laravel-cors 0.4.x@dev
Add the CorsServiceProvider to our app/config/app.php providers array.
'Barryvdh\Cors\CorsServiceProvider'
Then add the middleware to our app/Http/Kernel.php.
'Barryvdh\Cors\Middleware\HandleCors'
Publish the configuration to a local config/cors.php file by using the php artisan vendor:publish command.
Example of a cors.php file configuration:
return [
   'defaults' => [
       'supportsCredentials' => false,
       'allowedOrigins' => [],
       'allowedHeaders' => [],
       'allowedMethods' => [],
       'exposedHeaders' => [],
       'maxAge' => 0,
       'hosts' => [],
   ],

   'paths' => [
       'v1/*' => [
           'allowedOrigins' => ['*'],
           'allowedHeaders' => ['*'],
           'allowedMethods' => ['*'],
           'maxAge' => 3600,
       ],
   ],
];
Routing and Handling HTTP Requests
For the sake of brevity, I will put all my code inside the routes.php file that is responsible for Laravel routing and delegating requests to controllers. We would usually create dedicated controllers for handling all our HTTP requests and keep our code modular and clean.
We will load our AngularJS SPA view using
Route::get('/', function () {
   return view('spa');
});
User Registration
When we make a POST request to /signup with a username and password, we will try to create a new user and save it to the database. After the user has been created, a JWT is created and returned via JSON response.
Route::post('/signup', function () {
   $credentials = Input::only('email', 'password');

   try {
       $user = User::create($credentials);
   } catch (Exception $e) {
       return Response::json(['error' => 'User already exists.'], HttpResponse::HTTP_CONFLICT);
   }

   $token = JWTAuth::fromUser($user);

   return Response::json(compact('token'));
});
User Sign In
When we make a POST request to /signin with a username and password, we verify that the user exists and returns a JWT via the JSON response.
Route::post('/signin', function () {
   $credentials = Input::only('email', 'password');

   if ( ! $token = JWTAuth::attempt($credentials)) {
       return Response::json(false, HttpResponse::HTTP_UNAUTHORIZED);
   }

   return Response::json(compact('token'));
});
Fetching a Restricted Resource on the Same Domain
Once the user is signed in, we can fetch the restricted resource. I’ve created a route /restricted that simulates a resource that needs an authenticated user. In order to do this, the request Authorization header or query string needs to provide the JWT for the backend to verify.
Route::get('/restricted', [
   'before' => 'jwt-auth',
   function () {
       $token = JWTAuth::getToken();
       $user = JWTAuth::toUser($token);

       return Response::json([
           'data' => [
               'email' => $user->email,
               'registered_at' => $user->created_at->toDateTimeString()
           ]
       ]);
   }
]);
In this example, I’m using jwt-auth middleware provided in the jwt-auth package using 'before' => 'jwt-auth'. This middleware is used to filter the request and validate the JWT token. If the token is invalid, not present, or expired, the middleware will throw an exception that we can catch.
In Laravel 5, we can catch exceptions using the app/Exceptions/Handler.php file. Using the render function we can create HTTP responses based on the thrown exception.
public function render($request, Exception $e)
{
  if ($e instanceof \Tymon\JWTAuth\Exceptions\TokenInvalidException)
  {
     return response(['Token is invalid'], 401);
  }
  if ($e instanceof \Tymon\JWTAuth\Exceptions\TokenExpiredException)
  {
     return response(['Token has expired'], 401);
  }

  return parent::render($request, $e);
}
If the user is authenticated and the token is valid, we can safely return the restricted data to the frontend via JSON.
Fetching Restricted Resources from the API Subdomain
In the next JSON web token example, we’ll take a different approach for token validation. Instead of using jwt-auth middleware, we will handle exceptions manually. When we make a POST request to an API server api.jwt.dev/v1/restricted, we are making a cross-origin request, and have to enable CORS on the backend. Fortunately, we have already configured CORS in the config/cors.php file.
Route::group(['domain' => 'api.jwt.dev', 'prefix' => 'v1'], function () {
   Route::get('/restricted', function () {
       try {
           JWTAuth::parseToken()->toUser();
       } catch (Exception $e) {
           return Response::json(['error' => $e->getMessage()], HttpResponse::HTTP_UNAUTHORIZED);
       }

       return ['data' => 'This has come from a dedicated API subdomain with restricted access.'];
   });
});
AngularJS Frontend Example
We are using AngularJS as a front-end, relying on the API calls to the Laravel back-end authentication server for user authentication and sample data, plus the API server for cross-origin example data. Once we go to the homepage of our project, the backend will serve the resources/views/spa.blade.php view that will bootstrap the Angular application.
Here is the folder structure of the Angular app:
public/
  |-- css/
      `-- bootstrap.superhero.min.css
  |-- lib/
      |-- loading-bar.css
      |-- loading-bar.js
      `-- ngStorage.js
  |-- partials/
      |-- home.html
      |-- restricted.html
      |-- signin.html
      `-- signup.html
  `-- scripts/
      |-- app.js
      |-- controllers.js
      `-- services.js
Bootstrapping the Angular Application
spa.blade.php contains the bare essentials needed to run the application. We’ll use Twitter Bootstrap for styling, along with a custom theme from Bootswatch. To have some visual feedback when making an AJAX call, we’ll use the angular-loading-bar script, which intercepts XHR requests and creates a loading bar. In the header section, we have the following stylesheets:
<link rel="stylesheet" href="//maxcdn.bootstrapcdn.com/bootstrap/3.2.0/css/bootstrap.min.css">
<link rel="stylesheet" href="/css/bootstrap.superhero.min.css">
<link rel="stylesheet" href="/lib/loading-bar.css">
The footer of our markup contains references to libraries, as well as our custom scripts for Angular modules, controllers and services.
<script src="http://cdnjs.cloudflare.com/ajax/libs/jquery/2.1.1/jquery.min.js"></script>
<script src="http://maxcdn.bootstrapcdn.com/bootstrap/3.3.2/js/bootstrap.min.js"></script>
<script src="http://cdnjs.cloudflare.com/ajax/libs/angular.js/1.3.14/angular.min.js"></script>
<script src="http://cdnjs.cloudflare.com/ajax/libs/angular.js/1.3.14/angular-route.min.js"></script>
<script src="/lib/ngStorage.js"></script>
<script src="/lib/loading-bar.js"></script>
<script src="/scripts/app.js"></script>
<script src="/scripts/controllers.js"></script>
<script src="/scripts/services.js"></script>
</body>
We are using ngStorage library for AngularJS, to save tokens into the browser’s local storage, so that we can send it on each request via the Authorization header.
In the production environment, of course, we would minify and combine all our script files and stylesheets in order to improve performance.
I’ve created a navigation bar using Bootstrap that will change the visibility of appropriate links, depending on the sign-in status of the user. The sign-in status is determined by the presence of a token variable in the controller’s scope.
<div class="navbar-header">
   <button type="button" class="navbar-toggle collapsed" data-toggle="collapse" data-target=".navbar-collapse">
       <span class="sr-only">Toggle navigation</span>
       <span class="icon-bar"></span>
       <span class="icon-bar"></span>
       <span class="icon-bar"></span>
   </button>
   <a class="navbar-brand" href="#">JWT Angular example</a>
</div>
<div class="navbar-collapse collapse">
   <ul class="nav navbar-nav navbar-right">
       <li data-ng-show="token"><a ng-href="#/restricted">Restricted area</a></li>
       <li data-ng-hide="token"><a ng-href="#/signin">Sign in</a></li>
       <li data-ng-hide="token"><a ng-href="#/signup">Sign up</a></li>
       <li data-ng-show="token"><a ng-click="logout()">Logout</a></li>
   </ul>
</div>
Routing
We have a file named app.js which is responsible for configuring all our front end routes.
angular.module('app', [
   'ngStorage',
   'ngRoute',
   'angular-loading-bar'
])
   .constant('urls', {
       BASE: 'http://jwt.dev:8000',
       BASE_API: 'http://api.jwt.dev:8000/v1'
   })
   .config(['$routeProvider', '$httpProvider', function ($routeProvider, $httpProvider) {
       $routeProvider.
           when('/', {
               templateUrl: 'partials/home.html',
               controller: 'HomeController'
           }).
           when('/signin', {
               templateUrl: 'partials/signin.html',
               controller: 'HomeController'
           }).
           when('/signup', {
               templateUrl: 'partials/signup.html',
               controller: 'HomeController'
           }).
           when('/restricted', {
               templateUrl: 'partials/restricted.html',
               controller: 'RestrictedController'
           }).
           otherwise({
               redirectTo: '/'
           });
Here we can see that we have defined four routes that are handled by either HomeController or RestrictedController. Every route corresponds to a partial HTML view. We have also defined two constants that contain URLs for our HTTP requests to the backend.
Request Interceptor
The $http service of AngularJS allows us to communicate with the backend and make HTTP requests. In our case we want to intercept every HTTP request and inject it with an Authorization header containing our JWT if the user is authenticated. We can also use an interceptor to create a global HTTP error handler. Here is an example of our interceptor that injects a token if it’s available in browser’s local storage.
$httpProvider.interceptors.push(['$q', '$location', '$localStorage', function ($q, $location, $localStorage) {
   return {
       'request': function (config) {
           config.headers = config.headers || {};
           if ($localStorage.token) {
               config.headers.Authorization = 'Bearer ' + $localStorage.token;
           }
           return config;
       },
       'responseError': function (response) {
           if (response.status === 401 || response.status === 403) {
               $location.path('/signin');
           }
           return $q.reject(response);
       }
   };
}]);
Controllers
In the controllers.js file, we have defined two controllers for our application: HomeController and RestrictedController. HomeController handles sign-in, sign-up and logout functionality. It passes the username and password data from the sign-in and sign-up forms to the Auth service, which sends HTTP requests to the backend. It then saves the token to local storage, or shows an error message, depending on the response from the backend.
angular.module('app')
   .controller('HomeController', ['$rootScope', '$scope', '$location', '$localStorage', 'Auth',
       function ($rootScope, $scope, $location, $localStorage, Auth) {
           function successAuth(res) {
               $localStorage.token = res.token;
               window.location = "/";
           }

           $scope.signin = function () {
               var formData = {
                   email: $scope.email,
                   password: $scope.password
               };

               Auth.signin(formData, successAuth, function () {
                   $rootScope.error = 'Invalid credentials.';
               })
           };

           $scope.signup = function () {
               var formData = {
                   email: $scope.email,
                   password: $scope.password
               };

               Auth.signup(formData, successAuth, function () {
                   $rootScope.error = 'Failed to signup';
               })
           };

           $scope.logout = function () {
               Auth.logout(function () {
                   window.location = "/"
               });
           };
           $scope.token = $localStorage.token;
           $scope.tokenClaims = Auth.getTokenClaims();
       }])
RestrictedController behaves the same way, only it fetches the data by using the getRestrictedData and getApiData functions on the Data service.
   .controller('RestrictedController', ['$rootScope', '$scope', 'Data', function ($rootScope, $scope, Data) {
       Data.getRestrictedData(function (res) {
           $scope.data = res.data;
       }, function () {
           $rootScope.error = 'Failed to fetch restricted content.';
       });
       Data.getApiData(function (res) {
           $scope.api = res.data;
       }, function () {
           $rootScope.error = 'Failed to fetch restricted API content.';
       });
   }]);
The backend is responsible for serving the restricted data only if the user is authenticated. This means that in order to respond with the restricted data, the request for that data needs to contain a valid JWT inside its Authorization header or query string. If that is not the case, the server will respond with a 401 Unauthorized error status code.
Auth Service
The Auth service is responsible for making the sign in and sign up HTTP requests to the backend. If the request is successful, the response contains the signed token, which is then base64 decoded, and the enclosed token claims information is saved into a tokenClaims variable. This is passed to the controller via thegetTokenClaims function.
angular.module('app')
   .factory('Auth', ['$http', '$localStorage', 'urls', function ($http, $localStorage, urls) {
       function urlBase64Decode(str) {
           var output = str.replace('-', '+').replace('_', '/');
           switch (output.length % 4) {
               case 0:
                   break;
               case 2:
                   output += '==';
                   break;
               case 3:
                   output += '=';
                   break;
               default:
                   throw 'Illegal base64url string!';
           }
           return window.atob(output);
       }

       function getClaimsFromToken() {
           var token = $localStorage.token;
           var user = {};
           if (typeof token !== 'undefined') {
               var encoded = token.split('.')[1];
               user = JSON.parse(urlBase64Decode(encoded));
           }
           return user;
       }

       var tokenClaims = getClaimsFromToken();

       return {
           signup: function (data, success, error) {
               $http.post(urls.BASE + '/signup', data).success(success).error(error)
           },
           signin: function (data, success, error) {
               $http.post(urls.BASE + '/signin', data).success(success).error(error)
           },
           logout: function (success) {
               tokenClaims = {};
               delete $localStorage.token;
               success();
           },
           getTokenClaims: function () {
               return tokenClaims;
           }
       };
   }
   ]);
Data Service
This is a simple service that makes requests to the authentication server as well as the API server for some dummy restricted data. It makes the request, and delegates success and error callbacks to the controller.
angular.module('app')
   .factory('Data', ['$http', 'urls', function ($http, urls) {

       return {
           getRestrictedData: function (success, error) {
               $http.get(urls.BASE + '/restricted').success(success).error(error)
           },
           getApiData: function (success, error) {
               $http.get(urls.BASE_API + '/restricted').success(success).error(error)
           }
       };
   }
   ]);
Conclusion
Token-based authentication enables us to construct decoupled systems that are not tied to a particular authentication scheme. The token might be generated anywhere and consumed on any system that uses the same secret key for signing the token. They are mobile ready, and do not require us to use cookies.
JSON Web Tokens work across all popular programming languages and are quickly gaining in popularity. They are backed by companies like Google, Microsoft and Zendesk. Their standard specification by Internet Engineering Task Force (IETF) is still in the draft version and may change slightly in the future.
There is still a lot to cover about JWTs, such with how to handle the security details, and refreshing tokens when they expire, but the examples above should demonstrate the basic usage and, more importantly, advantages of using JSON Web Tokens.
Integrating Facebook Authentication in AngularJS App with Satellizer
With the arrival of feature-rich front-end frameworks such as AngularJS, more and more logic is being implemented on the front-end, such as data manipulation/validation, authentication, and more. Satellizer, an easy to use token-based authentication module for AngularJS, simplifies the process of implementing authentication mechanism in AngularJS, The library comes with built-in support for Google, Facebook, LinkedIn, Twitter, Instagram, GitHub, Bitbucket, Yahoo, Twitch, and Microsoft (Windows Live) accounts.

In this article, we will build a very simple webapp similar to the one here which allows you to login and see current user’s information.
Authentication vs Authorization
These are 2 scary words that you often encounter once your app starts integrating a user system. According to Wikipedia:
Authentication is the act of confirming the truth of an attribute of a single piece of data (a datum) claimed true by an entity.
Authorization is the function of specifying access rights to resources related to information security and computer security in general and to access control in particular.
In layman terms, let’s take an example of a blog website with some people working on it. The bloggers write articles and the manager validates the content. Each person can authenticate (login) into the system but their rights (authorisation) are different, so the blogger cannot validate content whereas the manager can.
Why Satellizer
You can create your own authentication system in AngularJS by following some tutorials such as this very detailed one: JSON Web Token Tutorial: An Example in Laravel and AngularJS. I suggest reading this article as it explains JWT (JSON Web Token) very well, and shows a simple way to implement authentication in AngularJS using directly the local storage and HTTP interceptors.
So why Satellizer? The principal reason is that it supports a handful of social network logins such as Facebook, Twitter, etc. Nowadays, especially for websites used on mobile, typing username and password is quite cumbersome and users expect to be able to use your website with little hindrance by using social logins. As integrating the SDK of each social network and following their documentations is quite repetitive, it would be nice to support these social logins with minimal effort.
Moreover Satellizer is an active project on Github. Active is key here as these SDKs change quite frequently and you don’t want to read their documentation every now and then (anyone working with Facebook SDK knows how annoying it is)
AngularJS App with Facebook Login
This is where things start to become interesting.
We will build a web app that has regular login/register (i.e. using username, password) mechanism and supports social logins as well. This webapp is very simple as it has only 3 pages:
- Home page: anyone can see
- Login page: to enter username/password
- Secret page: that only logged in users can see
For backend, we will use Python and Flask. Python and the framework Flask are quite expressive so I hope porting the code to other languages/frameworks will not be very hard. We will, of course, use AngularJS for front-end. And for the social logins, we will integrate with Facebook only as it is the most popular social network at this time.
Let’s start!
Step #1: Bootstrap Project
Here is how we will structure our code:
- app.py
- static/
	- index.html
- app.js
	- bower.json
	- partials/
		- login.tpl.html
		- home.tpl.html
		- secret.tpl.html
All the back-end code is in app.py. The front-end code is put in static/ folder. By default, Flask will automatically serve the contents of static/ folder. All the partial views are in static/partials/ and handled by the ui.router module.
To start coding the back-end, we’ll need Python 2.7.* and install the required libraries using pip. You can of course use virtualenv to isolate a Python environment. Below is the list of required Python modules to put in requirements.txt:
Flask==0.10.1
PyJWT==1.4.0
Flask-SQLAlchemy==1.0
requests==2.7.0
To install all these dependencies:
pip install -r requirements.txt
In app.py we have some initial code to bootstrap Flask (import statements are omitted for brevity):
app = Flask(__name__)

@app.route('/')
def index():
    return flask.redirect('/static/index.html')

if __name__ == '__main__':
    app.run(debug=True)
Next we init bower and install AngularJS and ui.router:
bower init # here you will need to answer some question. when in doubt, just hit enter :)
bower install angular angular-ui-router --save # install and save these dependencies into bower.json
Once these libraries are installed, we need to include AngularJS and ui-router in index.html and create routings for 3 pages: home, login, and secret.
<body ng-app="DemoApp">

<a ui-sref="home">Home</a>
<a ui-sref="login">Login</a>
<a ui-sref="secret">Secret</a>
<div ui-view></div>

<script src="bower_components/angular/angular.min.js"></script>
<script src="bower_components/angular-ui-router/release/angular-ui-router.min.js"></script>
<script src="main.js"></script>
</body>
Below is the code that we need in main.js to configure routing:
var app = angular.module('DemoApp', ['ui.router']);

app.config(function ($stateProvider, $urlRouterProvider) {
  $stateProvider
    .state('home', {
      url: '/home',
      templateUrl: 'partials/home.tpl.html'
    })
    .state('secret', {
      url: '/secret',
      templateUrl: 'partials/secret.tpl.html',
    })
    .state('login', {
      url: '/login',
      templateUrl: 'partials/login.tpl.html'
    });
  $urlRouterProvider.otherwise('/home');

});
At this point if you run the server python app.py, you should have this basic interface at http://localhost:5000

The links Home, Login, and Secret should work at this point and show the content of the corresponding templates.
Congratulation, you just finished setting up the skeleton! If you encounter any error, please check out thecode on GitHub
Step #2: Login and Register
At the end of this step, you’ll have a webapp that you can register/login using email and password.
The first step is to configure the backend. We need a User model and a way to generate the JWT token for a given user. The User model shown below is really simplified and does not perform even any basic checks such as if field email contains “@”, or if field password contains at least 6 characters, etc.
class User(db.Model):
    id = db.Column(db.Integer, primary_key=True)
    email = db.Column(db.String(100), nullable=False)
    password = db.Column(db.String(100))

    def token(self):
        payload = {
            'sub': self.id,
            'iat': datetime.utcnow(),
            'exp': datetime.utcnow() + timedelta(days=14)
        }
        token = jwt.encode(payload, app.config['TOKEN_SECRET'])
        return token.decode('unicode_escape')
We use the jwt module in python to generate the payload part in JWT. The iat and exp part correspond to the timestamp that token is created and expired. In this code, the token will be expired in 2 weeks.
After the model User was created, we can add the “login” and “register” endpoints. The code for both are quite similar, so here I will just show the “register” part. Please note that by default, Satellizer will call the endpoints /auth/login and /auth/signup for the “login” and “register” respectively.
@app.route('/auth/signup', methods=['POST'])
def signup():
    data = request.json

    email = data["email"]
    password = data["password"]

    user = User(email=email, password=password)
    db.session.add(user)
    db.session.commit()

    return jsonify(token=user.token())
Let’s check the endpoint using curl first:
curl localhost:5000/auth/signup -H "Content-Type: application/json" -X POST -d '{"email":"[email protected]","password":"xyz"}'
The result should look like this:
{
  "token": "very long string…."
}
Now that the back-end part is ready, let’s attack the front-end! First, we need to install satellizer and add it as a dependency in main.js:
bower install satellizer --save
Add satellizer as dependency:
var app = angular.module('DemoApp', ['ui.router', 'satellizer']);
Login and signup in satellizer is actually quite simple in comparison to all the setup until now:
$scope.signUp = function () {
    $auth
      .signup({email: $scope.email, password: $scope.password})
      .then(function (response) {
        // set the token received from server
        $auth.setToken(response);
        // go to secret page
        $state.go('secret');
      })
      .catch(function (response) {
        console.log("error response", response);
      })
  };
If you have any difficulty setting up the code, you can take a look at the code on GitHub.
Step #3: But Secret View Is Not Really Secret, Because Anyone Can See It!
Yes, that is correct! Until now, anyone can go to secret page without logging in.
It’s time to add some interceptor in AngularJS to make sure that if someone goes to secret page and if this user is not logged in, they will be redirected to the login page.
First, we should add a flag requiredLogin to distinguish secret page from other ones.
    .state('secret', {
      url: '/secret',
      templateUrl: 'partials/secret.tpl.html',
      controller: 'SecretCtrl',
      data: {requiredLogin: true}
    })
The “data” part will be used in the $stateChangeStart event which is fired each time the routing changes:
app.run(function ($rootScope, $state, $auth) {
  $rootScope.$on('$stateChangeStart',
    function (event, toState) {
      var requiredLogin = false;
      // check if this state need login
      if (toState.data && toState.data.requiredLogin)
        requiredLogin = true;

      // if yes and if this user is not logged in, redirect him to login page
      if (requiredLogin && !$auth.isAuthenticated()) {
        event.preventDefault();
        $state.go('login');
      }
    });
});
Now, the user cannot go directly to the secret page without logging in. Hooray!
As usual, the code of this step can be found here.
Step #4: It’s Time to Get Something Really Secret!
At this moment, there’s nothing really secret in the secret page. Let’s put something personal there.
This step starts by creating an endpoint in the back-end which is only accessible for an authenticated user, such as having a valid token. The endpoint /user below returns the user_id and email of the user corresponding to the token.
@app.route('/user')
def user_info():
    # the token is put in the Authorization header
    if not request.headers.get('Authorization'):
        return jsonify(error='Authorization header missing'), 401

    # this header looks like this: “Authorization: Bearer {token}”
    token = request.headers.get('Authorization').split()[1]
    try:
        payload = jwt.decode(token, app.config['TOKEN_SECRET'])
    except DecodeError:
        return jsonify(error='Invalid token'), 401
    except ExpiredSignature:
        return jsonify(error='Expired token'), 401
    else:
        user_id = payload['sub']
        user = User.query.filter_by(id=user_id).first()
        if user is None:
            return jsonify(error='Should not happen ...'), 500
        return jsonify(id=user.id, email=user.email), 200
    return jsonify(error="never reach here..."), 500
Again, we make use of the module jwt to decode the JWT token included in the ‘Authorization’ header and to handle the case when the token is expired or not valid.
Let’s test this endpoint using curl. First, we need to get a valid token:
curl localhost:5000/auth/signup -H "Content-Type: application/json" -X POST -d '{"email":"[email protected]","password":"xyz"}'
Then with this token:
curl localhost:5000/user -H "Authorization: Bearer {put the token here}"
Which gives this result:
{
  "email": "[email protected]",
  "id": 1
}
Now we need to include this endpoint in the Secret Controller. This is quite simple as we just need to call the endpoint using the regular $http module. The token is automatically inserted to the header by Satellizer, so we don’t need to bother with all the details of saving the token and then putting it in the right header.
  getUserInfo();

  function getUserInfo() {
    $http.get('/user')
      .then(function (response) {
        $scope.user = response.data;
      })
      .catch(function (response) {
        console.log("getUserInfo error", response);
      })
  }
Finally, we have something truly personal in the secret page!

The code of this step is on GitHub.
Step #5: Facebook Login with Satellizer
A nice thing about Satellizer, as mentioned at the beginning, is it makes integrating social login a lot easier. At the end of this step, users can login using their Facebook account!

First thing to do is to create an application on Facebook developers page in order to have an application_idand a secret code. Please follow developers.facebook.com/docs/apps/register to create a Facebook developer account if you don’t have one already and create a website app. After that, you will have the application ID and application secret as in the screenshot below.

Once the user chooses to connect with Facebook, Satellizer will send an authorization code to the endpoint/auth/facebook. With this authorization code, the back-end can retrieve an access token from Facebook/oauth endpoint that allows the call to Facebook Graph API to get user information such as location, user_friends, user email, etc.
We also need to keep track of whether a user account is created with Facebook or through regular signup. To do so, we add facebook_id to our User model.
facebook_id = db.Column(db.String(100))
The facebook secret is configured via env variables FACEBOOK_SECRET that we add to app.config.
app.config['FACEBOOK_SECRET'] = os.environ.get('FACEBOOK_SECRET')
So to launch the app.py, you should set this env variable:
FACEBOOK_SECRET={your secret} python app.py
Here is the method which handles Facebook logins. By default Satellizer will call the endpoint /auth/facebook.
@app.route('/auth/facebook', methods=['POST'])
def auth_facebook():
    access_token_url = 'https://graph.facebook.com/v2.3/oauth/access_token'
    graph_api_url = 'https://graph.facebook.com/v2.5/me?fields=id,email'

    params = {
        'client_id': request.json['clientId'],
        'redirect_uri': request.json['redirectUri'],
        'client_secret': app.config['FACEBOOK_SECRET'],
        'code': request.json['code']
    }

    # Exchange authorization code for access token.
    r = requests.get(access_token_url, params=params)
    # use json.loads instead of urlparse.parse_qsl
    access_token = json.loads(r.text)

    # Step 2. Retrieve information about the current user.
    r = requests.get(graph_api_url, params=access_token)
    profile = json.loads(r.text)

    # Step 3. Create a new account or return an existing one.
    user = User.query.filter_by(facebook_id=profile['id']).first()
    if user:
        return jsonify(token=user.token())

    u = User(facebook_id=profile['id'], email=profile['email'])
    db.session.add(u)
    db.session.commit()
    return jsonify(token=u.token())
To send a request to the Facebook server, we use the handy module requests. Now the difficult part on the back-end is done. On the front-end, adding Facebook login is quite simple. First, we need to tell Satellizer ourfacebook_id by adding this code into app.config function:
$authProvider.facebook({
    clientId: {your facebook app id},
    // by default, the redirect URI is http://localhost:5000
    redirectUri: 'http://localhost:5000/static/index.html'
  });
To login using Facebook, we can just call:
$auth.authenticate(“facebook”)
As usual, you can check the code on GitHub
At this time, the webapp is complete in terms of functionality. The user can login/register using regular email and password or by using Facebook. Once logged in, the user can see his secret page.
Make a Pretty Interface
The interface is not very pretty at this point, so let’s add a little bit of Bootstrap for the layout and the angular toaster module to handle an error message nicely, such as when login fails.
The code for this beautifying part can be found here.
Conclusion
This article shows a step-by-step integration of Satellizer in a (simple) AngularJS webapp. With Satellizer, we can easily add other social logins such as Twitter, Linkedin, and more. The code on the front-end is quite the same as in the article. However, the back-end varies as social network SDKs have different endpoints with different protocols. You can take a look at https://github.com/sahat/satellizer/blob/master/examples/server/python/app.py which contains examples for Facebook, Github, Google, Linkedin, Twiter and Bitbucket. When in doubt, you should take a look at the documentation on https://github.com/sahat/satellizer.
This article was written by Son Nguyen Kim, a Toptal freelance developer.
Rethinking Authentication And Biometric Security, The Toptal Way
Toptal is a vast network of tech talent and we currently boast the biggest distributed workforce in the industry. This is a source of pride for many Toptalers, especially our hard-working dev team. Why? Because we make it appear so easy and seamless, and we do it every single day. While a traditional tech company is bound to have a vast infrastructure (loads of office space, servers, standardized equipment, abundant physical and cyber security resources, and so on), we don’t.
We rely on off-the-shelf technology and services. Traditional companies struggle to cope with a small number of BYOD users, but here at Toptal, all our hardware is BYOD. The problem with our platform-agnostic approach and the reliance on a distributed network is self-evident: How can we ensure and maintain security?
It was never easy, but we like a good challenge, and like to stay one step ahead. That’s why we set about designing multiple authentication and onboarding procedures last year. We used the first quarter of 2016 for trials and pilots, and they were encouraging. As a result, we decided to announce the results of our trials and unveil our rollout plans.
By the end of the third quarter, all Toptalers will be acquainted with our new solutions, and if all goes well, they will start using them by the end of the year.
The Challenge
How do we make sure everyone logged onto our network is who they claim they are? Most of our team members have never met in real life, yet they collaborate on a daily basis. What if someone’s security has been compromised? Or, what if a disgruntled member decides to undermine the network?
We settled on a twofold approach to addressing these concerns:
- Including a set of personal reliability tests to our screening process.
- Introducing a new layer of biometric security.
What sort of tests will we institute? Our approach was inspired by the Personnel Reliability Program (PRP), created by the U.S. Department of Defense. The program is designed to identify personnel with the highest degree of reliability, taking into account their prior conduct, trustworthiness, behavior, and allegiance. PRP compliance will be evaluated continuously by our newly formed Internal Security Division (ISD), staffed by military intelligence veterans from Israel and Bosnia.

Platform access will be limited to individuals who meet stringent PRP criteria, however, failure to meet these standards will not be grounds for termination or demotion. It will merely reflect the individual’s lack of suitability for certain roles, restricting their access to confidential information.
To ensure continuous compliance, every Toptal member will be required to sign a new non-disclosure agreement and undergo evaluation. The agreement will include provisions covering the treatment of confidential information and outline a set of sanctions for individuals in violation of said agreement.
Since we are a distributed network, we will also rely on input from our members. Our existent monthly TopTeam reports will be expanded to include a personal reliability questionnaire. In other words, each network member will be able to report suspect coworkers or behavior via an anonymous evaluation form.
Lt. Col. David Finci, Head of Toptal’s Internal Security Division, explains the decision to include anonymous ‘tips’:
“Our goal is not to encourage dissent and create friction among team members, but we are convinced this is vital to ensuring personal reliability. We must allow network members to scrutinize the professional performance and personal integrity of their coworkers. Otherwise our ability to source actionable, time-sensitive information would be compromised.”
Network members with full PRP clearance will be issued security tokens and one-time pads to ensure encryption should the integrity of our network is compromised. They will also receive ID cards featuring a scannable QR code and/or barcode.

Use of these security measures will be mandatory, and loss or theft of ID cards will be taken seriously. Fortunately, these cards will be an interim solution and will be phased out as soon as our new security platform is deemed ready. We expect an early 2017 release.
Biometrics: Imperfect Marriage Of Convenience
We started experimenting with quasi-biometric security last year, quite by accident. After one Toptaler decided to tattoo our logo on their arm, we realized this approach could be employed for QR codes. Nobody wants to carry around yet another card in their wallet, and QR codes are relatively small and so they can be easily tattooed, or even engraved on fingernails.

You may be wondering whether or not we are serious, and the answer is obviously no. However, Graham’s tattoo gave us a good idea: Why not use biometric technology, backed by off-the-shelf tracking solutions?
We are already moving towards a passwordless future, and Toptal wants to be on the cutting edge. Why burden people with passwords, silly QR codes, two-factor authentication, or security tokens, if we can ensure superior security without any of them?
There have been attempts at this before, using personal technology such as smartphones and fingerprint scanners, but these techniques aren’t bulletproof. (In the case of smartphone fingerprint scanners, they can be beaten by a simple inkjet printer or knife.)

Besides, using smartphones for authentication opens up a Pandora’s box of other issues.
Bluetooth LE: Rendering Personal Security Bulletproof And Seamless
A lost phone is a recipe for disaster, and with all due respect for all the anti-theft and anti-loss technology out there, much of it doesn’t work well, or requires user input to do its magic. Besides, why rely solely on smartphones when we need to authenticate people on their office hardware?
A lost phone is called a lost phone for a reason, because the user is unaware that it’s lost to begin with. If you wake up and realize you lost your phone last night, it’s too late. That said, if you have a habit of waking up at strange places without your phone, or any recollection of the night before, you should also be on the lookout for kidney theft.
This is where it gets interesting. Security tokens and dongles work, but they’re a pain to carry around, and they have a habit of getting lost at the worst possible moment. That is why we planned for our ID cards to be a temporary measure, only active for 9 months or so. We intend to replace them with inexpensive, wearableBluetooth devices.
Yes, Toptalers will be required to carry them on their person at all times, but this won’t be a problem. Bluetooth LE is a killer technology, at least in terms of power consumption, and these devices can be secured with relative ease, providing a new layer of authentication (we can’t discuss the details due to NDA restrictions).
We initially tried a number of cheap fitness trackers and anti-loss tags to prove our approach was feasible. It worked, but these off-the-shelf devices were not ideally suited to our needs, so we set about designing our own, which proved to be surprisingly easy.
Enter The Toptal TopBand
We reached out to a number of reputable Chinese OEMs for consultation and technical input. We provided them with the specs, they provided us with their quote and a shipping date. Yes, it was that simple, and yes, we were pleasantly surprised.
We are currently in the process of going through several different Toptal TopBand designs and form factors, as well as working on the software side. These devices will not only interface with your phone and computer as wireless security tokens, they will also track your work and sleep habits.
Why? Because they can. They are based on hardware used in fitness trackers, so we didn’t need to reinvent the wheel and design the hardware from scratch. In fact, it would cost more to remove unnecessary features and sensors than to use off-the-shelf solutions.

Here are the specifications of our initial product:
- Bluetooth 4.0 chip manufactured by Dialog
- Accelerometer from ADI
- 50mAh lithium polymer battery by Sony, 40-day battery life
- Vibration assembly, three LED UI, notification speaker
- Dimensions: 8mm x 15mm x 35mm (estimate)
- Weight: 8g (estimate, without strap or clip-on)
We have not finalized the design yet, so the physical dimensions are just estimates. We are still in the process of deciding whether to use aluminium or polycarbonate for the housing, or a combination of both (we want it to look insanely cool). Either way, the device will be IP67 weather resistant, so you don’t even have to take it off when you hit the shower.
This is why we are convinced the device won’t be a nuisance. It’s tiny, you don’t have to charge it every other day, it can be carried as a standard fitness tracker on the wrist, keychain, and it can even fit in your wallet (as an added bonus, it can be used to alert users if they misplace their wallet or keys).
Of course, you could just pair it to your computer as wireless security device and forget about these features, but where’s the fun in that?
Here is what the TopBand brings to the table, allowing users to:
- Secure their hardware by limiting access to our platform if the TopBand is not paired and in range of the device.
- Locate misplaced phones, or vice versa (use a phone to find the TopBand).
- Receive notifications, via vibration and audio alarms.
- Collect physical activity data, which can be used to prevent burnout and keep track of your work habits (when used as a wearable).
The last point may prove controversial, but might be useful in some circumstances. For example, it will allow your team members to know whether or not you are awake and working, and it’s perfect for time tracking. Naturally, Toptal will not collect or use this data without prior consent. It’s there for your convenience; use it to improve your health and boost productivity.
Toptal Pet Project
While we were tinkering with the prototypes, a few Toptalers decided to create a potential spin-off, a pet project of sorts and when we say “pet project,” we literally mean pet project. A lot of our people are obsessed with their four-legged friends, so they went about devising ways of using our hardware in ways we did not expect: they turned the TopBand into a pet tracker.
The hardware was ready, so all it took was some tweaked code. We encouraged them to test the device on their pets; the data collected would prove valuable if only to ensure that unethical developers couldn’t cheat the system by mounting the TopBand on their cat and telling everyone they are at home, hard at work.
Pet-specific functionality is still being tested, but the results are encouraging. For the time being, the devices monitor basic activity, check whether or not your pet is asleep, and vibrate if the your pet strays out of range. It sounds a bit more humane than those nasty electric shock collars, doesn’t it?

Since cats and dogs come in all shapes and sizes, the biggest problem is sensor calibration, which the team is working on. The device was tested on a few cats, including a morbidly obese Italian feline, and dogs ranging from Jack Russells’ to Akita Inus.
Beyond that, we cannot reveal many details, and here is why; our developers have turned their pet project into a serious endeavour. They approached a few potential investors and secured funding for a limited commercial rollout (also scheduled for 2017), but this is just the first step towards a full pet product line.
Our team is already working on the next generation pet tracker, based on proprietary hardware, with wireless charging and the ability to be used as a subdermal implant.
Sounds Geeky, But Your Pets Will Love It
Subdermal implants have a bad reputation, but most of it is unjustified and peddled by conspiracy cranks. If you ask any pet professional, they will tell you that animals larger than a rat don’t even notice them, and in fact, they tend to be safer and more comfortable than most smart collars. Microchipping is already a widely supported practice globally to minimize stray pet populations; this just takes it one step further.
Until now, subdermal implants were limited to rudimentary RFID functionality and this limited their appeal. This isn’t a swipe at RFID tech; a lot of legit companies are working on RFID implants, and Dangerous Things is one startup that stands out in terms of innovation.
However, Qi wireless charging assemblies are getting smaller and cheaper with each new generation. This, obviously, allows engineers to design feature-packed implants because they can afford to use more battery power for sensors and always-on Bluetooth connectivity.
Unfortunately, we are still not there, and the first prototypes won’t be ready until 2018 at the earliest. Our hardware partners also informed us they won’t be able to conduct animal trials in mainland China, due to the country’s strict and inflexible animal rights legislation.

Therefore, the devices will be tested in Cambodia. We were assured the research would be ethical, so there’s nothing to worry about. Our team is eager to try out the implants on their own pets, and they wouldn’t dream of doing anything that would put their furry bundles of joy at risk.
If It’s Good Enough For My Dog…
This is where we hit a minor snag. Thanks to Toptal’s gung-ho culture, two of our team members volunteered to have the implants tested on them, not just their pets. While it’s still too early for human trials, it goes to show that people might not mind using subdermal implants, provided they can trust the technology. Since these individuals played a pivotal role in the development of our TopBand, they are eager to prove the concept. We are told it sort of gets under your skin after a while.
We need human subjects to test wireless charging and a few other features, as attempts to train cats and dogs to sit in one place for hours are unlikely to work. We settled on an alternative approach for the pilot stage, whereby the animals could still move around and recharge their implants, but this involves strapping a big powerbank and Qi charger mat to the animals. As an interim solution, we plan to make good use of ‘cat condo’ cages and catnip to prove the concept over the course of a few hours.

Human trials are still a long way off, and they require more planning and regulatory oversight. While this approach works for new drugs, we don’t have the time or resources necessary for clinical trials. However, our volunteers agreed to sign a waiver and have the implants installed anyway. Since this could create legal issues in the EU or US, they managed to find a small, Brazilian plastic surgery clinic willing to do the job. The clinic also offered a generous discount on gynecomastia procedures.
Toptal is looking for more volunteers, and there is no doubt in my mind that we will find them. After all, Google managed to find thousands of people eager to pay $1,500 for a useless wearable, only to stop development months later, and they still called it a success! These brave Explorers didn’t even mind being called Glassholes by the interwebs.
As one Toptal volunteer put it:
“I’d rather have an implant the size of an avocado in my groin, than Google Glass on my face!”
Note: No cats were harmed in the making of this post.
This article was written by NERMIN HAJDARBEGOVIC, a Toptal editor.
