Threat Modeling for Data Protection
When evaluating the security of an application and data model ask the questions:
- What is the sensitivity of the data?
- What are the regulatory, compliance, or privacy requirements for the data?
- What is the attack vector that a data owner is hoping to mitigate?
- What is the overall security posture of the environment, is it a hostile environment or a relatively trusted one?
Data When threat modeling, consider the following common scenarios:
Data at rest (“DAR”)
In information technology means inactive data that is stored physically in any digital form (e.g. database/data warehouses, spreadsheets, archives, tapes, off-site backups, mobile devices etc.).
- Transparent Data Encryption (often abbreviated to TDE) is a technology employed by Microsoft SQL, IBM DB2 and Oracle to encrypt the “table-space” files in a database. TDE offers encryption at the file level. It solves the problem of protecting data at rest by encrypting databases both on the hard drive as well as on backup media. It does not protect data in motion DIM nor data in use DIU.
- Mount-point encryption: This is another form of TDE is available for database systems which do not natively support table-space encryption. Several vendors offer mount-point encryption for Linux/Unix/Microsoft Windows file system mount-points. When a vendor does not support TDE, this type of encryption effectively encrypts the database table-space and stores the encryption keys separate from the file system. So, if the physical or logical storage medium is detached from the compute resource, the database table-space remains encrypted.
Data in Motion (“DIM”)
Data in motion considers the security of data that is being copied from one medium to another. Data in motion typically considers data being transmitted over a network transport. Web Applications represent common data in motion scenarios.
- Transport Layer Security (TLS or SSL): is commonly used to encrypt internet protocol based network transports. TLS works by encrypting the internet layer 7 “application layer” packets of a given network stream using symmetric encryption.
- Secure Shell/Secure File Transport (SSH, SCP, SFTP): SSH is a protocol used to securely login and access remote computers. SFTP runs over the SSH protocol (leveraging SSH security and authentication functionality) but is used for secure transfer of files. The SSH protocol utilizes public key cryptography to authenticate access to remote systems.
- Virtual Private Networks (VPNs) A virtual private network (VPN) extends a private network across a public network, and enables users to send and receive data across shared or public networks as if their computing devices were directly connected to the private network.
Data in Use (“DIU”)
Data in use happens whenever a computer application reads data from a storage medium into volatile memory.
- Full memory encryption: Encryption to prevent data visibility in the event of theft, loss, or unauthorized access or theft. This is commonly used to protect Data in Motion and Data at Rest. Encryption is increasingly recognized as an optimal method for protecting Data in Use. There have been multiple approaches to encrypt data in use within memory. Microsoft’s Xbox has a capability to provide memory encryption. A company Private Core presently has a commercial software product cage to provide attestation along with full memory encryption for x86 servers.
- RAM Enclaves: enable an enclave of protected data to be secured with encryption in RAM. Enclave data is encrypted while in RAM but available as clear text inside the CPU and CPU cache, when written to disk, when traversing networks etc. Intel Corporation has introduced the concept of “enclaves” as part of its Software Guard Extensions in technical papers published in 2013.
- 2013 papers: from Workshop on Hardware and Architectural Support for Security and Privacy 2013
- Innovative Instructions and Software Model for Isolated Execution
- Innovative Technology for CPU Based Attestation and Sealing
Where do traditional data protection techniques fall short?
TDE: Database and mount point encryption both fall short of fully protecting data across the data’s entire lifecycle. For instance: TDE was designed to defend against theft of physical or virtual storage media only. An authorized system administrator, or and unauthorized user or process can gain access to sensitive data either by running a legitimate query and , or by scraping RAM. TDE does not provide granular access control to data at rest once the data has been mounted.
TLS/SCP/STFP/VPN, etc: TCP/IP Transport layer encryption also falls short of protecting data across the entire data lifecycle. For example, TLS does not protect data at rest or in use. Quite often TLS is only enabled on Internet facing application load balancers. Often TLS calls to web applications are plaintext on the datacenter or cloud side of the application load-balancer.
DIU: Memory encryption, Data in use full memory encryption falls short of protecting data across the entire data lifecycle. DIU techniques are cutting edge and not generally available. Commodity compute architecture has just begun to support memory encryption. With DIU memory encryption, data is only encrypted while in memory. Data is in plaintext while in the CPU, Cache, written to disk, and traversing network transports.
Complimentary or Alternative Approach: Tokenization
We need an alternative approach that address all the exposure gaps 100% of the time. In information security, we really want a defense in depth strategy. That is, we want layers of controls so that if a single layer is fails or is compromised another layer can compensate for the failure.
Tokenization and format preserving encryption are unique in the fact they protect sensitive data throughout the data lifecycle/across a data-flow. Tokenization and FPE are portable and remain in force across mixed technology stacks. Tokenization and Format preserving encryption do not share the same exposures as traditional data protection techniques.
How does this work? Fields of sensitive data are cryptographically transformed at the system of origin, that is during intake. A cryptographic transform of a sensitive field is applied, producing a non-sensitive token representation of the original data.
Tokenization, when applied to data security, is the process of substituting a sensitive data element with a non-sensitive equivalent, referred to as a token, that has no extrinsic or exploitable meaning or value. The token is a reference (i.e. identifier) that maps back to the sensitive data through a tokenization system.
Format preserving encryption takes this a step further and allows the data element to maintain its original format and data type. For instance, a 16-digit credit card number can be protected and the result is another 16-digit value. The value here is to reduce the overall impact of code changes to applications and databases while reducing the time to market of implementing end to end data protection.
In Closing
Use of tokenization or format preserving encryption to replace live data in systems results in minimized exposure of sensitive data to those applications, stores, people and processes. Replacing sensitive data results in reduced risk of compromise or accidental exposure and unauthorized access to sensitive data.
Applications can operate using tokens instead of live data, with the exception of a small number of trusted applications explicitly permitted to detokenize when strictly necessary for an approved business purpose. Moreover: in several cases removal of sensitive data from an organization’s applications, databases, business processes will result in reduced compliance and audit scope, resulting in significantly less complex and shorter audits.
This article was originally published in Very Good Security.
WordPress 5.x Hardening Guide for CentOS 7.6
This document explains the process of installation, configuration and hardening of Apache server from source files, based on CentOS 7.6 default installation (Linux Firewall and SELinux enabled by default), including support for TLS v1.2 and PHP 7.3
- Pre-Requirements
-
- Linux server installed with CentOS 7.6 (64bit)
- policycoreutils-python-* package installed
- setools-libs-* package installed
- libcgroup-* package installed
- audit-libs-python-* package installed
- libsemanage-python-* package installed
- gcc* package installed
- gcc-c++* package installed
- autoconf* package installed
- automake* package installed
- libtool* package installed
- perl-core package installed
- zlib-devel package installed
- expat-devel package installed
- yum-utils package installed
- OpenSSL upgrade phase
- Login using privileged account
- Run the commands below to download the latest build of OpenSSL:
cd /usr/local/src

wget https://www.openssl.org/source/openssl-1.1.1.tar.gz

tar -xvzf openssl-1.1.1.tar.gz - Run the commands below to compile the latest build of OpenSSL:
cd openssl-1.1.1

./config --prefix=/usr/local/ssl --openssldir=/usr/local/ssl shared zlib

make

make test

make install - Edit using VI the file /etc/ld.so.conf.d/openssl-1.1.1.conf and add the following string to the file:
/usr/local/ssl/lib - Run the command below to reload the dynamic link:
ldconfig -v - Backup the original OpenSSL binary:
mv /usr/bin/openssl /usr/bin/openssl.BEKUP - Create using VI the file /etc/profile.d/openssl.sh and add the following content:
#Set OPENSSL_PATH

OPENSSL_PATH=/usr/local/ssl/bin

export OPENSSL_PATH

PATH=$PATH:$OPENSSL_PATH

export PATH - Run the commands below to complete the configuration of the OpenSSL:
chmod +x /etc/profile.d/openssl.sh

source /etc/profile.d/openssl.sh

echo $PATH

which openssl
- Apache 2.4.6 installation phase
- Login using privileged account
- Run the command below to install Apache 2.4.6:
yum install httpd -y - Updating Ownership and Permissions on Apache folders:
chown root:root /usr/sbin/apachectl

chown root:root /usr/sbin/httpd

chmod 770 /usr/sbin/apachectl

chmod 770 /usr/sbin/httpd

chown -R root:root /etc/httpd

chmod -R go-r /etc/httpd

chown -R root:root /etc/httpd/logs

chmod -R 700 /etc/httpd/logs - Create folder for the web content:
mkdir -p /www - Updating Ownership and Permissions on the web content folder:
chown -R root /www

chmod -R 775 /www - Fix the SELinux security context on the new web folder:
semanage fcontext -a -t httpd_sys_content_t "/www(/.*)?"

restorecon -F -R -v /www

chcon -R -t httpd_sys_content_t /www - Create folder for the first WordPress site:
mkdir /www/WebSiteA
Note: Replace WebSiteA with the relevant name - Create folder for the secondWordPress site:
mkdir /www/WebSiteB
Note: Replace WebSiteB with the relevant name - Create logs folder for the first WordPress site:
mkdir /www/WebSiteA/logs
Note: Replace WebSiteA with the relevant name - Create logs folder for the second WordPress site:
mkdir /www/WebSiteB/logs
Note: Replace WebSiteB with the relevant name - Configure permissions on the logs folder for the first WordPress site:
chown -R apache:apache /www/WebSiteA/logs

chmod -R 700 /www/WebSiteA/logs
Note: Replace WebSiteA with the relevant name - Configure permissions on the logs folder for the second WordPress site:
chown -R apache:apache /www/WebSiteB/logs

chmod -R 700 /www/WebSiteB/logs
Note: Replace WebSiteB with the relevant name - Fix the SELinux security context on the new web folder for the first WordPress site:
semanage fcontext -a -t httpd_log_t "/www/WebSiteA/logs(/.*)?"

restorecon -F -R -v /www/WebSiteA/logs

chcon -R -t httpd_log_t /www/WebSiteA/logs
Note: Replace WebSiteA with the relevant name - Fix the SELinux security context on the new web folder for the second WordPress site:
semanage fcontext -a -t httpd_log_t "/www/WebSiteB/logs(/.*)?"

restorecon -F -R -v /www/WebSiteB/logs

chcon -R -t httpd_log_t /www/WebSiteB/logs
Note: Replace WebSiteB with the relevant name - Create the following folders:
mkdir /etc/httpd/sites-available

mkdir /etc/httpd/sites-enabled - Edit using VI the file /etc/httpd/conf/httpd.conf and change the following strings:
From:
LogLevel warnTo:
LogLevel noticeFrom:
DocumentRoot "/var/www/html"To:
# DocumentRoot "/var/www/html"From:
ScriptAlias /cgi-bin/ "/var/www/cgi-bin/"To:
# ScriptAlias /cgi-bin/ "/var/www/cgi-bin/" - Comment out the entire sections below inside the /etc/httpd/conf/httpd.conf
<Directory />

<Directory "/var/www">

<Directory "/var/www/html">

<Directory "/var/www/cgi-bin">
- Add the following sections to the end of the /etc/httpd/conf/httpd.conf file:
IncludeOptional sites-enabled/*.conf

# Configure custom error message:

ErrorDocument 400 "The requested URL was not found on this server."

ErrorDocument 401 "The requested URL was not found on this server."

ErrorDocument 403 "The requested URL was not found on this server."

ErrorDocument 404 "The requested URL was not found on this server."

ErrorDocument 405 "The requested URL was not found on this server."

ErrorDocument 408 "The requested URL was not found on this server."

ErrorDocument 410 "The requested URL was not found on this server."

ErrorDocument 411 "The requested URL was not found on this server."

ErrorDocument 412 "The requested URL was not found on this server."

ErrorDocument 413 "The requested URL was not found on this server."

ErrorDocument 414 "The requested URL was not found on this server."

ErrorDocument 415 "The requested URL was not found on this server."

ErrorDocument 500 "The requested URL was not found on this server."

# Configure Server Tokens

ServerTokens Prod

# Disable Server Signature

ServerSignature Off

# Disable Tracing

TraceEnable Off

# Maximum size of the request body.

LimitRequestBody 4000000

# Maximum number of request headers in a request.

LimitRequestFields 40

# Maximum size of request header lines.

LimitRequestFieldSize 4000

# Maximum size of the request line.

LimitRequestLine 4000

MaxRequestsPerChild 10000

# Configure clickjacking protection

Header always append X-Frame-Options SAMEORIGIN - Remove the files below:
mv /etc/httpd/conf.d/autoindex.conf /etc/httpd/conf.d/autoindex.conf.bak

mv /etc/httpd/conf.d/userdir.conf /etc/httpd/conf.d/userdir.conf.bak - Comment out the lines inside the /etc/httpd/conf.modules.d/00-base.conf file below to disable default modules:
LoadModule status_module modules/mod_status.so

LoadModule info_module modules/mod_info.so

LoadModule autoindex_module modules/mod_autoindex.so

LoadModule include_module modules/mod_include.so

LoadModule userdir_module modules/mod_userdir.so

LoadModule env_module modules/mod_env.so

LoadModule negotiation_module modules/mod_negotiation.so

LoadModule actions_module modules/mod_actions.so - Comment out the lines inside the /etc/httpd/conf.modules.d/01-cgi.conf file below to disable default modules:
LoadModule cgi_module modules/mod_cgi.so - Using VI, create configuration file for the first WordPress site called /etc/httpd/sites-available/websitea.com.conf with the following content:
<VirtualHost *:80>

ServerAdmin admin@websitea.com

ServerName www.websitea.com

ServerAlias websitea.com

DocumentRoot /www/WebSiteA

<Directory />

Options FollowSymLinks

AllowOverride None

</Directory>

<Directory /www/WebSiteA>

Options Indexes FollowSymLinks MultiViews

AllowOverride all

Require all granted

Order allow,deny

Allow from all

<LimitExcept GET POST>

deny from all

</limitexcept>

</Directory>

ErrorLog /www/WebSiteA/logs/error.log

CustomLog /www/WebSiteA/logs/access.log combined

</VirtualHost>
Note: Replace WebSiteA with the relevant name - Using VI, create configuration file for the first WordPress site called /etc/httpd/sites-available/websiteb.com.conf with the following content:
<VirtualHost *:80>

ServerAdmin admin@websiteb.com

ServerName www.websiteb.com

ServerAlias websiteb.com

DocumentRoot /www/WebSiteB

<Directory />

Options FollowSymLinks

AllowOverride None

</Directory>

<Directory /www/WebSiteB>

Options Indexes FollowSymLinks MultiViews

AllowOverride all

Require all granted

Order allow,deny

Allow from all

<LimitExcept GET POST>

deny from all

</limitexcept>

</Directory>

ErrorLog /www/WebSiteB/logs/error.log

CustomLog /www/WebSiteB/logs/access.log combined

</VirtualHost>
Note: Replace WebSiteB with the relevant name - Run the commands below to enable the new virtual host files:
ln -s /etc/httpd/sites-available/websitea.com.conf /etc/httpd/sites-enabled/websitea.com.conf

ln -s /etc/httpd/sites-available/websiteb.com.conf /etc/httpd/sites-enabled/websiteb.com.conf
Note 1: Replace WebSiteA with the relevant name
Note 2: Replace WebSiteB with the relevant name - Run the command below to configure Apache to load at startup:
systemctl enable httpd - To start the Apace service, run the command below:
systemctl start httpd - Run the commands below to enable HTTPD rule on the firewall:
firewall-cmd --zone=public --add-service=http --permanent

systemctl restart firewalld
- MariaDB installation phase
- Login using privileged account
- Install MariaDB:
yum install -y mariadb-server mariadb-client - Enable the MariaDB service:
systemctl enable mariadb.service - Start the MariaDB service:
systemctl start mariadb.service - Run the command bellow to set ownership and permissions for /etc/my.cnf file:
chown root /etc/my.cnf

chmod 644 /etc/my.cnf - Edit using VI, the file /etc/my.cnf and add the string bellow under the [mysqld] section
bind-address = 127.0.0.1 - Run the command below to secure the MySQL:
mysql_secure_installation - Specify the MySQL root account password (leave blank) -> Press Y to set the Root password -> specify new complex password (at least 14 characters, upper case, lower case, number, special characters) and document it -> Press Y to remove anonymous users -> Press Y to disallow root login remotely -> Press Y to remove test database -> Press Y to reload privilege tables and exit the script.
- Restart the MariaDB service:
systemctl restart mariadb.service
- PHP 7.3 installation phase
- Login using privileged account
- Run the commands below to install PHP 7.3:
yum install http://rpms.remirepo.net/enterprise/remi-release-7.rpm -y

yum-config-manager --enable remi-php73

yum install php php-mcrypt php-cli php-gd php-curl php-mysql php-ldap php-zip php-fileinfo -y - Change the permissions on the php.ini file:
chmod 640 /etc/php.ini - Edit using VI, the file /etc/php.ini
From:
mysqli.default_host =To:
mysqli.default_host = 127.0.0.1:3306From:
allow_url_fopen = OnTo:
allow_url_fopen = Off
From:
expose_php = On
To:
expose_php = Off
From:
memory_limit = 128M
To:
memory_limit = 8M
From:
post_max_size = 8M
To:
post_max_size = 2M
From:
upload_max_filesize = 2M
To:
upload_max_filesize = 1M
From:
disable_functions =
To:
disable_functions = fpassthru,crack_check,crack_closedict,crack_getlastmessage,crack_opendict, psockopen,php_ini_scanned_files,shell_exec,chown,hell-exec,dl,ctrl_dir,phpini,tmp,safe_mode,systemroot,server_software, get_current_user,HTTP_HOST,ini_restore,popen,pclose,exec,suExec,passthru,proc_open,proc_nice,proc_terminate, proc_get_status,proc_close,pfsockopen,leak,apache_child_terminate,posix_kill,posix_mkfifo,posix_setpgid, posix_setsid,posix_setuid,escapeshellcmd,escapeshellarg,posix_ctermid,posix_getcwd,posix_getegid,posix_geteuid,posix_getgid,posix_getgrgid, posix_getgrnam,posix_getgroups,posix_getlogin,posix_getpgid,posix_getpgrp,posix_getpid, posix_getppid,posix_getpwnam,posix_getpwuid,posix_getrlimit,system,posix_getsid,posix_getuid,posix_isatty, posix_setegid,posix_seteuid,posix_setgid,posix_times,posix_ttyname,posix_uname,posix_access,posix_get_last_error,posix_mknod, posix_strerror,posix_initgroups,posix_setsidposix_setuid
systemctl restart httpd.service- Login using privileged account.
- Run the command bellow to login to the MariaDB:
/usr/bin/mysql -uroot -p
Note: When prompted, specify the password for the MariaDB root account. - Run the following commands from the MariaDB prompt:
CREATE USER 'blgusr'@'localhost' IDENTIFIED BY 'A3fg1j7x!s2gEq';

CREATE USER 'hswjm'@'localhost' IDENTIFIED BY 'hj5fa1fnu@zw0p';

CREATE DATABASE m6gf42s;

CREATE DATABASE b7mf3aq;

GRANT ALL PRIVILEGES ON m6gf42s.* TO "blgusr"@"localhost" IDENTIFIED BY "A3fg1j7x!s2gEq";

GRANT ALL PRIVILEGES ON b7mf3aq.* TO "hswjm"@"localhost" IDENTIFIED BY "hj5fa1fnu@zw0p";

FLUSH PRIVILEGES;

quit
Note 1: Replace “blgusr” with a username to access first the database.
Note 2: Replace “A3fg1j7x!s2gEq” with complex password for the account who will access the first database (at least 14 characters, upper case, lower case, number, special characters).
Note 3: Replace “hswjm” with a username to access second the database.
Note 4: Replace “hj5fa1fnu@zw0p” with complex password for the account who will access the second database (at least 14 characters, upper case, lower case, number, special characters).
Note 5: Replace “m6gf42s” with the first WordPress database name.
Note 6: Replace “b7mf3aq” with the second WordPress database name. - Run the commands below to download the latest build of WordPress:
cd /usr/local/src

wget https://wordpress.org/latest.zip

unzip latest.zip -d /www/WebSiteA

unzip latest.zip -d /www/WebSiteB
Note 1: Replace WebSiteA with the relevant name
Note 2: Replace WebSiteB with the relevant name - Fix the SELinux security context on the new web folder for the first WordPress site:
semanage fcontext -a -t httpd_sys_content_t "/www/WebSiteA(/.*)?"

restorecon -F -R -v /www/WebSiteA

chcon -R -t httpd_sys_content_t /www/WebSiteA

semanage fcontext -a -t httpd_sys_rw_content_t "/www/WebSiteA/wp-content(/.*)?"

restorecon -F -R -v /www/WebSiteA/wp-content

chcon -R -t httpd_sys_rw_content_t /www/WebSiteA/wp-content
Note: Replace WebSiteA with the relevant name - Fix the SELinux security context on the new web folder for the second WordPress site:
semanage fcontext -a -t httpd_sys_content_t "/www/WebSiteB(/.*)?"

restorecon -F -R -v /www/WebSiteB

chcon -R -t httpd_sys_content_t /www/WebSiteB

semanage fcontext -a -t httpd_sys_rw_content_t "/www/WebSiteB/wp-content(/.*)?"

restorecon -F -R -v /www/WebSiteB/wp-content

chcon -R -t httpd_sys_rw_content_t /www/WebSiteB/wp-content
Note: Replace WebSiteB with the relevant name - Create using VI the file /www/WebSiteA/config.php with the following content:
<?php

define('DB_NAME', 'm6gf42s');

define('DB_USER', 'blgusr');

define('DB_PASSWORD', 'A3fg1j7x!s2gEq');

define('DB_HOST', 'localhost');

$table_prefix  = 'm6gf42s_';

define('AUTH_KEY', 'put your unique phrase here');

define('SECURE_AUTH_KEY', 'put your unique phrase here');

define('LOGGED_IN_KEY', 'put your unique phrase here');

define('NONCE_KEY', 'put your unique phrase here');

define('AUTH_SALT',        'put your unique phrase here');

define('SECURE_AUTH_SALT', 'put your unique phrase here');

define('LOGGED_IN_SALT',   'put your unique phrase here');

define('NONCE_SALT',       'put your unique phrase here');

define('FS_METHOD', 'direct');

?>
Note 1: Make sure there are no spaces, newlines, or other strings before an opening ‘< ?php’ tag or after a closing ‘?>’ tag.
Note 2: Replace “blgusr” with MariaDB account to access the first database.
Note 3: Replace “A3fg1j7x!s2gEq” with complex password (at least 14 characters).
Note 4: Replace “m6gf42s” with the first WordPress database name.
Note 5: In-order to generate random values for the AUTH_KEY, SECURE_AUTH_KEY, LOGGED_IN_KEY and NONCE_KEY, use the web site bellow:
http://api.wordpress.org/secret-key/1.1/ - Create using VI the file /www/WebSiteB/config.php with the following content:
<?php

define('DB_NAME', 'b7mf3aq');

define('DB_USER', 'hswjm');

define('DB_PASSWORD', 'hj5fa1fnu@zw0p');

define('DB_HOST', 'localhost');

$table_prefix  = 'b7mf3aq_';

define('AUTH_KEY', 'put your unique phrase here');

define('SECURE_AUTH_KEY', 'put your unique phrase here');

define('LOGGED_IN_KEY', 'put your unique phrase here');

define('NONCE_KEY', 'put your unique phrase here');

define('AUTH_SALT',        'put your unique phrase here');

define('SECURE_AUTH_SALT', 'put your unique phrase here');

define('LOGGED_IN_SALT',   'put your unique phrase here');

define('NONCE_SALT',       'put your unique phrase here');

define('FS_METHOD', 'direct');

?>
Note 1: Make sure there are no spaces, newlines, or other strings before an opening ‘< ?php’ tag or after a closing ‘?>’ tag.
Note 2: Replace “hswjm” with MariaDB account to access the second database.
Note 3: Replace “hj5fa1fnu@zw0p” with complex password (at least 14 characters).
Note 4: Replace “b7mf3aq” with the second WordPress database name.
Note 5: In-order to generate random values for the AUTH_KEY, SECURE_AUTH_KEY, LOGGED_IN_KEY and NONCE_KEY, use the web site bellow:
http://api.wordpress.org/secret-key/1.1/ - Copy the wp-config.php file:
cp /www/WebSiteA/wordpress/wp-config-sample.php /www/WebSiteA/wordpress/wp-config.php

cp /www/WebSiteB/wordpress/wp-config-sample.php /www/WebSiteB/wordpress/wp-config.php
Note 1: Replace WebSiteA with the relevant name
Note 2: Replace WebSiteB with the relevant name - Edit using VI, the file /www/WebSiteA/wordpress/wp-config.php
Add the following lines before the string “That’s all, stop editing! Happy blogging”:
/* Multisite */

define('WP_ALLOW_MULTISITE', true);

include('/www/WebSiteA/config.php');
Remove or comment the following sections:
define('DB_NAME', 'putyourdbnamehere');

define('DB_USER', 'usernamehere');

define('DB_PASSWORD', 'yourpasswordhere');

define('DB_HOST', 'localhost');

$table_prefix  = 'wp_';

define('AUTH_KEY', 'put your unique phrase here');

define('SECURE_AUTH_KEY', 'put your unique phrase here');

define('LOGGED_IN_KEY', 'put your unique phrase here');

define('NONCE_KEY', 'put your unique phrase here');

define('AUTH_SALT',        'put your unique phrase here');

define('SECURE_AUTH_SALT', 'put your unique phrase here');

define('LOGGED_IN_SALT',   'put your unique phrase here');

define('NONCE_SALT',       'put your unique phrase here');
Note: Replace WebSiteA with the relevant name - Edit using VI, the file /www/WebSiteB/wordpress/wp-config.php
Add the following lines before the string “That’s all, stop editing! Happy blogging”:
/* Multisite */

define('WP_ALLOW_MULTISITE', true);

include('/www/WebSiteB/config.php');
Remove or comment the following sections:
define('DB_NAME', 'putyourdbnamehere');

define('DB_USER', 'usernamehere');

define('DB_PASSWORD', 'yourpasswordhere');

define('DB_HOST', 'localhost');

$table_prefix  = 'wp_';

define('AUTH_KEY', 'put your unique phrase here');

define('SECURE_AUTH_KEY', 'put your unique phrase here');

define('LOGGED_IN_KEY', 'put your unique phrase here');

define('NONCE_KEY', 'put your unique phrase here');

define('AUTH_SALT',        'put your unique phrase here');

define('SECURE_AUTH_SALT', 'put your unique phrase here');

define('LOGGED_IN_SALT',   'put your unique phrase here');

define('NONCE_SALT',       'put your unique phrase here');
Note: Replace WebSiteB with the relevant name - Create using VI the file /www/WebSiteA/wordpress/.htaccess and add the following content:
# BEGIN WordPress

<IfModule mod_rewrite.c>

RewriteEngine On

RewriteBase /

RewriteRule ^index\.php$ - [L]

RewriteCond %{REQUEST_FILENAME} !-f

RewriteCond %{REQUEST_FILENAME} !-d

RewriteRule . /index.php [L]

</IfModule>

# END WordPress

Header set X-XSS-Protection "1; mode=block"

Header set X-Content-Type-Options nosniff

Header set Content-Security-Policy "default-src 'self' 'unsafe-inline' 'unsafe-eval' https: data:"
Note: Replace WebSiteA with the relevant name - Create using VI the file /www/WebSiteA/wordpress/wp-content/.htaccess and add the following content:
# BEGIN WordPress

<IfModule mod_rewrite.c>

RewriteEngine On

RewriteBase /

RewriteRule ^index\.php$ - [L]

RewriteCond %{REQUEST_FILENAME} !-f

RewriteCond %{REQUEST_FILENAME} !-d

RewriteRule . /index.php [L]

</IfModule>

# END WordPress
Note: Replace WebSiteA with the relevant name - Create using VI the file /www/WebSiteA/wordpress/wp-includes/.htaccess and add the following content:
# BEGIN WordPress

<IfModule mod_rewrite.c>

RewriteEngine On

RewriteBase /

RewriteRule ^index\.php$ - [L]

RewriteCond %{REQUEST_FILENAME} !-f

RewriteCond %{REQUEST_FILENAME} !-d

RewriteRule . /index.php [L]

</IfModule>

# END WordPress
Note: Replace WebSiteA with the relevant name - Set ownership and permissions on the .htaccess files below:
chown apache:apache /www/WebSiteA/wordpress/.htaccess

chown apache:apache /www/WebSiteA/wordpress/wp-content/.htaccess

chown apache:apache /www/WebSiteA/wordpress/wp-includes/.htaccess

chmod 644 /www/WebSiteA/wordpress/.htaccess

chmod 644 /www/WebSiteA/wordpress/wp-content/.htaccess

chmod 644 /www/WebSiteA/wordpress/wp-includes/.htaccess
Note: Replace WebSiteA with the relevant name - Create using VI the file /www/WebSiteB/wordpress/.htaccess and add the following content:
# BEGIN WordPress

<IfModule mod_rewrite.c>

RewriteEngine On

RewriteBase /

RewriteRule ^index\.php$ - [L]

RewriteCond %{REQUEST_FILENAME} !-f

RewriteCond %{REQUEST_FILENAME} !-d

RewriteRule . /index.php [L]

</IfModule>

# END WordPress

Header set X-XSS-Protection "1; mode=block"

Header set X-Content-Type-Options nosniff

Header set Content-Security-Policy "default-src 'self' 'unsafe-inline' 'unsafe-eval' https: data:"
Note: Replace WebSiteB with the relevant name - Create using VI the file /www/WebSiteB/wordpress/wp-content/.htaccess and add the following content:
# BEGIN WordPress

<IfModule mod_rewrite.c>

RewriteEngine On

RewriteBase /

RewriteRule ^index\.php$ - [L]

RewriteCond %{REQUEST_FILENAME} !-f

RewriteCond %{REQUEST_FILENAME} !-d

RewriteRule . /index.php [L]

</IfModule>

# END WordPress
Note: Replace WebSiteB with the relevant name - Create using VI the file /www/WebSiteB/wordpress/wp-includes/.htaccess and add the following content:
# BEGIN WordPress

<IfModule mod_rewrite.c>

RewriteEngine On

RewriteBase /

RewriteRule ^index\.php$ - [L]

RewriteCond %{REQUEST_FILENAME} !-f

RewriteCond %{REQUEST_FILENAME} !-d

RewriteRule . /index.php [L]

</IfModule>

# END WordPress
Note: Replace WebSiteB with the relevant name - Set ownership and permissions on the .htaccess files below:
chown apache:apache /www/WebSiteB/wordpress/.htaccess

chown apache:apache /www/WebSiteB/wordpress/wp-content/.htaccess

chown apache:apache /www/WebSiteB/wordpress/wp-includes/.htaccess

chmod 644 /www/WebSiteB/wordpress/.htaccess

chmod 644 /www/WebSiteB/wordpress/wp-content/.htaccess

chmod 644 /www/WebSiteB/wordpress/wp-includes/.htaccess
Note: Replace WebSiteB with the relevant name - Remove default content from the first WordPress site:
rm -f /www/WebSiteA/wordpress/license.txt

rm -f /www/WebSiteA/wordpress/readme.html

rm -f /www/WebSiteA/wordpress/wp-config-sample.php

rm -f /www/WebSiteA/wordpress/wp-content/plugins/hello.php - Remove default content from the second WordPress site:
rm -f /www/WebSiteB/wordpress/license.txt

rm -f /www/WebSiteB/wordpress/readme.html

rm -f /www/WebSiteB/wordpress/wp-config-sample.php

rm -f /www/WebSiteB/wordpress/wp-content/plugins/hello.php - Edit using VI the file /etc/httpd/sites-available/websitea.com.conf
Replace the value of the string, from:
DocumentRoot /www/WebSiteA
To:
DocumentRoot /www/WebSiteA/wordpress
Replace the value of the string, from:
<Directory /www/WebSiteA>
To:
<Directory /www/WebSiteA/wordpress>
Note: Replace WebSiteA with the relevant name - Edit using VI the file /etc/httpd/sites-available/websiteb.com.conf
Replace the value of the string, from:
DocumentRoot /www/WebSiteB
To:
DocumentRoot /www/WebSiteB/wordpress
Replace the value of the string, from:
<Directory /www/WebSiteB>
To:
<Directory /www/WebSiteB/wordpress>
Note: Replace WebSiteB with the relevant name - Restart the Apache service:
systemctl restart httpd.service - Open a web browser from a client machine, and enter the URL bellow:
http://Server_FQDN/wp-admin/install.php
Note: Replace Server_FQDN with the relevant DNS name - Select language and click Continue
- Specify the following information:
- Site Title
- Username – replace the default “admin”
- Password
- E-mail
- Click on “Install WordPress” button, and close the web browser.
- Change ownership and permissions on the files and folders below:
chown -R apache:apache /www/WebSiteA/wordpress

find /www/WebSiteA/wordpress/ -type d -exec chmod -R 755 {} \;

find /www/WebSiteA/wordpress/ -type f -exec chmod -R 644 {} \;

chmod 400 /www/WebSiteA/wordpress/wp-config.php

chown apache:apache /www/WebSiteA/config.php

chmod 644 /www/WebSiteA/config.php
Note: Replace WebSiteA with the relevant name - Change ownership and permissions on the files and folders below:
chown -R apache:apache /www/WebSiteB/wordpress

find /www/WebSiteB/wordpress/ -type d -exec chmod -R 755 {} \;

find /www/WebSiteB/wordpress/ -type f -exec chmod -R 644 {} \;

chmod 400 /www/WebSiteB/wordpress/wp-config.php

chown apache:apache /www/WebSiteB/config.php

chmod 644 /www/WebSiteB/config.php
Note: Replace WebSiteB with the relevant name - Download “WordPress Firewall” plugin from:
http://www.seoegghead.com/software/wordpress-firewall.seo - Copy the “WordPress Firewall” plugin file “wordpress-firewall.php” using PSCP (or SCP) into /www/WebSiteA/wordpress/wp-content/plugins
Note: Replace WebSiteA with the relevant name - Copy the “WordPress Firewall” plugin file “wordpress-firewall.php” using PSCP (or SCP) into /www/WebSiteB/wordpress/wp-content/plugins
- Open a web browser from a client machine, and enter the URL bellow:
http://Server_FQDN/wp-login.php
Note: Replace Server_FQDN with the relevant DNS name - From WordPress dashboard, click on “settings” -> make sure that “Anyone can register” is left unchecked -> put a new value inside the “Tagline” field -> click on “Save changes”.
- From the left pane, click on Plugins -> Add New -> search, install and activate the following plugins:
- Acunetix WP Security
- Antispam Bee
- WP Limit Login Attempts
- Login LockDown
- WP Security Audit Log
- From the list of installed plugins, locate and activate the Firewall plugin
- From the upper pane, click on “Log Out”.
- Delete the file /wp-admin/install.php
- WordPress 5.x installation phase
- SSL Configuration Phase
- Login using privileged account
- To add support for SSL certificates, run the command below:
yum install mod_ssl -y - Run the command below to change the permissions on the certificates folder:
chmod 700 /etc/pki/CA/private - Run the command bellow to generate a key pair for the first WordPress site:
openssl genrsa -des3 -out /etc/pki/CA/private/websitea-server.key 2048
Note 1: Specify a complex pass phrase for the private key (and document it)
Note 2: Replace websitea with the relevant name - Run the command bellow to generate a key pair for the second WordPress site:
openssl genrsa -des3 -out /etc/pki/CA/private/websiteb-server.key 2048
Note 1: Specify a complex pass phrase for the private key (and document it)
Note 2: Replace websiteb with the relevant name - Run the command bellow to generate the CSR for the first WordPress site:
openssl req -new -newkey rsa:2048 -nodes -sha256 -keyout /etc/pki/CA/private/websitea-server.key -out /tmp/websitea-apache.csr
Note 1: The command above should be written as one line.
Note 2: Replace websitea with the relevant name - Run the command bellow to generate the CSR for the second WordPress site:
openssl req -new -newkey rsa:2048 -nodes -sha256 -keyout /etc/pki/CA/private/websiteb-server.key -out /tmp/websiteb-apache.csr
Note 1: The command above should be written as one line.
Note 2: Replace websiteb with the relevant name - Edit using VI the file /etc/httpd/sites-available/websitea.com.conf and add the following:
<VirtualHost *:443>

ServerAdmin admin@websitea.com

ServerName www.websitea.com

ServerAlias websitea.com

DocumentRoot /www/WebSiteA/wordpress

<Directory />

Options FollowSymLinks

AllowOverride None

</Directory>

<Directory /www/WebSiteA/wordpress>

Options Indexes FollowSymLinks MultiViews

AllowOverride all

Require all granted

Order allow,deny

Allow from all

<LimitExcept GET POST>

deny from all

</limitexcept>

</Directory>

SSLCertificateFile /etc/ssl/certs/websitea.crt

SSLCertificateKeyFile /etc/pki/CA/private/websitea-server.key

SSLCipherSuite EECDH+ECDSA+AESGCM:EECDH+aRSA+AESGCM:EECDH+ECDSA+SHA384:EECDH+ECDSA+SHA256:EECDH+aRSA+SHA384:EECDH+aRSA+SHA256:ECDHE-ECDSA-AES256-SHA:ECDHE-RSA-AES128-SHA256:AES128-GCM-SHA256:ECDH+AESGCM:DH+AESGCM:ECDH+AES256:DH+AES256:DH+AES:ECDH+3DES:DH+3DES:RSA+AES:RSA+3DES:!ADH:!AECDH:!MD5:!DSS:!aNULL:!EDH:!eNULL:!LOW:!3DES:!MD5:!EXP:!PSK:!SRP:!DSS

SSLHonorCipherOrder On

# Disable SSLv2 and SSLv3

SSLProtocol ALL -SSLv2 –SSLv3 +TLSv1 +TLSv1.1 +TLSv1.2

# Disable SSL Compression

SSLCompression Off

SSLEngine on

ErrorLog /www/WebSiteA/logs/ssl_error.log

CustomLog /www/WebSiteA/logs/ssl_access.log combined

</VirtualHost>
Note: Replace WebSiteA with the relevant name - Edit using VI the file /etc/httpd/sites-available/websiteb.com.conf and add the following:
<VirtualHost *:443>

ServerAdmin admin@websiteb.com

ServerName www.websiteb.com

ServerAlias websiteb.com

DocumentRoot /www/WebSiteB/wordpress

<Directory />

Options FollowSymLinks

AllowOverride None

</Directory>

<Directory /www/WebSiteB/wordpress>

Options Indexes FollowSymLinks MultiViews

AllowOverride all

Require all granted

Order allow,deny

Allow from all

<LimitExcept GET POST>

deny from all

</limitexcept>

</Directory>

SSLCertificateFile /etc/ssl/certs/websiteb.crt

SSLCertificateKeyFile /etc/pki/CA/private/websiteb-server.key

SSLCipherSuite EECDH+ECDSA+AESGCM:EECDH+aRSA+AESGCM:EECDH+ECDSA+SHA384:EECDH+ECDSA+SHA256:EECDH+aRSA+SHA384:EECDH+aRSA+SHA256:ECDHE-ECDSA-AES256-SHA:ECDHE-RSA-AES128-SHA256:AES128-GCM-SHA256:ECDH+AESGCM:DH+AESGCM:ECDH+AES256:DH+AES256:DH+AES:ECDH+3DES:DH+3DES:RSA+AES:RSA+3DES:!ADH:!AECDH:!MD5:!DSS:!aNULL:!EDH:!eNULL:!LOW:!3DES:!MD5:!EXP:!PSK:!SRP:!DSS

SSLHonorCipherOrder On

# Disable SSLv2 and SSLv3

SSLProtocol ALL -SSLv2 –SSLv3 +TLSv1 +TLSv1.1 +TLSv1.2

# Disable SSL Compression

SSLCompression Off

SSLEngine on

ErrorLog /www/WebSiteB/logs/ssl_error.log

CustomLog /www/WebSiteB/logs/ssl_access.log combined

</VirtualHost>
Note: Replace WebSiteB with the relevant name - Edit using VI the file /etc/httpd/conf.d/ssl.conf and comment the following commands:
<VirtualHost _default_:443>

ErrorLog logs/ssl_error_log

TransferLog logs/ssl_access_log

LogLevel warn

SSLEngine on

SSLProtocol all -SSLv2 -SSLv3

SSLCipherSuite HIGH:3DES:!aNULL:!MD5:!SEED:!IDEA

SSLCertificateFile

SSLCertificateKeyFile - Restart the Apace service, run the command below:
systemctl restart httpd - Run the commands below to enable HTTPD rule on the firewall:
firewall-cmd --zone=public --add-service=https --permanent

systemctl restart firewalld - Run the command below to change the permissions on the certificates folder:
chmod 600 /etc/pki/CA/private - In-case the server was configured with SSL certificate, add the following line to the /www/WebSiteA/config.php file:
define('FORCE_SSL_LOGIN', true);
Note: Replace WebSiteA with the relevant name - In-case the server was configured with SSL certificate, add the following line to the /www/WebSiteB/config.php file:
define('FORCE_SSL_LOGIN', true);
Note: Replace WebSiteB with the relevant name
- WordPress upgrade process
- Run the commands below to change the SELinux permissions:
semanage fcontext -a -t httpd_sys_rw_content_t "/www/WebSiteA/wordpress(/.*)?"

restorecon -F -R -v /www/WebSiteA/wordpress

chcon -R -t httpd_sys_rw_content_t /www/WebSiteA/wordpress
Note: Replace WebSiteA with the relevant name - Login to the WordPress admin portal:
http://Server_FQDN/wp-login.php
Note: Replace Server_FQDN with the relevant DNS name - When prompted, select to upgrade the WordPress
- Once the upgrade process completes successfully, log off the WordPress admin portal
- Run the commands below to change the SELinux permissions:
semanage fcontext -a -t httpd_sys_content_t "/www/WebSiteA/wordpress(/.*)?"

restorecon -F -R -v /www/WebSiteA/wordpress

chcon -R -t httpd_sys_content_t /www/WebSiteA/wordpress

semanage fcontext -a -t httpd_sys_rw_content_t "/www/WebSiteA/wordpress/wp-content(/.*)?"

restorecon -F -R -v /www/WebSiteA/wordpress/wp-content

chcon -R -t httpd_sys_rw_content_t /www/WebSiteA/wordpress/wp-content
Note: Replace WebSiteA with the relevant name - Logoff the SSH console
- Check your site on the following test sites
-
- https://www.ssllabs.com/ssltest/
-
- https://dnsflagday.net/
-
- https://securityheaders.com/
-
- https://search.google.com/test/mobile-friendly
Why should SMBs deploy Software Defined Backup Solutions
You might be thinking, shouldn’t the question be: Why should SMBs (Small to Medium-sized Businesses) deploy backup solutions at all? Well, we’re going with the assumption that you’ve already accepted that backup solutions; whether cloud based backups or on-premises backup appliances, are very important for SMBs. If you’re still dubious about the significance of data backup solutions for SMBs, then allow me to shed some brief light on the subject before venturing onto the main topic.
Why should SMBs deploy backup solutions
If you Google “data loss cost implications for SMBs”, you’ll find a ton of statistics how costly they can be. One such statistic, for your reference, is a report by National Archives and Records Administration in Washington. This report states that 93% of businesses that lost their data for 10 days or more filed for bankruptcy within 1 year and 50% filed for bankruptcy immediately. That’s how devastating data loss can be and that’s exactly the reason why SMBs need to deploy backup solutions.
With that established, let’s move to the main point of interest here: Why should SMBs focus on Software Defined Backup Solutions and not physical infrastructures or backup appliances.
Software Defined Backup Solutions – Simpler, Easier, Less Costly and Reliable
I think software defined backup solutions are the best choice for SMBs. Backup appliances, verily, have their own perks. However, from an SMBs perspective, it’s better to look away from them.
Why do I say that software based backup is the best option for SMBs? Here are some of my reasons:
Software based Backups are Simpler and deliver faster deployment
Consider the process of acquisition for a backup appliance. You have to order it, wait for it to be delivered. Once it gets to you, you have to follow a detailed manual that describes how it will be setup. After you make your way through all of that, the appliance is setup. As it starts working, it begins to consume resources like cooling, power, maintenance etc. You have to make sure there’s a professional keeping an eye on it and that it’s safe from physical harm as well. A backup appliance can be quite delicate as well. If someone accidentally ends up touching it the wrong way and it suddenly ends up on the ground, the impact will be on your pocket.
Suffice to say, backup appliances take quite a bit of time to acquire and deploy. Backup appliances maybe essential for large enterprises but SMBs can work it out with software defined backup solutions instead.
To setup a software defined backup solution, you just have to go through a series of purchase procedures; that are far simpler and less time consuming compared to the acquisition of physical backup appliances. Once you’re done with those and you conclude the payment procedure, you can be up and running within a matter of an hour or two. It’s easier, it’s simpler and it’s a lot faster. Milestones are easily achieved with each click.
Software based Backup solutions are Cost Effectiveness
As an SMB, cost is a major thing to consider in all matters. Software Defined Backup solutions are very economical. Compared to the initial cost of backup appliances, software defined backup solutions cost a lot less.
As mentioned earlier, backup appliances incur quite a few dynamic costs. Software defined backup solutions do not incur such costs. You can begin from the storage capacity that you immediately need and then you can increase as you go. Payment models like pay-as-you-go make the cost attribute of software defined backup solutions a lot more appealing.
Unlike backup appliances that incur dynamic costs like maintenance or power or cooling; software backup solutions do not incur such costs.
Software Based Backup Solutions offer Enhanced Data Security
Let’s say the backup appliance is accidentally damaged or it experiences hardware failure, all of the data within the appliance may never recover. If the appliance goes down, all the backed up data goes down with it. How difficult are accidents at a workplace? Something as simple as spilling your coffee is sometimes what it takes to initiate a disaster.
However, you don’t have to worry about such things with a software defined backup solution that keeps all your backed up data in the cloud. With cloud backups,the data security of your backed up data is in the hands of the cloud service provider. These three are only the gist of my reasons why businesses should setup software defined backup solutions that facilitate simplified backup to the cloud. By effectively leveraging cloud technology, SMBs can ensure that their data is well protected and recoverable.
This article is written by George Williams. George is a Senior Technical Content Marketer at StoneFly Inc.
Why Millennials Are Blasé About Privacy

Millennials don’t seem to care that Facebook and other companies harvest their data for profit. At least that’s the premise of a recent opinion piece in the New York Post. It suggests that millennials are consigned to the fact that, in order to have the many advantages that the new tech world provides, there has to be a sacrifice. If you are a millennial, I would be interested in your reaction to this premise and others which follow.
Millennials seem more comfortable with the notion that if a product is free then you are the product, and allow themselves to be an ’’open book” for all to see. As it will be revealed later, the opinion piece opines that this is not true of previous generations who appear to be more guarded with their privacy. Of course, previous generations had fewer threats to their privacy to go along with markedly less availability to information, entertainment, and communication (just to name a few).
So it is not necessarily fair to single out the millennials as if they were some alien outliers. Although, like aliens, they come from and live in different worlds to their predecessors. I mean, book burning was non-existent before Guttenberg’s printing press printed books, and there wasn’t a need for fallout shelters until the world went nuclear. In fact, you could make a case that the dangerous, crazy world that was passed on to millennials, and that they now inherit, may make the exposure of their personal information to the public seem tame by comparison. Not to mention that heavy engagement with social media and the like is a needed distraction from modern life!
Besides, no one would have guessed some fifteen years ago that Mark Zuckerberg’s dorm room doodle would morph into the behemoth of a business model it is today – replete with its invasive algorithms. Who could have imagined that social media companies could learn our political leanings, our likes and dislikes, our religious affiliations, and our sexual orientations and proclivities? If I, or some other legal or law enforcement entity want to retrace my activities on a given day – that is easily and readily accessible from my smartphone.
As millennials blithely rollover to the tech gods when it comes to filleting themselves publicly, the article takes them (and others) to task for handwringing and breathlessly expressing surprise and outrage at Cambridge Analytica for just working with the leeway given to them. Of course, if the company had helped Hillary Clinton win the Whitehouse instead of purportedly boosting the prospects of the odious ogre, Trump, there likely wouldn’t have been the same angst – or so the piece posits.
Be that as it may, the question must be asked: what did Cambridge Analytica do that countless other companies haven’t done? I mean, why should it be treated any differently by Facebook because it’s a political firm and not an avaricious advertising scavenger? The other Silicon Valley savants – Google, Apple, and Microsoft – all monetize your information. They are eager to invite advertisers, researchers, and government agencies to discover your treasure trove of personal information through them.
And millennials, as well as those of other generations, are only too willing, it seems, to provide such information- and in massive amounts. Indeed, they seem to relish, in a race to the bottom, who can post the most content, photos, and the like. They seem to be ambivalent about the inevitable fallout. “So what?” they say, “I’ve got nothing to hide.”
The article questions if those of previous generations would be so forthcoming, citing the so-called Greatest Generation eschewing the telephone if it meant that the government could eavesdrop on their conversations with impunity. On the contrary, millennials, it would appear, view the lack of privacy and the co-opting of personal information as the price for the plethora of pleasures that the digital medium supplies.
As Wired magazine founder Kevin Kelly said in his 2016 book, The Inevitable: Understanding the 12 Technological Forces That Will Shape Our Future:
“If today’s social media has taught us anything about ourselves as a species, it is that the human impulse to share overwhelms the human impulse for privacy.“
What do you think? Is it a fair assessment of the current state of affairs?
This article was originally published at BestVPN.com.
Your Internet Privacy Is at Risk, But You Can Salvage It All
In what has to be the most ironical turn of events, companies collectively pay cybersecurity experts billions of dollars every year so that they can keep their business safe and out of prying eyes. Once they have attained the level of security and privacy they want, they turn around to infringe upon the privacy of the people.
This has been the model many of them have been operating for a while now, and they don’t seem to be slowing down anytime soon. We would have said the government should fight against this, but not when they have a hand in the mud pie too.
In this piece, we discuss the various ways these organizations have been shredding your privacy to bits, what the future of internet privacy is shaping up to be and how to take back the control of your own data privacy.
How Your Internet Privacy Is Being Violated
A lot of the simple operations you perform with the internet every day means more to some data collectors than you know. In fact, it is what they are using to make decisions on what to offer you, what to hold back from you and so much more.
Going by the available technology, here are some of the frameworks that allow the collection and use of your information.
- Big data analytics: These are mapped to certain individuals/ demographics and used to predictive models for the future.
When you hear big data, what is being referred to is a large body of data which is meant for later analysis. Via a combination of efforts from man, bot and algorithms, the large amount of data is sifted through with the sole aim of finding patterns, trends, and behaviors.
- Internet of Things: Thus, you can access live video feeds of your home from anywhere in the world. You can even have your refrigerator tell you what supplies you are running low on.
What you don’t know is that as your IoT units collect this data, they are not just feeding it to you. In fact, they are sending back a lot more than you know to the companies that developed them.
Everyday things (such as your printer, refrigerator, light, AC unit and so much more) can now be connected to an internet connection. This enables them to work with one another with the sole aim of interoperability and remote access.
-
- Machine learning: These machines are then released into data sets to practice their newfound freedom.
Guess what they do? Mine for data from almost any source they can lay hands on, rigorously analyze the data and use that to diverse ends.
Machines were taught to do more than just be machines. Instead of being given a set of commands to run with, they have now been given specialized commands to aid their learning.
The significance of The Data Collections
All of the above might look like normal procedures for the achievement of the intended purposes that these technologies bring. However, they cause more harm than good.
On the one hand, the datasets are used to pigeonhole consumers by companies.
As of the time of this writing, machine learning data is already being used by some credit card companies to determine who they should allow a credit card and who they shouldn’t. It is even more ridiculous to think this decision is based off something as simple as what type of car accessory a customer would opt for.
As if that is not enough, machine learning is approaching a place where it would soon be able to diagnose diseases. That is not the scary part. This diagnosis will be based on social media data.
The companies don’t even need to see you physically before they know what diseases you might have. Talk about prodding into the most sensitive areas of your life that you might not even have shared with family and friends.
That, and we have not even talked about how marketers will chase you around with ads based on what you’ve searched, offer suggested content based on your patterns and prevent you from seeing out of the box across the board.
Putting an End to The Nonsense
You don’t have to put up with all these. Technology is meant to be enjoyed, so you shouldn’t be punished by being exploited.
One helpful tip is to layer all your connection over a VPN. These will help make you anonymous on the network, preventing data collectors and monitors from identifying your computer with your data stream.
Your IoT devices will also benefit from a VPN if you can share one over your router. This helps to make them more secure since they cannot us a VPN otherwise.
Private browser networks such as Tor will do you a lot of good when browsing the web. If you prefer conventional browsers, though, don’t forget to install an ad blocker before you go online again. They help prevent marketers and companies from tracking you all around the web after looking at some content.
Don’t forget to switch from Google to other search engines that leave your data to you. DuckDuckGo and Qwant are some of the options on this list.
Combine all of that, and you have your shot back at decency and privacy on the internet.
Cloud Services – Evolution and Future Trends
Cloud services are no longer a buzz, they are existing fact. Small and large organizations are leading the revolution in the IT industry for almost a decade, some migrating small environments and conducting experiments while others deploying their entire production environments using this model.
It is commonly used to consider cloud services as a continue of the data center environment and in fact this is where the concept evolved, and yet, the differences between the traditional computing services, server farms, storage and even virtualization are fundamentally different from a true cloud. Let’s evaluate the differences:
In the past we used to call “cloud”, for any compute services containing the following characteristics as defined by NIST:
- On-Demand Self-Service
- Broad Network Access
- Resource Pooling
- Rapid Elasticity
- Measured service
When looking deeper into the various cloud service models such as IaaS (Infrastructure as a Service), PaaS (Platform as a Service) and SaaS (Software as a Service), we find that things are not always black or white: In some cases we come across services that we know for fact they are cloud services, we can’t always say these services include all the above characteristics.
A good example: File sharing services such as Dropbox. As a private customer we are not exposed to data that will enable us to measure the service (in terms of performance or in terms of billing vs storage capacity cost).
In case we choose to deploy a “private cloud” inside our organizational data center, based on infrastructure such as VMWARE, OpenStack or alike, we expect all the above characteristics in our on premise as well.
Let’s differentiate between cloud and hosting service
In the current IT industry there are many companies offering compute services, on the range between cloud services and hosting services.
Hosting companies (or managed services), usually offers the customer the following capabilities:
- Compute environments – Such as physical servers (in case of special hardware requirements), virtual servers, storage and network equipment (Routers, Firewalls, VPN Gateway, etc.)
- Managed services – Such as web hosting for marketing or commercial web sites, email services, file sharing services and organizational systems such as CRM as a service.
- Backup and DR as a service.
- Managed support/IT services.
Hosting companies might offer the customer a capability to increase the number of servers and in some cases even to choose servers in data center abroad (in case we would like to allow access to the data/servers close to the end customer).
For SMB or enterprise organizations making their first move to the cloud, or for customers who wishes to outsource their IT services to external providers, there isn’t much of a difference between choosing hosting/managed service and choose public cloud service.
The differences between hosting and cloud services begins when trying to deploy entire environments in the cloud, based on architectures emphasizing service and platform (SaaS and PaaS), and less on infrastructure as a service (IaaS).
In this configuration, the system is developed based on dynamic scaling capabilities, environments deployed for a short amount of time, servers and infrastructure raised for specific purpose and stop to exist a few minutes after the entire process completes.
This model is called “Cloud Native Applications”, which allows us to avoid committing to pre-defined amount of infrastructure, specific task management, compatibility, server health check, etc., what is the role of each server or platform, in case they will be destroyed within a second? The infrastructure in this model is not important, only the service the system meant to provide.
Unlike hard-coded infrastructure management, there is a new concept – “Infrastructure as a code”. Environments are written as “recipes”, sent to the cloud provider using API’s, and environments are being created instantly and on the fly.
A few examples for the efficiencies of this model – A large American service provider destroys his entire IT environment in the cloud and deploys an entire up-to-date mirror environment within a few minutes instead of updating each and every server. A different American service provider increases the amount of servers automatically in advanced before peak hours, as a result of applicative monitoring, and after peak hours, all the new servers vanishes.
This change is not a magic, but a result of cloud efficient planning of systems and applications, training dedicated teams with the relevant capabilities, understanding the cloud provider’s services, billing, prioritization and the constant changes in the management interfaces.
Process of migrating systems to the public cloud
Infrastructure as a Service (IaaS) allows organizations to perform “Lift & Shift” (copying existing systems to the cloud with minor changes) from the on premise environment to the public cloud, as part of migration processes to the cloud.
Most organizations will quickly find out that the “Lift & Shift” strategy is indeed easier as first stage, but in the long term it is a very bad economical decision, with the same challenges that organizations struggle with today: waste of hardware resources, un-optimized operating system and running code on servers, distributed management difficulties, etc.
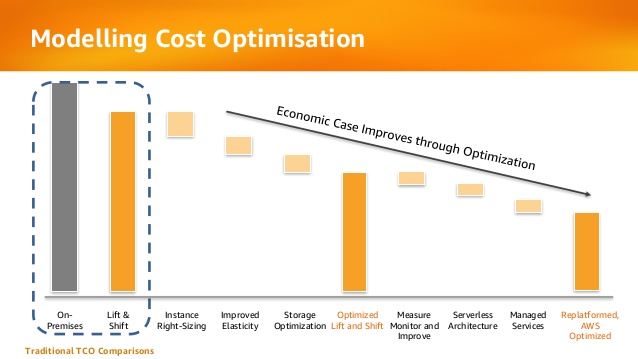
At later stages, organizations who migrated systems to the public cloud, begin to perform tuning to their cloud environments by measuring resource usage, for their virtual servers, adapting the proper VM instance type for the actual use in terms of CPU/memory/storage.
Below is an example from AWS presentation about the evolution organizations pass migrating to public cloud in terms of cost:
The future is here
Today, startup companies and enterprise organizations are developing applications for the cloud, agnostically to the hardware or infrastructure underneath.
In past, organizations used to migrate from developing on physical servers to virtual servers, and today, organizations are migrating from developing monolith applications to micro-service based applications and even Serverless applications (code running inside a managed compute environment, without the need to manage infrastructure resources such as servers, storage, etc.)
Changes in the development world is crucial to understanding what is cloud service, due to the fact that today, we are less relying on NIST definition of cloud service, and providers offering Infrastructure as a Service (as most hosting providers) and today cloud service is characterized by the following capabilities:
- Collection of API’s
- Billing capability of services/resources by their actual usage
- Services managed using API (such as the ability to provision, decommission, start/stop, etc.)
The bottom line
Today there are many providers who wrap VMWARE infrastructure with friendly user interface, allowing the customer to choose the VM type (in terms of CPU/Memory) and the number of servers the customer would like to consume, but it is not scale enough and it doesn’t allow the customer the flexibility to scale-up or scale-down to hundreds of servers automatically, and within seconds over multiple geographical regions.
Cloud provider who supports “Cloud Native Applications” enables the customer to connect his automation mechanisms, build and deployment processes using API’s to the cloud provider’s infrastructure, in-order to allow provisioning/changing compute environments, deploy micro-services based systems and even allowing the customer to deploy and run Serverless infrastructure.
The next time you are considering a service provider, whether using a hosting provider (sophisticated as he might be) or using public cloud provider, with capabilities of running hundreds of servers over multiple geographic regions within minutes, hands-free, supporting micro-services and Serverless applications, with API connectivity capabilities, simply present the service provider your requirements, and choose the most suitable service provider.
This article was written by Eyal Estrin, cloud security architect and Vitaly Unic, application security architect.
Integrate security aspects in a DevOps process
A diagram of a common DevOps lifecycle:
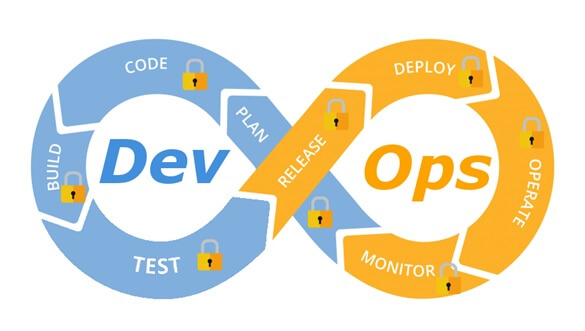
The DevOps world meant to provide complementary solution for both quick development (such as Agile) and a solution for cloud environments, where IT personnel become integral part of the development process. In the DevOps world, managing large number of development environments manually is practically infeasible. Monitoring mixed environments become a complex solution and deploying large number of different builds is becoming extremely fast and sensitive to changes.
The idea behind any DevOps solution is to provide a solution for deploying an entire CI/CD process, which means supporting constant changes and immediate deployment of builds/versions.
For the security department, this kind of process is at first look a nightmare – dozen builds, partial tests, no human control for any change, etc.
For this reason, it is crucial for the security department to embrace DevOps attitude, which means, embedding security in any part of the development lifecycle, software deployment or environment change.
It is important to understand that there are no constant stages as we used to have in waterfall development lifecycle, and most of the stages are parallel – in the CI/CD world everything changes quickly, components can be part of different stages, and for this reason it is important to confer the processes, methods and tools in all developments and DevOps teams.
In-order to better understand how to embed security into the DevOps lifecycle, we need to review the different stages in the development lifecycle:
Planning phase
This stage in the development process is about gathering business requirements.
At this stage, it is important to embed the following aspects:
- Gather information security requirements (such as authentication, authorization, auditing, encryptions, etc.)
- Conduct threat modeling in-order to detect possible code weaknesses
- Training / awareness programs for developers and DevOps personnel about secure coding
Creation / Code writing phase
This stage in the development process is about the code writing itself.
At this stage, it is important to embed the following aspects:
- Connect the development environments (IDE) to a static code analysis products
- Review the solution architecture by a security expert or a security champion on his behalf
- Review open source components embedded inside the code
Verification / Testing phase
This stage in the development process is about testing, conducted mostly by QA personnel.
At this stage, it is important to embed the following aspects:
- Run SAST (Static application security tools) on the code itself (pre-compiled stage)
- Run DAST (Dynamic application security tools) on the binary code (post-compile stage)
- Run IAST (Interactive application security tools) against the application itself
- Run SCA (Software composition analysis) tools in-order to detect known vulnerabilities in open source components or 3rd party components
Software packaging and pre-production phase
This stage in the development process is about software packaging of the developed code before deployment/distribution phase.
At this stage, it is important to embed the following aspects:
- Run IAST (Interactive application security tools) against the application itself
- Run fuzzing tools in-order to detect buffer overflow vulnerabilities – this can be done automatically as part of the build environment by embedding security tests for functional testing / negative testing
- Perform code signing to detect future changes (such as malwares)
Software packaging release phase
This stage is between the packaging and deployment stages.
At this stage, it is important to embed the following aspects:
- Compare code signature with the original signature from the software packaging stage
- Conduct integrity checks to the software package
- Deploy the software package to a development environment and conduct automate or stress tests
- Deploy the software package in a green/blue methodology for software quality and further security quality tests
Software deployment phase
At this stage, the software package (such as mobile application code, docker container, etc.) is moving to the deployment stage.
At this stage, it is important to embed the following aspects:
- Review permissions on destination folder (in case of code deployment for web servers)
- Review permissions for Docker registry
- Review permissions for further services in a cloud environment (such as storage, database, application, etc.) and fine-tune the service role for running the code
Configure / operate / Tune phase
At this stage, the development is in the production phase and passes modifications (according to business requirements) and on-going maintenance.
At this stage, it is important to embed the following aspects:
- Patch management processes or configuration management processes using tools such as Chef, Ansible, etc.
- Scanning process for detecting vulnerabilities using vulnerability assessment tools
- Deleting and re-deployment of vulnerable environments with an up-to-date environments (if possible)
On-going monitoring phase
At this stage, constant application monitoring is being conducted by the infrastructure or monitoring teams.
At this stage, it is important to embed the following aspects:
- Run RASP (Runtime application self-production) tools
- Implement defense at the application layer using WAF (Web application firewall) products
- Implement products for defending the application from Botnet attacks
- Implement products for defending the application from DoS / DDoS attacks
- Conduct penetration testing
- Implement monitoring solution using automated rules such as automated recovery of sensitive changes (tools such as GuardRails)
Security recommendations for developments based on CI/CD / DevOps process
- It is highly recommended to perform on-going training for the development and DevOps teams on security aspects and secure development
- It is highly recommended to nominate a security champion among the development and DevOps teams in-order to allow them to conduct threat modeling at early stages of the development lifecycle and in-order to embed security aspects as soon as possible in the development lifecycle
- Use automated tools for deploying environments in a simple and standard form.
Tools such as Puppet require root privileges for folders it has access to. In-order to lower the risk, it is recommended to enable folder access auditing. - Avoid storing passwords and access keys, hard-coded inside scripts and code.
- It is highly recommended to store credentials (SSH keys, privileged credentials, API keys, etc.) in a vault (Solutions such as HashiCorp vault or CyberArk).
- It is highly recommended to limit privilege access based on role (Role based access control) using least privileged.
- It is recommended to perform network separation between production environment and Dev/Test environments.
- Restrict all developer teams’ access to production environments, and allow only DevOps team’s access to production environments.
- Enable auditing and access control for all development environments and identify access attempts anomalies (such as developers access attempt to a production environment)
- Make sure sensitive data (such as customer data, credentials, etc.) doesn’t pass in clear text at transit. In-case there is a business requirement for passing sensitive data at transit, make sure the data is passed over encrypted protocols (such as SSH v2, TLS 1.2, etc.), while using strong cipher suites.
- It is recommended to follow OWASP organization recommendations (such as OWASP Top10, OWASP ASVS, etc.)
- When using Containers, it is recommended to use well-known and signed repositories.
- When using Containers, it is recommended not to rely on open source libraries inside the containers, and to conduct scanning to detect vulnerable versions (including dependencies) during the build creation process.
- When using Containers, it is recommended to perform hardening using guidelines such as CIS Docker Benchmark or CIS Kubernetes Benchmark.
- It is recommended to deploy automated tools for on-going tasks, starting from build deployments, code review for detecting vulnerabilities in the code and open source code, and patch management processes that will be embedded inside the development and build process.
- It is recommended to perform scanning to detect security weaknesses, using vulnerability management tools during the entire system lifetime.
- It is recommended to deploy configuration management tools, in-order to detect and automatically remediate configuration anomalies from the original configuration.
Additional reading sources:
- 20 Ways to Make Application Security Move at the Speed of DevOps
- The DevOps Security Checklist
- Making AppSec Testing Work in CI/CD
- Value driven threat modeling
- Automated Security Testing
- Security at the Speed of DevOps
- DevOps Security Best Practices
- The integration of DevOps and security
- When DevOps met Security - DevSecOps in a nutshell
- Grappling with DevOps Security
- Minimizing Risk and Improving Security in DevOps
- Security In A DevOps World
- Application Security in Devops
- Five Security Defenses Every Containerized Application Needs
- 5 ways to find and fix open source vulnerabilities
This article was written by Eyal Estrin, cloud security architect and Vitaly Unic, application security architect.
4 Ways To Learn About Internet Security
What Is Internet Security And Why Is It Important?
While the digital age has revolutionized the way we communicate, interact, buy and sell products and search for information, it has also created new risks that were not risks before. The internet, while extraordinary, is not always the safest environment and learning how to protect yourself, your business and your data is an important part of being an internet user. Internet security is a term that encompasses all of the strategies, processes and means an individual or company might use to protect themselves online including browser security, data protection, authentication and security for any transactions made on the web. It is about securing and protecting your networks and ensuring your privacy online.
With more and more people using the internet every day, more and more information is being processed online and this means huge amounts of data is being moved around the web. Sadly, this has seen the rise of new types of cybercrime and more opportunities for those looking to act criminally online to do so. If you use the internet in any way, whether it be for personal or professional reasons, such as for social media, emailing, for banking, running a website, to buy groceries or to publish content, you need to be thinking about your internet security and how to keep yourself safe online.
Whether you want to protect yourself or your business, it is important to know and understand internet security and the best methods for protecting yourself. Here are four ways you can begin to learn about internet security.
- Take An Online Course
If you are serious about learning more about internet security and using your knowledge to help you professionally, then you may consider undertaking an online course on internet and network security. This is one of the more thorough and structured ways to learn everything there is to know about internet security and what strategies you can implement yourself. By doing an online course, diploma or degree, you know that you are learning from teachers and tutors who know what they are talking about which allows you to gain valuable skills and knowledge. With a qualification at the end of the course, you can then put this knowledge to good use and help others develop advanced internet security mechanisms.
- Read Blogs
One of the great things about the internet is that you can find a wealth of information online about any topic that you are interested in. Whether it is baking, travel, fashion, or sports, you can find websites and blogs that help keep you up to date with what is going on in each of these areas. The same can be said for security. If you are interested in learning a bit more about security in your own time, then doing some online research is a good way to begin. Many experts out there understand the importance of network security and write about it. The good thing about reading blogs is that you can find blogs suitable for all levels of knowledge about network security. Whether you have very limited knowledge and are looking to understand basic terminology or you are more experienced and hoping to be introduced to more complex problems, you can find blogs that will be tailored to both.
- Check Out Youtube
Youtube may be a great platform for watching funny animal videos of music video clips, but it also a great online learning resource. There are many channels on Youtube that provide online learning videos, which offer a more hands-on approach to learning about internet security. With the videos, you can see the steps behind different processes in internet security and concepts that may be difficult to understand when you read about them can be more easily explained in a visual manner. Once you understand the basics of cybersecurity, Youtube is a great way to learn about how to use certain tools in a systematic fashion.
- Read Some Books
It may seem ironic to read about internet security from a book but there are some great books and textbooks out there that are focused on internet security. These books are usually written by experts in the field who really know their stuff. Whether you want to learn about hacking, malware, security systems or privacy, chances are there is a book on the subject that will cover every aspect of the topic. Check out Amazon or your local library to see if they have any books that will interest you.
Benefits of using managed database as a service in the cloud
When using public cloud services for relational databases, you have two options:
- IaaS solution – Install a database server on top of a virtual machine
- PaaS solution – Connect to a managed database service
In the traditional data center, organizations had to maintain the operating system and the database by themselves.
The benefits are very clear – full control over the entire stack.
The downside – The organization needs to maintain availability, license cost and security (access control, patch level, hardening, auditing, etc.)
Today, all the major public cloud vendors offer managed services for databases in the cloud.
To connect to the database and begin working, all a customer needs is a DNS name, port number and credentials.
The benefits of a managed database service are:
- Easy administration – No need to maintain the operating system (including patch level for the OS and for the database, system hardening, backup, etc.)
- Scalability – The number of virtual machines in the cluster will grow automatically according to load, in addition to the storage space required for the data
- High availability – The cluster can be configured to span across multiple availability zones (physical data centers)
- Performance – Usually the cloud provider installs the database on SSD storage
- Security – Encryption at rest and in transit
- Monitoring – Built-in the service
- Cost – Pay only for what you use
Not all features available on the on-premises version of the database are available on the PaaS version, and not all common databases are available as managed service of the major cloud providers.
Amazon RDS
Amazon managed services currently (as of April 2018) supports the following database engines:
- Microsoft SQL Server (2008 R2, 2012, 2014, 2016, and 2017)
Amazon RDS for SQL Server FAQs:
https://aws.amazon.com/rds/sqlserver/faqs
Known limitations:
https://docs.aws.amazon.com/AmazonRDS/latest/UserGuide/CHAP_SQLServer.html#SQLServer.Concepts.General.FeatureSupport.Limits
- MySQL (5.5, 5.6 and 5.7)
Amazon RDS for MySQL FAQs:
https://aws.amazon.com/rds/mysql/faqs
Known limitations:
https://docs.aws.amazon.com/AmazonRDS/latest/UserGuide/MySQL.KnownIssuesAndLimitations.html
- Oracle (11.2 and 12c)
Amazon RDS for Oracle Database FAQs:
https://aws.amazon.com/rds/oracle/faqs
Known limitations:
https://docs.aws.amazon.com/AmazonRDS/latest/UserGuide/CHAP_Limits.html
- PostgreSQL (9.3, 9.4, 9.5, and 9.6)
Amazon RDS for PostgreSQL FAQs:
https://aws.amazon.com/rds/postgresql/faqs
Known limitations:
https://docs.aws.amazon.com/AmazonRDS/latest/UserGuide/CHAP_PostgreSQL.html#PostgreSQL.Concepts.General.Limits
- MariaDB (10.2)
Amazon RDS for MariaDB FAQs:
https://aws.amazon.com/rds/mariadb/faqs
Known limitations:
https://docs.aws.amazon.com/AmazonRDS/latest/UserGuide/CHAP_Limits.html
Azure Managed databases
Microsoft Azure managed database services currently (as of April 2018) support the following database engines:
- Azure SQL Database
Technical overview:
https://docs.microsoft.com/en-us/azure/sql-database/sql-database-technical-overview
Known limitations:
https://docs.microsoft.com/en-us/azure/sql-database/sql-database-dtu-resource-limits
- MySQL (5.6 and 5.7)
Technical overview:
https://docs.microsoft.com/en-us/azure/mysql/overview
Known limitations:
https://docs.microsoft.com/en-us/azure/mysql/concepts-limits
- PostgreSQL (9.5, and 9.6)
Technical overview:
https://docs.microsoft.com/en-us/azure/postgresql/overview
Known limitations:
https://docs.microsoft.com/en-us/azure/postgresql/concepts-limits
Google Cloud SQL
Google managed database services currently (as of April 2018) support the following database engines:
- MySQL (5.6 and 5.7)
Product documentation:
https://cloud.google.com/sql/docs/mysql
Known limitations:
https://cloud.google.com/sql/docs/mysql/known-issues
- PostgreSQL (9.6)
Product documentation:
https://cloud.google.com/sql/docs/postgres
Known limitations:
https://cloud.google.com/sql/docs/postgres/known-issues
Oracle Database Cloud Service
Oracle managed database services currently (as of April 2018) support the following database engines:
- Oracle (11g and 12c)
Product documentation:
https://cloud.oracle.com/en_US/database/features
Known issues:
https://docs.oracle.com/en/cloud/paas/database-dbaas-cloud/kidbr/index.html#KIDBR109
- MySQL (5.7)
Product documentation:
https://cloud.oracle.com/en_US/mysql/features
Cloud Providers Service Limits

When working with cloud service providers, you may notice that at some point there are service / quota limitations.
Some limits are per account / subscription; some of them are per region and some limits are per pricing tier (free tier vs billable).
Here are some of the most common reasons for service / quota limitations:
- Performance issues on the cloud provider’s side – loading a lot of virtual machines on the same data center requires a lot of resources from the cloud provider
- Avoiding spikes in usage – protect from a situation where one customer consumes a lot of resources that might affect other customers and might eventually cause denial of service
For more information about default cloud service limits, see:
- AWS Service Limits:
https://docs.aws.amazon.com/general/latest/gr/aws_service_limits.html - Azure subscription and service limits, quotas, and constraints:
https://docs.microsoft.com/en-us/azure/azure-subscription-service-limits - Google App Engine Quotas:
https://cloud.google.com/appengine/quotas - Oracle Cloud Service Limits:
https://docs.us-phoenix-1.oraclecloud.com/Content/General/Concepts/servicelimits.htm
Default limitations can be changed by contacting the cloud service provider’s support and requesting a change to the default limitation.
For instructions on how to change the service limitations, see:
- How do I manage my AWS service limits?
https://aws.amazon.com/premiumsupport/knowledge-center/manage-service-limits/ - Understanding Azure Limits and Increases
https://azure.microsoft.com/en-us/blog/azure-limits-quotas-increase-requests/ - Google Resource Quotas
https://cloud.google.com/compute/quotas#request_quotas - Oracle Cloud – Requesting a Service Limit Increase
https://docs.us-phoenix-1.oraclecloud.com/Content/General/Concepts/servicelimits.htm#three
