Archive for the ‘Cloud computing’ Category
Smart use of cloud services

Many organizations are talking and beginning to embrace system migration to the cloud, as part of a global IT strategy to use public clouds.
The migration from the on premise to the public cloud, allows organizations to choose from a variety of alternatives, each with its own benefits, knowledge requirement and different pricing model (as compared to the on premise licensing model).
In this article, I shell review the different methods, with their pros and cons and I will try to explain which method suites which scenario.
Lift & Shift Migration
In this method, the customer chooses an existing system from the on premise environment, reviewing the required resources for running the system in a cloud environment (number of CPU/amount of Memory and required disk space), the operating system version (assuming the cloud provider has an image for this operating system), checking with the software vendor the ability to run the system a cloud environment (licensing issues) and deploying all software components on a virtual server in the cloud environment (or migrating the entire system, assuming the cloud provider offers a managed service for system migration).
This is the most common method and the simplest one (comparing to other alternatives…) for migrating to the cloud, and most cloud vendors (Infrastructure as a Service) support this method, but we should take under consideration, that cost-wise, this method is considered expensive (in terms of cost and resource usage) when comparing to purchasing physical hardware for 3-5 years in advanced in the on premise environment.
The most common ways to lower the server cost are:
• Resizing the server size (number of CPU/amount of memory) to the actual usage
• Purchase reserved instance for 1 or 3 years in advanced
• Using Spot instances for servers who does not require availability of 24×7 or for applications who can survive temporary downtime, without harming the entire service
Moving to Micro-Services and Containers
In this method, the organization begins migration from monolith application (a system where all components relay on each other and required to be deployed together) to micro-services based development, where each component runs independently (usually inside its own container) and it can be replaced, upgraded and vertically scale out as needed and independently from the rest of the system components.
It is possible to run containers on virtual servers (the entire management, update and scale is the customer’s responsibility) or as part of a managed service (such as managed Kubernetes clusters service).
This method requires the developer’s teams to know how to package their applications inside containers, take care of scaling, monitoring of containers activities (and the communications between containers), and taking care of security topics (such as who can access a container or whether or not the communication between containers is encrypted, etc.)
This method is suitable for organizations who wish to change their current application architecture or being developing new applications. Modern applications are being developed today as containers and allows the customer to migrate between the on premise environments to the public cloud, and with proper adjustments between different cloud providers (once we solve topics such as connectivity to current cloud vendor’s services such as message queuing, storage, logging, etc.)
Moving to Serverless / Function as a Service
In this method, the customer isn’t in charge of operating system maintenance, system availability or scale. Due to the fact that the entire infrastructure is been managed by the cloud vendor, the vendor takes care of scale, as required by the application needs.
This method is suitable for event based services, with short running time (few seconds to few minutes). As part of moving to modern applications, there are many scenarios for choosing specific development language, uploading the code to a managed cloud environment (Serverless), selecting the desired compute power (amount of memory, which effects the number of CPU) and creating triggers for running the function.
It is possible to embed Serverless capabilities, as part of modern micro-services architecture.
The pricing model for this method is based on the amount of time the function was running and the amount of memory used for running the function.
Common use cases for Serverless – image processing, data analysis from IoT devices, etc.
This method is not suitable for every application (due to short running intervals), and also not every development language is currently been supported by every cloud vendor.
For example:
• AWS Lambda (currently) support natively the following languages: Java, Go, PowerShell, Node.JS, C#, Python, Ruby
• Azure Functions (currently) support natively the following languages: Java, JavaScript, C#, PowerShell, Python, TrueScript
• Google Cloud Functions (currently) support natively the following languages: Python, Go, Node.JS
• Oracle Functions (currently) support natively the following languages: Java, Python, Node.JS, Go, Ruby
Migration to managed services (SaaS / PaaS)
In this method, the organization chooses an existing SaaS (such as Messaging, CRM, ERP, etc.) or existing PaaS (such as Database, Storage, etc.)
This method suites many scenarios in which the organization would like to consume existing service, without the need to maintain the infrastructure (operating system, storage, backup, security aspects, etc.). After choosing an existing service, the organization begin migrating data to the managed service, configure proper access rights, sometimes configure VPN connectivity between the on premise and the cloud environment, configures backup (according to the service support this capability) and being consuming the service.
The pricing model changes between cloud vendors (sometime is it based on monthly pricing and sometimes it is based on consumed compute power or consumed storage space).
Mature and transparent the cloud vendors, reveal accurate monthly billing information.
Also, mature cloud vendors knows how to handle privacy, low and regulation aspects (such as GDPR compliance and other privacy regulations) using data processing agreements.
Summary
In this article, I have reviewed the various methods of using cloud service wisely. As we can see, not every method suites every scenario or every organization, but there is no doubt that the future is heading cloud and managed services.
My recommendation for organizations – focus on what brings your organization business value (such as banking, commerce, retail, education, etc.), train your IT and development teams on the coming technological changes and migrate the responsibility for maintaining your organization infrastructure to vendors who specialized on the topic.
Cloud Services – Evolution and Future Trends
Cloud services are no longer a buzz, they are existing fact. Small and large organizations are leading the revolution in the IT industry for almost a decade, some migrating small environments and conducting experiments while others deploying their entire production environments using this model.
It is commonly used to consider cloud services as a continue of the data center environment and in fact this is where the concept evolved, and yet, the differences between the traditional computing services, server farms, storage and even virtualization are fundamentally different from a true cloud. Let’s evaluate the differences:
In the past we used to call “cloud”, for any compute services containing the following characteristics as defined by NIST:
- On-Demand Self-Service
- Broad Network Access
- Resource Pooling
- Rapid Elasticity
- Measured service
When looking deeper into the various cloud service models such as IaaS (Infrastructure as a Service), PaaS (Platform as a Service) and SaaS (Software as a Service), we find that things are not always black or white: In some cases we come across services that we know for fact they are cloud services, we can’t always say these services include all the above characteristics.
A good example: File sharing services such as Dropbox. As a private customer we are not exposed to data that will enable us to measure the service (in terms of performance or in terms of billing vs storage capacity cost).
In case we choose to deploy a “private cloud” inside our organizational data center, based on infrastructure such as VMWARE, OpenStack or alike, we expect all the above characteristics in our on premise as well.
Let’s differentiate between cloud and hosting service
In the current IT industry there are many companies offering compute services, on the range between cloud services and hosting services.
Hosting companies (or managed services), usually offers the customer the following capabilities:
- Compute environments – Such as physical servers (in case of special hardware requirements), virtual servers, storage and network equipment (Routers, Firewalls, VPN Gateway, etc.)
- Managed services – Such as web hosting for marketing or commercial web sites, email services, file sharing services and organizational systems such as CRM as a service.
- Backup and DR as a service.
- Managed support/IT services.
Hosting companies might offer the customer a capability to increase the number of servers and in some cases even to choose servers in data center abroad (in case we would like to allow access to the data/servers close to the end customer).
For SMB or enterprise organizations making their first move to the cloud, or for customers who wishes to outsource their IT services to external providers, there isn’t much of a difference between choosing hosting/managed service and choose public cloud service.
The differences between hosting and cloud services begins when trying to deploy entire environments in the cloud, based on architectures emphasizing service and platform (SaaS and PaaS), and less on infrastructure as a service (IaaS).
In this configuration, the system is developed based on dynamic scaling capabilities, environments deployed for a short amount of time, servers and infrastructure raised for specific purpose and stop to exist a few minutes after the entire process completes.
This model is called “Cloud Native Applications”, which allows us to avoid committing to pre-defined amount of infrastructure, specific task management, compatibility, server health check, etc., what is the role of each server or platform, in case they will be destroyed within a second? The infrastructure in this model is not important, only the service the system meant to provide.
Unlike hard-coded infrastructure management, there is a new concept – “Infrastructure as a code”. Environments are written as “recipes”, sent to the cloud provider using API’s, and environments are being created instantly and on the fly.
A few examples for the efficiencies of this model – A large American service provider destroys his entire IT environment in the cloud and deploys an entire up-to-date mirror environment within a few minutes instead of updating each and every server. A different American service provider increases the amount of servers automatically in advanced before peak hours, as a result of applicative monitoring, and after peak hours, all the new servers vanishes.
This change is not a magic, but a result of cloud efficient planning of systems and applications, training dedicated teams with the relevant capabilities, understanding the cloud provider’s services, billing, prioritization and the constant changes in the management interfaces.
Process of migrating systems to the public cloud
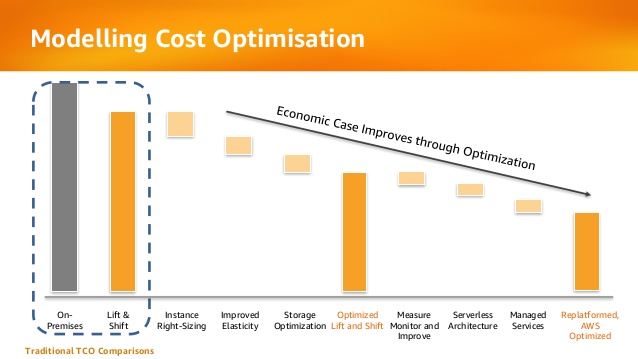
Infrastructure as a Service (IaaS) allows organizations to perform “Lift & Shift” (copying existing systems to the cloud with minor changes) from the on premise environment to the public cloud, as part of migration processes to the cloud.
Most organizations will quickly find out that the “Lift & Shift” strategy is indeed easier as first stage, but in the long term it is a very bad economical decision, with the same challenges that organizations struggle with today: waste of hardware resources, un-optimized operating system and running code on servers, distributed management difficulties, etc.
At later stages, organizations who migrated systems to the public cloud, begin to perform tuning to their cloud environments by measuring resource usage, for their virtual servers, adapting the proper VM instance type for the actual use in terms of CPU/memory/storage.
Below is an example from AWS presentation about the evolution organizations pass migrating to public cloud in terms of cost:
The future is here
Today, startup companies and enterprise organizations are developing applications for the cloud, agnostically to the hardware or infrastructure underneath.
In past, organizations used to migrate from developing on physical servers to virtual servers, and today, organizations are migrating from developing monolith applications to micro-service based applications and even Serverless applications (code running inside a managed compute environment, without the need to manage infrastructure resources such as servers, storage, etc.)
Changes in the development world is crucial to understanding what is cloud service, due to the fact that today, we are less relying on NIST definition of cloud service, and providers offering Infrastructure as a Service (as most hosting providers) and today cloud service is characterized by the following capabilities:
- Collection of API’s
- Billing capability of services/resources by their actual usage
- Services managed using API (such as the ability to provision, decommission, start/stop, etc.)
The bottom line
Today there are many providers who wrap VMWARE infrastructure with friendly user interface, allowing the customer to choose the VM type (in terms of CPU/Memory) and the number of servers the customer would like to consume, but it is not scale enough and it doesn’t allow the customer the flexibility to scale-up or scale-down to hundreds of servers automatically, and within seconds over multiple geographical regions.
Cloud provider who supports “Cloud Native Applications” enables the customer to connect his automation mechanisms, build and deployment processes using API’s to the cloud provider’s infrastructure, in-order to allow provisioning/changing compute environments, deploy micro-services based systems and even allowing the customer to deploy and run Serverless infrastructure.
The next time you are considering a service provider, whether using a hosting provider (sophisticated as he might be) or using public cloud provider, with capabilities of running hundreds of servers over multiple geographic regions within minutes, hands-free, supporting micro-services and Serverless applications, with API connectivity capabilities, simply present the service provider your requirements, and choose the most suitable service provider.
This article was written by Eyal Estrin, cloud security architect and Vitaly Unic, application security architect.
Benefits of using managed database as a service in the cloud
When using public cloud services for relational databases, you have two options:
- IaaS solution – Install a database server on top of a virtual machine
- PaaS solution – Connect to a managed database service
In the traditional data center, organizations had to maintain the operating system and the database by themselves.
The benefits are very clear – full control over the entire stack.
The downside – The organization needs to maintain availability, license cost and security (access control, patch level, hardening, auditing, etc.)
Today, all the major public cloud vendors offer managed services for databases in the cloud.
To connect to the database and begin working, all a customer needs is a DNS name, port number and credentials.
The benefits of a managed database service are:
- Easy administration – No need to maintain the operating system (including patch level for the OS and for the database, system hardening, backup, etc.)
- Scalability – The number of virtual machines in the cluster will grow automatically according to load, in addition to the storage space required for the data
- High availability – The cluster can be configured to span across multiple availability zones (physical data centers)
- Performance – Usually the cloud provider installs the database on SSD storage
- Security – Encryption at rest and in transit
- Monitoring – Built-in the service
- Cost – Pay only for what you use
Not all features available on the on-premises version of the database are available on the PaaS version, and not all common databases are available as managed service of the major cloud providers.
Amazon RDS
Amazon managed services currently (as of April 2018) supports the following database engines:
- Microsoft SQL Server (2008 R2, 2012, 2014, 2016, and 2017)
Amazon RDS for SQL Server FAQs:
https://aws.amazon.com/rds/sqlserver/faqs
Known limitations:
https://docs.aws.amazon.com/AmazonRDS/latest/UserGuide/CHAP_SQLServer.html#SQLServer.Concepts.General.FeatureSupport.Limits
- MySQL (5.5, 5.6 and 5.7)
Amazon RDS for MySQL FAQs:
https://aws.amazon.com/rds/mysql/faqs
Known limitations:
https://docs.aws.amazon.com/AmazonRDS/latest/UserGuide/MySQL.KnownIssuesAndLimitations.html
- Oracle (11.2 and 12c)
Amazon RDS for Oracle Database FAQs:
https://aws.amazon.com/rds/oracle/faqs
Known limitations:
https://docs.aws.amazon.com/AmazonRDS/latest/UserGuide/CHAP_Limits.html
- PostgreSQL (9.3, 9.4, 9.5, and 9.6)
Amazon RDS for PostgreSQL FAQs:
https://aws.amazon.com/rds/postgresql/faqs
Known limitations:
https://docs.aws.amazon.com/AmazonRDS/latest/UserGuide/CHAP_PostgreSQL.html#PostgreSQL.Concepts.General.Limits
- MariaDB (10.2)
Amazon RDS for MariaDB FAQs:
https://aws.amazon.com/rds/mariadb/faqs
Known limitations:
https://docs.aws.amazon.com/AmazonRDS/latest/UserGuide/CHAP_Limits.html
Azure Managed databases
Microsoft Azure managed database services currently (as of April 2018) support the following database engines:
- Azure SQL Database
Technical overview:
https://docs.microsoft.com/en-us/azure/sql-database/sql-database-technical-overview
Known limitations:
https://docs.microsoft.com/en-us/azure/sql-database/sql-database-dtu-resource-limits
- MySQL (5.6 and 5.7)
Technical overview:
https://docs.microsoft.com/en-us/azure/mysql/overview
Known limitations:
https://docs.microsoft.com/en-us/azure/mysql/concepts-limits
- PostgreSQL (9.5, and 9.6)
Technical overview:
https://docs.microsoft.com/en-us/azure/postgresql/overview
Known limitations:
https://docs.microsoft.com/en-us/azure/postgresql/concepts-limits
Google Cloud SQL
Google managed database services currently (as of April 2018) support the following database engines:
- MySQL (5.6 and 5.7)
Product documentation:
https://cloud.google.com/sql/docs/mysql
Known limitations:
https://cloud.google.com/sql/docs/mysql/known-issues
- PostgreSQL (9.6)
Product documentation:
https://cloud.google.com/sql/docs/postgres
Known limitations:
https://cloud.google.com/sql/docs/postgres/known-issues
Oracle Database Cloud Service
Oracle managed database services currently (as of April 2018) support the following database engines:
- Oracle (11g and 12c)
Product documentation:
https://cloud.oracle.com/en_US/database/features
Known issues:
https://docs.oracle.com/en/cloud/paas/database-dbaas-cloud/kidbr/index.html#KIDBR109
- MySQL (5.7)
Product documentation:
https://cloud.oracle.com/en_US/mysql/features
Cloud Providers Service Limits

When working with cloud service providers, you may notice that at some point there are service / quota limitations.
Some limits are per account / subscription; some of them are per region and some limits are per pricing tier (free tier vs billable).
Here are some of the most common reasons for service / quota limitations:
- Performance issues on the cloud provider’s side – loading a lot of virtual machines on the same data center requires a lot of resources from the cloud provider
- Avoiding spikes in usage – protect from a situation where one customer consumes a lot of resources that might affect other customers and might eventually cause denial of service
For more information about default cloud service limits, see:
- AWS Service Limits:
https://docs.aws.amazon.com/general/latest/gr/aws_service_limits.html - Azure subscription and service limits, quotas, and constraints:
https://docs.microsoft.com/en-us/azure/azure-subscription-service-limits - Google App Engine Quotas:
https://cloud.google.com/appengine/quotas - Oracle Cloud Service Limits:
https://docs.us-phoenix-1.oraclecloud.com/Content/General/Concepts/servicelimits.htm
Default limitations can be changed by contacting the cloud service provider’s support and requesting a change to the default limitation.
For instructions on how to change the service limitations, see:
- How do I manage my AWS service limits?
https://aws.amazon.com/premiumsupport/knowledge-center/manage-service-limits/ - Understanding Azure Limits and Increases
https://azure.microsoft.com/en-us/blog/azure-limits-quotas-increase-requests/ - Google Resource Quotas
https://cloud.google.com/compute/quotas#request_quotas - Oracle Cloud – Requesting a Service Limit Increase
https://docs.us-phoenix-1.oraclecloud.com/Content/General/Concepts/servicelimits.htm#three
Best practices for using AWS access keys
AWS access keys enable us to use programmatic or AWS CLI services in a manner similar to using a username and password.
AWS access keys have account privileges – for better and for worse.
For example, if you save access keys (credentials) of a root account inside code, anyone who uses this code can totally damage your AWS account.
Many stories have been published about security breaches due to access key exposure, especially combined with open source version control systems such as GitHub and GitLab.
In order to avoid security breaches, here is a list of best practices for securing your environment when using access keys:
- Avoid using access keys for the root account. In case you already created access keys, delete them.
https://docs.aws.amazon.com/IAM/latest/UserGuide/best-practices.html#remove-credentials - Use minimum privileges when creating account roles.
https://docs.aws.amazon.com/IAM/latest/UserGuide/access_controlling.html - Use AWS IAM roles instead of using access keys, for resources such as Amazon EC2 instance.
https://docs.aws.amazon.com/IAM/latest/UserGuide/id_roles_use_switch-role-ec2.html - Use different access keys for each application, in-order to minimize the risk of credential exposure.
https://docs.aws.amazon.com/IAM/latest/UserGuide/id_credentials_access-keys.html - Protect access keys by storing them on encrypted machines or encrypted volumes, and avoid sending access keys via email or any other insecure medium.
https://docs.aws.amazon.com/kms/latest/developerguide/services-s3.html - Rotate (change) access keys on a regular basis, to avoid reuse of credentials.
https://aws.amazon.com/blogs/security/how-to-rotate-access-keys-for-iam-users/ - Remove unused access keys, to avoid unnecessary access.
https://docs.aws.amazon.com/cli/latest/reference/iam/delete-access-key.html - Use MFA (Multi-factor authentication) for privileged operations/accounts.
https://docs.aws.amazon.com/IAM/latest/UserGuide/id_credentials_mfa.html - Configure billing alerts using Amazon CloudWatch, to get notifications about anomaly operations in your AWS account.
https://docs.aws.amazon.com/awsaccountbilling/latest/aboutv2/monitor-charges.html - Use AWS CloudTrail auditing to review when was an access key was last used.
https://aws.amazon.com/blogs/security/new-in-iam-quickly-identify-when-an-access-key-was-last-used/ - Use open source tools such as git-secrets to avoid storing passwords and sensitive information inside a GIT repository.
https://github.com/awslabs/git-secrets - Work according to GitHub recommendations and avoid using sensitive information in a public repository.
https://help.github.com/articles/removing-sensitive-data-from-a-repository/
How I passed the CCSP exam
The CCSP is one of the hardest vendor-neutral cloud related certifications in the industry.
The CCSP exam test the candidate’s knowledge in the following domains:
- Architectural Concepts and Design Requirements
- Cloud Data Security
- Cloud Platform and Infrastructure Security
- Cloud Application Security
- Operations
- Legal and Compliance
I strongly recommend to take this exam if you are a solution or cloud security architect, passionate about cloud computing.
CISSP certification gives you an advantage when taking the exam, due to the amount of study material, amount of exam questions and the exam length.
Here are the steps I took in-order to pass the exam:
Official Cloud Security Alliance course and exam – I have attended the CCSK course and took the official exam.
As part of the CCSK exam preparation, I read the following documents:
- Security Guidance for Critical Areas of Focus in Cloud Computing, V3
- The European Network and Information Security Agency (ENISA) whitepaper “Cloud Computing: Benefits, Risks and Recommendations for Information Security“
Official CCSP CBK training – I took the official live on-line training. Most of the study were based on the official book – “Official (ISC)2 Guide to the CISSP CBK”
As part of the instructor’s recommendations, I have summarized key aspects of the material and reviewed those couple of times (instead of reading 600 pages of the CBK more than once).
The online training was not cheap, but an exam voucher (for one year) was included.
Extra reading – I read the “CCSP (ISC)2 Certified Cloud Security Professional Official Study Guide”
Purchasing this book allowed me access to Wiley’s test bank of more than 700 practice exam questions, which allowed me to better test my knowledge and prepared for a long time-based exam.
Mobile applications – I have installed the following free applications with practice exam questions:
Free CBT – I watched the Cybrary’s free CCSP Training, which covers the exam materials
Work experience – I have no doubt that work experience gave me allot of knowledge for passing some of the tough scenarios.
I have not measured the time it took me to review the written material and prepare myself for the exam, but I am guessing couple of months of preparations.
I am proud to hold the CCSP (Certified Cloud Security Professional) certification.
Cloud Computing Journey – Part 2
Cloud service provider questionnaire
In my previous post I gave you a short introduction to cloud computing.
When engaging with cloud service provider, it is important to evaluate the provider’s maturity level by asking the provider, as many questions as possible to allow you the comfort level to sign a contract.
Below is a sample questionnaire I recommend you to ask the cloud service provider.
Privacy related questions:
- Does the cloud service provider has an official privacy policy?
- Where are the cloud service provider data centers located around the world?
- Are the cloud service provider data centers compliant with the EU Directive 95/46/EC?
- Are the cloud service provider data centers compliant with the General Data Protection Regulation (GDPR)?
Availability related questions:
- What is the SLA of the cloud service provider? (Please elaborate)
- Does the cloud service provider publish information about system issues or outages?
- What compensation does the cloud service provider offer in case of potential financial loss due to lack of availability?
- Does the cloud service provider sync data between more than one data center on the same region?
- How many data centers does the cloud service provider has in the same region?
- Does the cloud service provider have business continuity processes and procedures? (Please elaborate)
- What is the cloud service provider’s RTO?
- What is the cloud service provider’s RPO?
- What is the cloud service provider disaster recovery strategy?
- Does the cloud service provider have change management processes? (Please elaborate)
- Does the cloud service provider have backup processes? (Please elaborate)
Interoperability related questions:
- Does the cloud service provider support security event monitoring using an API? (Please elaborate)
- Does the cloud service provider support infrastructure related event monitoring using an API? (Please elaborate)
Security related questions:
- What is the cloud service provider’s audit trail process for my organizational data stored or processed? (Please elaborate)
- What logical controls does the cloud service provider use for my organizational data stored or processed? (Please elaborate)
- What physical controls does the cloud service provider use for my organizational data stored or processed? (Please elaborate)
- Does the cloud service provider encrypt data at transit? (Please elaborate)
- Does the cloud service provider encrypt data at rest? (Please elaborate)
- What encryption algorithm is been used?
- What encryption key size is been used?
- Where are the encryption keys stored?
- At what interval does the cloud service provider rotate the encryption keys?
- Does the cloud service provider support BYOK (Bring your own keys)?
- Does the cloud service provider support HYOK (Hold your own keys):
- At what level does the data at rest been encrypted? (Storage, database, application, etc.)
- What security controls are been used by the cloud service provider to protect the cloud service itself?
- Is there an on-going process for Firewall rule review been done by the cloud service provider? (Please elaborate)
- Are all cloud service provider’s platform (Operating system, database, middleware, etc.) been hardened according to best practices? (Please elaborate)
- Does the cloud service provider perform an on-going patch management process for all hardware and software? (Please elaborate)
- What security controls are been used by the cloud service provider to protect against data leakage in a multi-tenant environment?
- How does the cloud service provider perform access management process? (Please elaborate)
- Does the cloud service provider enforce 2-factor authentication for accessing all management interfaces?
- Is the authentication to the cloud service based on standard protocols such as SAML, OAuth, OpenID?
- How many employees at the cloud service provider will have access to my organizational data? (Infrastructure and database level)
- Is there an access to the cloud service provider’s 3rd party suppliers to my organizational data?
- Does the cloud service provider enforce separation between production and development/test environments? (Please elaborate)
- What is the cloud service provider’s password policy (Operating system, database, network components, etc.) for systems that store or process my organizational data?
- Is it possible to schedule security survey and penetration test on the systems that stored my organizational data?
- Does the cloud service provider have incident response processes and procedures? (Please elaborate)
- What are the escalation processes in case of security incident related to my organizational data? (Please elaborate)
- What are the cloud service provider’s processes and controls against distributed denial-of-service? (Please elaborate)
- Does the cloud service provider have vulnerability management processes? (Please elaborate)
- Does the cloud service provider have secure development lifecycle (SDLC) process? (Please elaborate)
Compliance related questions:
- Is the cloud service provider compliant with certifications or standards? (Please elaborate)
- What is the level of compliance with the Cloud Security Alliance Matrix (https://cloudsecurityalliance.org/research/ccm)?
- Is it possible to receive a copy of internal audit report performed on the cloud service in the last 12 months?
- Is it possible to receive a copy of external audit report performed on the cloud service in the last 12 months?
- Is it possible to perform an on site audit on the cloud service provider’s data center and activity?
Contract termination related questions:
- What are the cloud service provider’s contract termination options?
- What options does the cloud service provider allow me to export my organizational data stored on the cloud?
- Is there a process for data deletion in case of contract termination?
- What standard does the cloud service provider use for data deletion?
Stay tuned for my next article.
Here are some recommended articles:
Separation Anxiety: A Tutorial for Isolating Your System with Linux Namespaces
With the advent of tools like Docker, Linux Containers, and others, it has become super easy to isolate Linux processes into their own little system environments. This makes it possible to run a whole range of applications on a single real Linux machine and ensure no two of them can interfere with each other, without having to resort to using virtual machines. These tools have been a huge boon to PaaS providers. But what exactly happens under the hood?
These tools rely on a number of features and components of the Linux kernel. Some of these features were introduced fairly recently, while others still require you to patch the kernel itself. But one of the key components, using Linux namespaces, has been a feature of Linux since version 2.6.24 was released in 2008.
Anyone familiar with chroot already has a basic idea of what Linux namespaces can do and how to use namespace generally. Just as chroot allows processes to see any arbitrary directory as the root of the system (independent of the rest of the processes), Linux namespaces allow other aspects of the operating system to be independently modified as well. This includes the process tree, networking interfaces, mount points, inter-process communication resources and more.
Why Use Namespaces for Process Isolation?
In a single-user computer, a single system environment may be fine. But on a server, where you want to run multiple services, it is essential to security and stability that the services are as isolated from each other as possible. Imagine a server running multiple services, one of which gets compromised by an intruder. In such a case, the intruder may be able to exploit that service and work his way to the other services, and may even be able compromise the entire server. Namespace isolation can provide a secure environment to eliminate this risk.
For example, using namespacing, it is possible to safely execute arbitrary or unknown programs on your server. Recently, there has been a growing number of programming contest and “hackathon” platforms, such as HackerRank, TopCoder, Codeforces, and many more. A lot of them utilize automated pipelines to run and validate programs that are submitted by the contestants. It is often impossible to know in advance the true nature of contestants’ programs, and some may even contain malicious elements. By running these programs namespaced in complete isolation from the rest of the system, the software can be tested and validated without putting the rest of the machine at risk. Similarly, online continuous integration services, such as Drone.io, automatically fetch your code repository and execute the test scripts on their own servers. Again, namespace isolation is what makes it possible to provide these services safely.
Namespacing tools like Docker also allow better control over processes’ use of system resources, making such tools extremely popular for use by PaaS providers. Services like Heroku and Google App Engine use such tools to isolate and run multiple web server applications on the same real hardware. These tools allow them to run each application (which may have been deployed by any of a number of different users) without worrying about one of them using too many system resources, or interfering and/or conflicting with other deployed services on the same machine. With such process isolation, it is even possible to have entirely different stacks of dependency softwares (and versions) for each isolated environment!
If you’ve used tools like Docker, you already know that these tools are capable of isolating processes in small “containers”. Running processes in Docker containers is like running them in virtual machines, only these containers are significantly lighter than virtual machines. A virtual machine typically emulates a hardware layer on top of your operating system, and then runs another operating system on top of that. This allows you to run processes inside a virtual machine, in complete isolation from your real operating system. But virtual machines are heavy! Docker containers, on the other hand, use some key features of your real operating system, including namespaces, and ensure a similar level of isolation, but without emulating the hardware and running yet another operating system on the same machine. This makes them very lightweight.
Process Namespace
Historically, the Linux kernel has maintained a single process tree. The tree contains a reference to every process currently running in a parent-child hierarchy. A process, given it has sufficient privileges and satisfies certain conditions, can inspect another process by attaching a tracer to it or may even be able to kill it.
With the introduction of Linux namespaces, it became possible to have multiple “nested” process trees. Each process tree can have an entirely isolated set of processes. This can ensure that processes belonging to one process tree cannot inspect or kill – in fact cannot even know of the existence of – processes in other sibling or parent process trees.
Every time a computer with Linux boots up, it starts with just one process, with process identifier (PID) 1. This process is the root of the process tree, and it initiates the rest of the system by performing the appropriate maintenance work and starting the correct daemons/services. All the other processes start below this process in the tree. The PID namespace allows one to spin off a new tree, with its own PID 1 process. The process that does this remains in the parent namespace, in the original tree, but makes the child the root of its own process tree.
With PID namespace isolation, processes in the child namespace have no way of knowing of the parent process’s existence. However, processes in the parent namespace have a complete view of processes in the child namespace, as if they were any other process in the parent namespace.
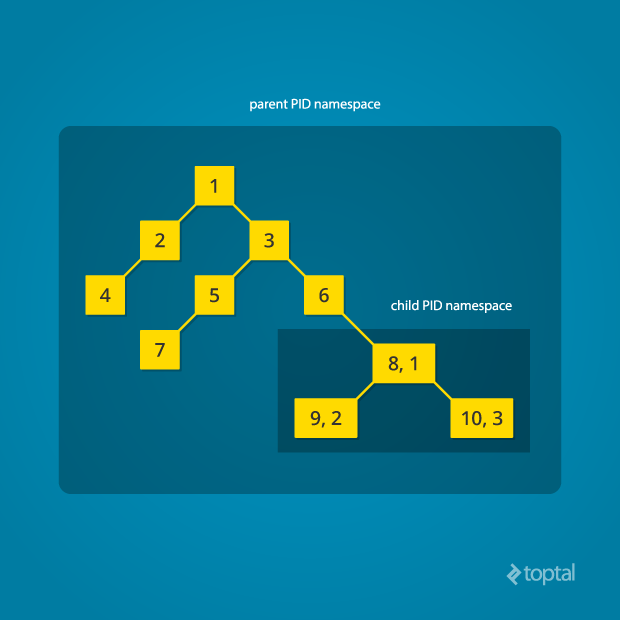
It is possible to create a nested set of child namespaces: one process starts a child process in a new PID namespace, and that child process spawns yet another process in a new PID namespace, and so on.
With the introduction of PID namespaces, a single process can now have multiple PIDs associated with it, one for each namespace it falls under. In the Linux source code, we can see that a struct named pid, which used to keep track of just a single PID, now tracks multiple PIDs through the use of a struct named upid:
struct upid {
  int nr;                     // the PID value
  struct pid_namespace *ns;   // namespace where this PID is relevant
  // ...
};

struct pid {
  // ...
  int level;                  // number of upids
  struct upid numbers[0];     // array of upids
};
To create a new PID namespace, one must call the clone() system call with a special flag CLONE_NEWPID. (C provides a wrapper to expose this system call, and so do many other popular languages.) Whereas the other namespaces discussed below can also be created using the unshare() system call, a PID namespace can only be created at the time a new process is spawned using clone(). Once clone() is called with this flag, the new process immediately starts in a new PID namespace, under a new process tree. This can be demonstrated with a simple C program:
#define _GNU_SOURCE
#include <sched.h>
#include <stdio.h>
#include <stdlib.h>
#include <sys/wait.h>
#include <unistd.h>

static char child_stack[1048576];

static int child_fn() {
  printf("PID: %ld\n", (long)getpid());
  return 0;
}

int main() {
  pid_t child_pid = clone(child_fn, child_stack+1048576, CLONE_NEWPID | SIGCHLD, NULL);
  printf("clone() = %ld\n", (long)child_pid);

  waitpid(child_pid, NULL, 0);
  return 0;
}
Compile and run this program with root privileges and you will notice an output that resembles this:
clone() = 5304
PID: 1
The PID, as printed from within the child_fn, will be 1.
Even though this namespace tutorial code above is not much longer than “Hello, world” in some languages, a lot has happened behind the scenes. The clone() function, as you would expect, has created a new process by cloning the current one and started execution at the beginning of the child_fn() function. However, while doing so, it detached the new process from the original process tree and created a separate process tree for the new process.
Try replacing the static int child_fn() function with the following, to print the parent PID from the isolated process’s perspective:
static int child_fn() {
  printf("Parent PID: %ld\n", (long)getppid());
  return 0;
}
Running the program this time yields the following output:
clone() = 11449
Parent PID: 0
Notice how the parent PID from the isolated process’s perspective is 0, indicating no parent. Try running the same program again, but this time, remove the CLONE_NEWPID flag from within the clone() function call:
pid_t child_pid = clone(child_fn, child_stack+1048576, SIGCHLD, NULL);
This time, you will notice that the parent PID is no longer 0:
clone() = 11561
Parent PID: 11560
However, this is just the first step in our tutorial. These processes still have unrestricted access to other common or shared resources. For example, the networking interface: if the child process created above were to listen on port 80, it would prevent every other process on the system from being able to listen on it.
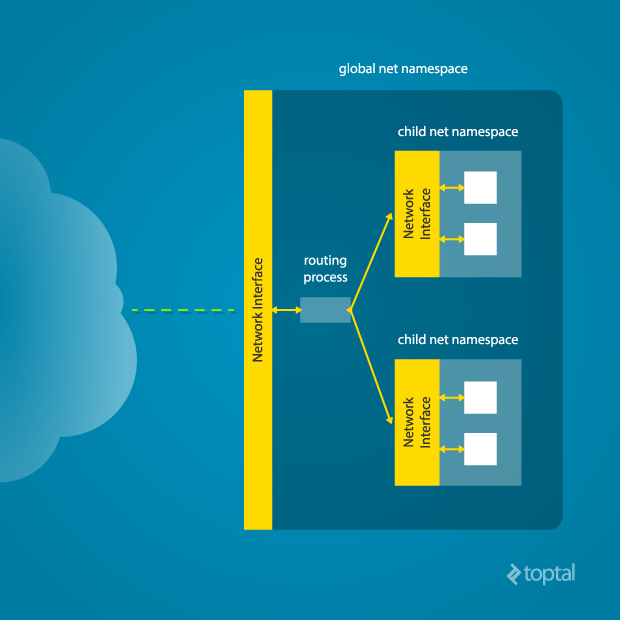
Linux Network Namespace
This is where a network namespace becomes useful. A network namespace allows each of these processes to see an entirely different set of networking interfaces. Even the loopback interface is different for each network namespace.
Isolating a process into its own network namespace involves introducing another flag to the clone() function call: CLONE_NEWNET;
#define _GNU_SOURCE
#include <sched.h>
#include <stdio.h>
#include <stdlib.h>
#include <sys/wait.h>
#include <unistd.h>


static char child_stack[1048576];

static int child_fn() {
  printf("New `net` Namespace:\n");
  system("ip link");
  printf("\n\n");
  return 0;
}

int main() {
  printf("Original `net` Namespace:\n");
  system("ip link");
  printf("\n\n");

  pid_t child_pid = clone(child_fn, child_stack+1048576, CLONE_NEWPID | CLONE_NEWNET | SIGCHLD, NULL);

  waitpid(child_pid, NULL, 0);
  return 0;
}
Output:
Original `net` Namespace:
1: lo: <LOOPBACK,UP,LOWER_UP> mtu 65536 qdisc noqueue state UNKNOWN mode DEFAULT group default
    link/loopback 00:00:00:00:00:00 brd 00:00:00:00:00:00
2: enp4s0: <BROADCAST,MULTICAST,UP,LOWER_UP> mtu 1500 qdisc pfifo_fast state UP mode DEFAULT group default qlen 1000
    link/ether 00:24:8c:a1:ac:e7 brd ff:ff:ff:ff:ff:ff


New `net` Namespace:
1: lo: <LOOPBACK> mtu 65536 qdisc noop state DOWN mode DEFAULT group default
    link/loopback 00:00:00:00:00:00 brd 00:00:00:00:00:00
What’s going on here? The physical ethernet device enp4s0 belongs to the global network namespace, as indicated by the “ip” tool run from this namespace. However, the physical interface is not available in the new network namespace. Moreover, the loopback device is active in the original network namespace, but is “down” in the child network namespace.
In order to provide a usable network interface in the child namespace, it is necessary to set up additional “virtual” network interfaces which span multiple namespaces. Once that is done, it is then possible to create Ethernet bridges, and even route packets between the namespaces. Finally, to make the whole thing work, a “routing process” must be running in the global network namespace to receive traffic from the physical interface, and route it through the appropriate virtual interfaces to to the correct child network namespaces. Maybe you can see why tools like Docker, which do all this heavy lifting for you, are so popular!
To do this by hand, you can create a pair of virtual Ethernet connections between a parent and a child namespace by running a single command from the parent namespace:
ip link add name veth0 type veth peer name veth1 netns <pid>
Here, <pid> should be replaced by the process ID of the process in the child namespace as observed by the parent. Running this command establishes a pipe-like connection between these two namespaces. The parent namespace retains the veth0 device, and passes the veth1 device to the child namespace. Anything that enters one of the ends, comes out through the other end, just as you would expect from a real Ethernet connection between two real nodes. Accordingly, both sides of this virtual Ethernet connection must be assigned IP addresses.
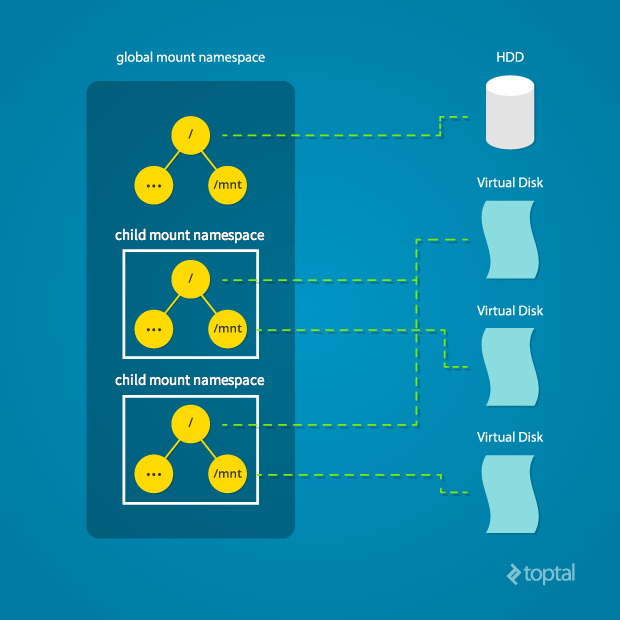
Mount Namespace
Linux also maintains a data structure for all the mountpoints of the system. It includes information like what disk partitions are mounted, where they are mounted, whether they are readonly, et cetera. With Linux namespaces, one can have this data structure cloned, so that processes under different namespaces can change the mountpoints without affecting each other.
Creating separate mount namespace has an effect similar to doing a chroot(). chroot() is good, but it does not provide complete isolation, and its effects are restricted to the root mountpoint only. Creating a separate mount namespace allows each of these isolated processes to have a completely different view of the entire system’s mountpoint structure from the original one. This allows you to have a different root for each isolated process, as well as other mountpoints that are specific to those processes. Used with care per this tutorial, you can avoid exposing any information about the underlying system.
The clone() flag required to achieve this is CLONE_NEWNS:
clone(child_fn, child_stack+1048576, CLONE_NEWPID | CLONE_NEWNET | CLONE_NEWNS | SIGCHLD, NULL)
Initially, the child process sees the exact same mountpoints as its parent process would. However, being under a new mount namespace, the child process can mount or unmount whatever endpoints it wants to, and the change will affect neither its parent’s namespace, nor any other mount namespace in the entire system. For example, if the parent process has a particular disk partition mounted at root, the isolated process will see the exact same disk partition mounted at the root in the beginning. But the benefit of isolating the mount namespace is apparent when the isolated process tries to change the root partition to something else, as the change will only affect the isolated mount namespace.
Interestingly, this actually makes it a bad idea to spawn the target child process directly with the CLONE_NEWNS flag. A better approach is to start a special “init” process with the CLONE_NEWNS flag, have that “init” process change the “/”, “/proc”, “/dev” or other mountpoints as desired, and then start the target process. This is discussed in a little more detail near the end of this namespace tutorial.
Other Namespaces
There are other namespaces that these processes can be isolated into, namely user, IPC, and UTS. The user namespace allows a process to have root privileges within the namespace, without giving it that access to processes outside of the namespace. Isolating a process by the IPC namespace gives it its own interprocess communication resources, for example, System V IPC and POSIX messages. The UTS namespace isolates two specific identifiers of the system: nodename and domainname.
A quick example to show how UTS namespace is isolated is shown below:
#define _GNU_SOURCE
#include <sched.h>
#include <stdio.h>
#include <stdlib.h>
#include <sys/utsname.h>
#include <sys/wait.h>
#include <unistd.h>


static char child_stack[1048576];

static void print_nodename() {
  struct utsname utsname;
  uname(&utsname);
  printf("%s\n", utsname.nodename);
}

static int child_fn() {
  printf("New UTS namespace nodename: ");
  print_nodename();

  printf("Changing nodename inside new UTS namespace\n");
  sethostname("GLaDOS", 6);

  printf("New UTS namespace nodename: ");
  print_nodename();
  return 0;
}

int main() {
  printf("Original UTS namespace nodename: ");
  print_nodename();

  pid_t child_pid = clone(child_fn, child_stack+1048576, CLONE_NEWUTS | SIGCHLD, NULL);

  sleep(1);

  printf("Original UTS namespace nodename: ");
  print_nodename();

  waitpid(child_pid, NULL, 0);

  return 0;
}
This program yields the following output:
Original UTS namespace nodename: XT
New UTS namespace nodename: XT
Changing nodename inside new UTS namespace
New UTS namespace nodename: GLaDOS
Original UTS namespace nodename: XT
Here, child_fn() prints the nodename, changes it to something else, and prints it again. Naturally, the change happens only inside the new UTS namespace.
More information on what all of the namespaces provide and isolate can be found in the tutorial here
Cross-Namespace Communication
Often it is necessary to establish some sort of communication between the parent and the child namespace. This might be for doing configuration work within an isolated environment, or it can simply be to retain the ability to peek into the condition of that environment from outside. One way of doing that is to keep an SSH daemon running within that environment. You can have a separate SSH daemon inside each network namespace. However, having multiple SSH daemons running uses a lot of valuable resources like memory. This is where having a special “init” process proves to be a good idea again.
The “init” process can establish a communication channel between the parent namespace and the child namespace. This channel can be based on UNIX sockets or can even use TCP. To create a UNIX socket that spans two different mount namespaces, you need to first create the child process, then create the UNIX socket, and then isolate the child into a separate mount namespace. But how can we create the process first, and isolate it later? Linux provides unshare(). This special system call allows a process to isolate itself from the original namespace, instead of having the parent isolate the child in the first place. For example, the following code has the exact same effect as the code previously mentioned in the network namespace section:
#define _GNU_SOURCE
#include <sched.h>
#include <stdio.h>
#include <stdlib.h>
#include <sys/wait.h>
#include <unistd.h>


static char child_stack[1048576];

static int child_fn() {
  // calling unshare() from inside the init process lets you create a new namespace after a new process has been spawned
  unshare(CLONE_NEWNET);

  printf("New `net` Namespace:\n");
  system("ip link");
  printf("\n\n");
  return 0;
}

int main() {
  printf("Original `net` Namespace:\n");
  system("ip link");
  printf("\n\n");

  pid_t child_pid = clone(child_fn, child_stack+1048576, CLONE_NEWPID | SIGCHLD, NULL);

  waitpid(child_pid, NULL, 0);
  return 0;
}
And since the “init” process is something you have devised, you can make it do all the necessary work first, and then isolate itself from the rest of the system before executing the target child.
Conclusion
This tutorial is just an overview of how to use namespaces in Linux. It should give you a basic idea of how a Linux developer might start to implement system isolation, an integral part of the architecture of tools like Docker or Linux Containers. In most cases, it would be best to simply use one of these existing tools, which are already well-known and tested. But in some cases, it might make sense to have your very own, customized process isolation mechanism, and in that case, this namespace tutorial will help you out tremendously.
There is a lot more going on under the hood than I’ve covered in this article, and there are more ways you might want to limit your target processes for added safety and isolation. But, hopefully, this can serve as a useful starting point for someone who is interested in knowing more about how namespace isolation with Linux really works.
Originally from Toptal
Cloud Computing Journey – Part 1
So, you decided to migrate a system to the cloud. It may be business or IT initiative, but what does it really mean switching between on premise and the cloud?
For ages, we used to manage our IT infrastructure by ourselves, on our own data centers (or network communication cabinets, for small companies…), using our purchased hardware, while maintaining and troubleshooting every software/hardware/network problem.
In the cloud, things change. In the cloud, we are one of the many customers sharing compute resources in multi-tenant environment. We have no control of the hardware or the chosen platform technology (from the servers’ hardware vendor to the storage vendor), we barely control the virtualization layer, and don’t even get me started talking about troubleshooting the network layer.
There are 3 cloud service models:
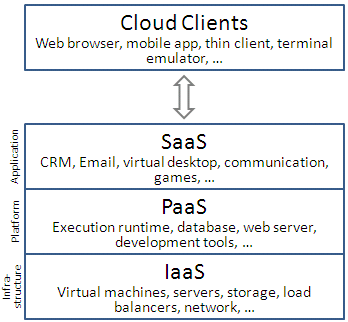
- IaaS (Infrastructure as a service) – In this service model, the customer controls (almost) everything from the virtual servers operating system, through the application layer, up until the data itself.
- PaaS (Platform as a service) – In this service model, the customer controls the application layer, up until the data itself.
- SaaS (Software as a service) – In this service model, the customer has access to a close application, but the customer is the data owner and can control permissions (and auditing) of the data.
Once we understood those basic rules, let’s analyze what does it really means migrating to the cloud.
The word that differentiates a mature cloud service provider from a rookie is transparency.
Mature cloud service provider won’t hesitate to answer tough questions such as “Can I have a copy of your last external audit report?”, “Do you have a business continuity plan?”, “Do you have an SDLC (Software development lifecycle) process?”, etc.
When engaging with cloud service provider, it is important to know as much details about the provider as you can, until you are comfortable enough to sign a contract.
A solid contract will give you assurance about the cloud service provider’s ability to fulfill his obligations and will higher the chances of project success.
In the next couple of articles, I will try to pinpoint important tips for a successful cloud project.
Stay tuned for my next article.
Here are some recommended articles:
Scaling Scala: How to Dockerize Using Kubernetes
Kubernetes is the new kid on the block, promising to help deploy applications into the cloud and scale them more quickly. Today, when developing for a microservices architecture, it’s pretty standard to choose Scala for creating API servers.
If there is a Scala application in your plans and you want to scale it into a cloud, then you are at the right place. In this article I am going to show step-by-step how to take a generic Scala application and implement Kubernetes with Docker to launch multiple instances of the application. The final result will be a single application deployed as multiple instances, and load balanced by Kubernetes.
All of this will be implemented by simply importing the Kubernetes source kit in your Scala application. Please note, the kit hides a lot of complicated details related to installation and configuration, but it is small enough to be readable and easy to understand if you want to analyze what it does. For simplicity, we will deploy everything on your local machine. However, the same configuration is suitable for a real-world cloud deployment of Kubernetes.

What is Kubernetes?
Before going into the gory details of the implementation, let’s discuss what Kubernetes is and why it’s important.
You may have already heard of Docker. In a sense, it is a lightweight virtual machine.
For these reasons, it is already one of the more widely used tools for deploying applications in clouds. A Docker image is pretty easy and fast to build and duplicable, much easier than a traditional virtual machine like VMWare, VirtualBox, or XEN.
Kubernetes complements Docker, offering a complete environment for managing dockerized applications. By using Kubernetes, you can easily deploy, configure, orchestrate, manage, and monitor hundreds or even thousands of Docker applications.
Kubernetes is an open source tool developed by Google and has been adopted by many other vendors. Kubernetes is available natively on the Google cloud platform, but other vendors have adopted it for their OpenShift cloud services too. It can be found on Amazon AWS, Microsoft Azure, RedHat OpenShift, and even more cloud technologies. We can say it is well positioned to become a standard for deploying cloud applications.
Prerequisites
Now that we covered the basics, let’s check if you have all the prerequisite software installed. First of all, you need Docker. If you are using either Windows or Mac, you need the Docker Toolbox. If you are using Linux, you need to install the particular package provided by your distribution or simply follow the official directions.
We are going to code in Scala, which is a JVM language. You need, of course, the Java Development Kit and the scala SBT tool installed and available in the global path. If you are already a Scala programmer, chances are you have those tools already installed.
If you are using Windows or Mac, Docker will by default create a virtual machine named default with only 1GB of memory, which can be too small for running Kubernetes. In my experience, I had issues with the default settings. I recommend that you open the VirtualBox GUI, select your virtual machine default, and change the memory to at least to 2048MB.

The Application to Clusterize
The instructions in this tutorial can apply to any Scala application or project. For this article to have some “meat” to work on, I chose an example used very often to demonstrate a simple REST microservice in Scala, called Akka HTTP. I recommend you try to apply source kit to the suggested example before attempting to use it on your application. I have tested the kit against the demo application, but I cannot guarantee that there will be no conflicts with your code.
So first, we start by cloning the demo application:
git clone https://github.com/theiterators/akka-http-microservice
Next, test if everything works correctly:
cd akka-http-microservice
sbt run
Then, access to http://localhost:9000/ip/8.8.8.8, and you should see something like in the following image:

Adding the Source Kit
Now, we can add the source kit with some Git magic:
git remote add ScalaGoodies https://github.com/sciabarra/ScalaGoodies
git fetch --all
git merge ScalaGoodies/kubernetes
With that, you have the demo including the source kit, and you are ready to try. Or you can even copy and paste the code from there into your application.
Once you have merged or copied the files in your projects, you are ready to start.
Starting Kubernetes
Once you have downloaded the kit, we need to download the necessary kubectl binary, by running:
bin/install.sh
This installer is smart enough (hopefully) to download the correct kubectl binary for OSX, Linux, or Windows, depending on your system. Note, the installer worked on the systems I own. Please do report any issues, so that I can fix the kit.
Once you have installed the kubectl binary, you can start the whole Kubernetes in your local Docker. Just run:
bin/start-local-kube.sh
The first time it is run, this command will download the images of the whole Kubernetes stack, and a local registry needed to store your images. It can take some time, so please be patient. Also note, it needs direct accesses to the internet. If you are behind a proxy, it will be a problem as the kit does not support proxies. To solve it, you have to configure the tools like Docker, curl, and so on to use the proxy. It is complicated enough that I recommend getting a temporary unrestricted access.
Assuming you were able to download everything successfully, to check if Kubernetes is running fine, you can type the following command:
bin/kubectl get nodes
The expected answer is:
NAME        STATUS    AGE
127.0.0.1   Ready     2m
Note that age may vary, of course. Also, since starting Kubernetes can take some time, you may have to invoke the command a couple of times before you see the answer. If you do not get errors here, congratulations, you have Kubernetes up and running on your local machine.
Dockerizing Your Scala App
Now that you have Kubernetes up and running, you can deploy your application in it. In the old days, before Docker, you had to deploy an entire server for running your application. With Kubernetes, all you need to do to deploy your application is:
- Create a Docker image.
- Push it in a registry from where it can be launched.
- Launch the instance with Kubernetes, that will take the image from the registry.
Luckily, it is way less complicated that it looks, especially if you are using the SBT build tool like many do.
In the kit, I included two files containing all the necessary definitions to create an image able to run Scala applications, or at least what is needed to run the Akka HTTP demo. I cannot guarantee that it will work with any other Scala applications, but it is a good starting point, and should work for many different configurations. The files to look for building the Docker image are:
docker.sbt
project/docker.sbt
Let’s have a look at what’s in them. The file project/docker.sbt contains the command to import the sbt-docker plugin:
addSbtPlugin("se.marcuslonnberg" % "sbt-docker" % "1.4.0")
This plugin manages the building of the Docker image with SBT for you. The Docker definition is in the docker.sbt file and looks like this:
imageNames in docker := Seq(ImageName("localhost:5000/akkahttp:latest"))

dockerfile in docker := {
  val jarFile: File = sbt.Keys.`package`.in(Compile, packageBin).value
  val classpath = (managedClasspath in Compile).value
  val mainclass = mainClass.in(Compile, packageBin).value.getOrElse(sys.error("Expected exactly one main class"))
  val jarTarget = s"/app/${jarFile.getName}"
  val classpathString = classpath.files.map("/app/" + _.getName)
    .mkString(":") + ":" + jarTarget
  new Dockerfile {
    from("anapsix/alpine-java:8")
    add(classpath.files, "/app/")
    add(jarFile, jarTarget)
    entryPoint("java", "-cp", classpathString, mainclass)
  }
}
To fully understand the meaning of this file, you need to know Docker well enough to understand this definition file. However, we are not going into the details of the Docker definition file, because you do not need to understand it thoroughly to build the image.
the SBT will take care of collecting all the files for you.
Note the classpath is automatically generated by the following command:
val classpath = (managedClasspath in Compile).value
In general, it is pretty complicated to gather all the JAR files to run an application. Using SBT, the Docker file will be generated with add(classpath.files, "/app/"). This way, SBT collects all the JAR files for you and constructs a Dockerfile to run your application.
The other commands gather the missing pieces to create a Docker image. The image will be built using an existing image APT to run Java programs (anapsix/alpine-java:8, available on the internet in the Docker Hub). Other instructions are adding the other files to run your application. Finally, by specifying an entry point, we can run it. Note also that the name starts with localhost:5000 on purpose, because localhost:5000 is where I installed the registry in the start-kube-local.sh script.
Building the Docker Image with SBT
To build the Docker image, you can ignore all the details of the Dockerfile. You just need to type:
sbt dockerBuildAndPush
The sbt-docker plugin will then build a Docker image for you, downloading from the internet all the necessary pieces, and then it will push to a Docker registry that was started before, together with the Kubernetes application in localhost. So, all you need is to wait a little bit more to have your image cooked and ready.
Note, if you experience problems, the best thing to do is to reset everything to a known state by running the following commands:
bin/stop-kube-local.sh
bin/start-kube-local.sh
Those commands should stop all the containers and restart them correctly to get your registry ready to receive the image built and pushed by sbt.
Starting the Service in Kubernetes
Now that the application is packaged in a container and pushed in a registry, we are ready to use it. Kubernetes uses the command line and configuration files to manage the cluster. Since command lines can become very long, and also be able to replicate the steps, I am using the configurations files here. All the samples in the source kit are in the folder kube.
Our next step is to launch a single instance of the image. A running image is called, in the Kubernetes language, a pod. So let’s create a pod by invoking the following command:
bin/kubectl create -f kube/akkahttp-pod.yml
You can now inspect the situation with the command:
bin/kubectl get pods
You should see:
NAME                   READY     STATUS    RESTARTS   AGE
akkahttp               1/1       Running   0          33s
k8s-etcd-127.0.0.1     1/1       Running   0          7d
k8s-master-127.0.0.1   4/4       Running   0          7d
k8s-proxy-127.0.0.1    1/1       Running   0          7d
Status actually can be different, for example, “ContainerCreating”, it can take a few seconds before it becomes “Running”. Also, you can get another status like “Error” if, for example, you forget to create the image before.
You can also check if your pod is running with the command:
bin/kubectl logs akkahttp
You should see an output ending with something like this:
[DEBUG] [05/30/2016 12:19:53.133] [default-akka.actor.default-dispatcher-5] [akka://default/system/IO-TCP/selectors/$a/0] Successfully bound to /0:0:0:0:0:0:0:0:9000
Now you have the service up and running inside the container. However, the service is not yet reachable. This behavior is part of the design of Kubernetes. Your pod is running, but you have to expose it explicitly. Otherwise, the service is meant to be internal.
Creating a Service
Creating a service and checking the result is a matter of executing:
bin/kubectl create -f kube/akkahttp-service.yaml
bin/kubectl get svc
You should see something like this:
NAME               CLUSTER-IP   EXTERNAL-IP   PORT(S)    AGE
akkahttp-service   10.0.0.54                  9000/TCP   44s
kubernetes         10.0.0.1     <none>        443/TCP    3m
Note that the port can be different. Kubernetes allocated a port for the service and started it. If you are using Linux, you can directly open the browser and type http://10.0.0.54:9000/ip/8.8.8.8 to see the result. If you are using Windows or Mac with Docker Toolbox, the IP is local to the virtual machine that is running Docker, and unfortunately it is still unreachable.
I want to stress here that this is not a problem of Kubernetes, rather it is a limitation of the Docker Toolbox, which in turn depends on the constraints imposed by virtual machines like VirtualBox, which act like a computer within another computer. To overcome this limitation, we need to create a tunnel. To make things easier, I included another script which opens a tunnel on an arbitrary port to reach any service we deployed. You can type the following command:
bin/forward-kube-local.sh akkahttp-service 9000
Note that the tunnel will not run in the background, you have to keep the terminal window open as long as you need it and close when you do not need the tunnel anymore. While the tunnel is running, you can open: http://localhost:9000/ip/8.8.8.8 and finally see the application running in Kubernetes.
Final Touch: Scale
So far we have “simply” put our application in Kubernetes. While it is an exciting achievement, it does not add too much value to our deployment. We’re saved from the effort of uploading and installing on a server and configuring a proxy server for it.
Where Kubernetes shines is in scaling. You can deploy two, ten, or one hundred instances of our application by only changing the number of replicas in the configuration file. So let’s do it.
We are going to stop the single pod and start a deployment instead. So let’s execute the following commands:
bin/kubectl delete -f kube/akkahttp-pod.yml
bin/kubectl create -f kube/akkahttp-deploy.yaml
Next, check the status. Again, you may try a couple of times because the deployment can take some time to be performed:
NAME                                   READY     STATUS    RESTARTS   AGE
akkahttp-deployment-4229989632-mjp6u   1/1       Running   0          16s
akkahttp-deployment-4229989632-s822x   1/1       Running   0          16s
k8s-etcd-127.0.0.1                     1/1       Running   0          6d
k8s-master-127.0.0.1                   4/4       Running   0          6d
k8s-proxy-127.0.0.1                    1/1       Running   0          6d
Now we have two pods, not one. This is because in the configuration file I provided, there is the value replica: 2, with two different names generated by the system. I am not going into the details of the configuration files, because the scope of the article is simply an introduction for Scala programmers to jump-start into Kubernetes.
Anyhow, there are now two pods active. What is interesting is that the service is the same as before. We configured the service to load balance between all the pods labeled akkahttp. This means we do not have to redeploy the service, but we can replace the single instance with a replicated one.
We can verify this by launching the proxy again (if you are on Windows and you have closed it):
bin/forward-kube-local.sh akkahttp-service 9000
Then, we can try to open two terminal windows and see the logs for each pod. For example, in the first type:
bin/kubectl logs -f akkahttp-deployment-4229989632-mjp6u
And in the second type:
bin/kubectl logs -f akkahttp-deployment-4229989632-s822x
Of course, edit the command line accordingly with the values you have in your system.
Now, try to access the service with two different browsers. You should expect to see the requests to be split between the multiple available servers, like in the following image:

Conclusion
Today we barely scratched the surface. Kubernetes offers a lot more possibilities, including automated scaling and restart, incremental deployments, and volumes. Furthermore, the application we used as an example is very simple, stateless with the various instances not needing to know each other. In the real world, distributed applications do need to know each other, and need to change configurations according to the availability of other servers. Indeed, Kubernetes offers a distributed keystore (etcd) to allow different applications to communicate with each other when new instances are deployed. However, this example is purposefully small enough and simplified to help you get going, focusing on the core functionalities. If you follow the tutorial, you should be able to get a working environment for your Scala application on your machine without being confused by a large number of details and getting lost in the complexity.
This article was written by Michele Sciabarra, a Toptal Scala developer.
