Archive for the ‘API Management’ Category
Not all cloud providers are built the same

When organizations debate workload migration to the cloud, they begin to realize the number of public cloud alternatives that exist, both U.S hyper-scale cloud providers and several small to medium European and Asian providers.
The more we study the differences between the cloud providers (both IaaS/PaaS and SaaS providers), we begin to realize that not all cloud providers are built the same.
How can we select a mature cloud provider from all the alternatives?
Transparency
Mature cloud providers will make sure you don’t have to look around their website, to locate their security compliance documents, allow you to download their security controls documentation, such as SOC 2 Type II, CSA Star, CSA Cloud Controls Matrix (CCM), etc.
What happens if we wish to evaluate the cloud provider by ourselves?
Will the cloud provider (no matter what cloud service model), allow me to conduct a security assessment (or even a penetration test), to check the effectiveness of his security controls?
Global presence
When evaluating cloud providers, ask yourself the following questions:
- Does the cloud provider have a local presence near my customers?
- Will I be able to deploy my application in multiple countries around the world?
- In case of an outage, will I be able to continue serving my customers from a different location with minimal effort?
Scale
Deploying an application for the first time, we might not think about it, but what happens in the peak scenario?
Will the cloud provider allow me to deploy hundreds or even thousands of VM’s (or even better, containers), in a short amount of time, for a short period, from the same location?
Will the cloud provider allow me infinite scale to store my data in cloud storage, without having to guess or estimate the storage size?
Multi-tenancy
As customers, we expect our cloud providers to offer us a fully private environment.
We never want to hear about “noisy neighbor” (where one customer is using a lot of resources, which eventually affect other customers), and we never want to hear a provider admits that some or all of the resources (from VMs, database, storage, etc.) are being shared among customers.
Will the cloud provider be able to offer me a commitment to a multi-tenant environment?
Stability
One of the major reasons for migrating to the cloud is the ability to re-architect our services, whether we are still using VMs based on IaaS, databases based on PaaS, or fully managed CRM services based on SaaS.
In all scenarios, we would like to have a stable service with zero downtime.
Will the cloud provider allow me to deploy a service in a redundant architecture, that will survive data center outage or infrastructure availability issues (from authentication services, to compute, storage, or even network infrastructure) and return to business with minimal customer effect?
APIs
In the modern cloud era, everything is based on API (Application programming interface).
Will the cloud provider offer me various APIs?
From deploying an entire production environment in minutes using Infrastructure as Code, to monitoring both performances of our services, cost, and security auditing – everything should be allowed using API, otherwise, it is simply not scale/mature/automated/standard and prone to human mistakes.
Data protection
Encrypting data at transit, using TLS 1.2 is a common standard, but what about encryption at rest?
Will the cloud provider allow me to encrypt a database, object storage, or a simple NFS storage using my encryption keys, inside a secure key management service?
Will the cloud provider allow me to automatically rotate my encryption keys?
What happens if I need to store secrets (credentials, access keys, API keys, etc.)? Will the cloud provider allow me to store my secrets in a secured, managed, and audited location?
In case you are about to store extremely sensitive data (from PII, credit card details, healthcare data, or even military secrets), will the cloud provider offer me a solution for confidential computing, where I can store sensitive data, even in memory (or in use)?
Well architected
A mature cloud provider has a vast amount of expertise to share knowledge with you, about how to build an architecture that will be secure, reliable, performance efficient, cost-optimized, and continually improve the processes you have built.
Will the cloud provider offer me rich documentation on how to achieve all the above-mentioned goals, to provide your customers the best experience?
Will the cloud provider offer me an automated solution for deploying an entire application stack within minutes from a large marketplace?
Cost management
The more we broaden our use of the IaaS / PaaS service, the more we realize that almost every service has its price tag.
We might not prepare for this in advance, but once we begin to receive the monthly bill, we begin to see that we pay a lot of money, sometimes for services we don’t need, or for an expensive tier of a specific service.
Unlike on-premise, most cloud providers offer us a way to lower the monthly bill or pay for what we consume.
Regarding cost management, ask yourself the following questions:
Will the cloud provider charge me for services when I am not consuming them?
Will the cloud provider offer me detailed reports that will allow me to find out what am I paying for?
Will the cloud provider offer me documents and best practices for saving costs?
Summary
Answering the above questions with your preferred cloud provider, will allow you to differentiate a mature cloud provider, from the rest of the alternatives, and to assure you that you have made the right choice selecting a cloud provider.
The answers will provide you with confidence, both when working with a single cloud provider, and when taking a step forward and working in a multi-cloud environment.
References
Security, Trust, Assurance, and Risk (STAR)
https://cloudsecurityalliance.org/star/
SOC 2 – SOC for Service Organizations: Trust Services Criteria
https://www.aicpa.org/interestareas/frc/assuranceadvisoryservices/aicpasoc2report.html
Confidential Computing and the Public Cloud
https://eyal-estrin.medium.com/confidential-computing-and-the-public-cloud-fa4de863df3
Confidential computing: an AWS perspective
https://aws.amazon.com/blogs/security/confidential-computing-an-aws-perspective/
AWS Well-Architected
https://aws.amazon.com/architecture/well-architected
Azure Well-Architected Framework
https://docs.microsoft.com/en-us/azure/architecture/framework/
Google Cloud’s Architecture Framework
https://cloud.google.com/architecture/framework
Oracle Architecture Center
https://docs.oracle.com/solutions/
Alibaba Cloud’s Well-Architectured Framework
Cloud Services – Evolution and Future Trends
Cloud services are no longer a buzz, they are existing fact. Small and large organizations are leading the revolution in the IT industry for almost a decade, some migrating small environments and conducting experiments while others deploying their entire production environments using this model.
It is commonly used to consider cloud services as a continue of the data center environment and in fact this is where the concept evolved, and yet, the differences between the traditional computing services, server farms, storage and even virtualization are fundamentally different from a true cloud. Let’s evaluate the differences:
In the past we used to call “cloud”, for any compute services containing the following characteristics as defined by NIST:
- On-Demand Self-Service
- Broad Network Access
- Resource Pooling
- Rapid Elasticity
- Measured service
When looking deeper into the various cloud service models such as IaaS (Infrastructure as a Service), PaaS (Platform as a Service) and SaaS (Software as a Service), we find that things are not always black or white: In some cases we come across services that we know for fact they are cloud services, we can’t always say these services include all the above characteristics.
A good example: File sharing services such as Dropbox. As a private customer we are not exposed to data that will enable us to measure the service (in terms of performance or in terms of billing vs storage capacity cost).
In case we choose to deploy a “private cloud” inside our organizational data center, based on infrastructure such as VMWARE, OpenStack or alike, we expect all the above characteristics in our on premise as well.
Let’s differentiate between cloud and hosting service
In the current IT industry there are many companies offering compute services, on the range between cloud services and hosting services.
Hosting companies (or managed services), usually offers the customer the following capabilities:
- Compute environments – Such as physical servers (in case of special hardware requirements), virtual servers, storage and network equipment (Routers, Firewalls, VPN Gateway, etc.)
- Managed services – Such as web hosting for marketing or commercial web sites, email services, file sharing services and organizational systems such as CRM as a service.
- Backup and DR as a service.
- Managed support/IT services.
Hosting companies might offer the customer a capability to increase the number of servers and in some cases even to choose servers in data center abroad (in case we would like to allow access to the data/servers close to the end customer).
For SMB or enterprise organizations making their first move to the cloud, or for customers who wishes to outsource their IT services to external providers, there isn’t much of a difference between choosing hosting/managed service and choose public cloud service.
The differences between hosting and cloud services begins when trying to deploy entire environments in the cloud, based on architectures emphasizing service and platform (SaaS and PaaS), and less on infrastructure as a service (IaaS).
In this configuration, the system is developed based on dynamic scaling capabilities, environments deployed for a short amount of time, servers and infrastructure raised for specific purpose and stop to exist a few minutes after the entire process completes.
This model is called “Cloud Native Applications”, which allows us to avoid committing to pre-defined amount of infrastructure, specific task management, compatibility, server health check, etc., what is the role of each server or platform, in case they will be destroyed within a second? The infrastructure in this model is not important, only the service the system meant to provide.
Unlike hard-coded infrastructure management, there is a new concept – “Infrastructure as a code”. Environments are written as “recipes”, sent to the cloud provider using API’s, and environments are being created instantly and on the fly.
A few examples for the efficiencies of this model – A large American service provider destroys his entire IT environment in the cloud and deploys an entire up-to-date mirror environment within a few minutes instead of updating each and every server. A different American service provider increases the amount of servers automatically in advanced before peak hours, as a result of applicative monitoring, and after peak hours, all the new servers vanishes.
This change is not a magic, but a result of cloud efficient planning of systems and applications, training dedicated teams with the relevant capabilities, understanding the cloud provider’s services, billing, prioritization and the constant changes in the management interfaces.
Process of migrating systems to the public cloud
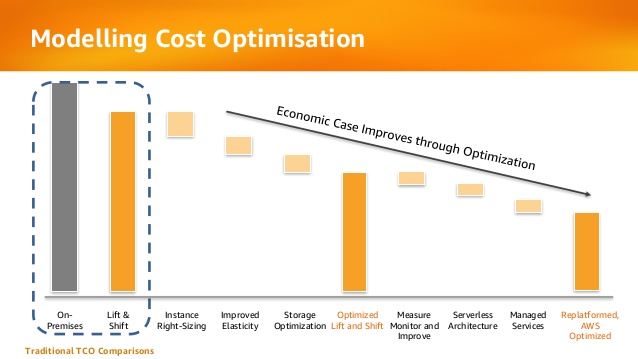
Infrastructure as a Service (IaaS) allows organizations to perform “Lift & Shift” (copying existing systems to the cloud with minor changes) from the on premise environment to the public cloud, as part of migration processes to the cloud.
Most organizations will quickly find out that the “Lift & Shift” strategy is indeed easier as first stage, but in the long term it is a very bad economical decision, with the same challenges that organizations struggle with today: waste of hardware resources, un-optimized operating system and running code on servers, distributed management difficulties, etc.
At later stages, organizations who migrated systems to the public cloud, begin to perform tuning to their cloud environments by measuring resource usage, for their virtual servers, adapting the proper VM instance type for the actual use in terms of CPU/memory/storage.
Below is an example from AWS presentation about the evolution organizations pass migrating to public cloud in terms of cost:
The future is here
Today, startup companies and enterprise organizations are developing applications for the cloud, agnostically to the hardware or infrastructure underneath.
In past, organizations used to migrate from developing on physical servers to virtual servers, and today, organizations are migrating from developing monolith applications to micro-service based applications and even Serverless applications (code running inside a managed compute environment, without the need to manage infrastructure resources such as servers, storage, etc.)
Changes in the development world is crucial to understanding what is cloud service, due to the fact that today, we are less relying on NIST definition of cloud service, and providers offering Infrastructure as a Service (as most hosting providers) and today cloud service is characterized by the following capabilities:
- Collection of API’s
- Billing capability of services/resources by their actual usage
- Services managed using API (such as the ability to provision, decommission, start/stop, etc.)
The bottom line
Today there are many providers who wrap VMWARE infrastructure with friendly user interface, allowing the customer to choose the VM type (in terms of CPU/Memory) and the number of servers the customer would like to consume, but it is not scale enough and it doesn’t allow the customer the flexibility to scale-up or scale-down to hundreds of servers automatically, and within seconds over multiple geographical regions.
Cloud provider who supports “Cloud Native Applications” enables the customer to connect his automation mechanisms, build and deployment processes using API’s to the cloud provider’s infrastructure, in-order to allow provisioning/changing compute environments, deploy micro-services based systems and even allowing the customer to deploy and run Serverless infrastructure.
The next time you are considering a service provider, whether using a hosting provider (sophisticated as he might be) or using public cloud provider, with capabilities of running hundreds of servers over multiple geographic regions within minutes, hands-free, supporting micro-services and Serverless applications, with API connectivity capabilities, simply present the service provider your requirements, and choose the most suitable service provider.
This article was written by Eyal Estrin, cloud security architect and Vitaly Unic, application security architect.
Integrating Facebook Authentication in AngularJS App with Satellizer
With the arrival of feature-rich front-end frameworks such as AngularJS, more and more logic is being implemented on the front-end, such as data manipulation/validation, authentication, and more. Satellizer, an easy to use token-based authentication module for AngularJS, simplifies the process of implementing authentication mechanism in AngularJS, The library comes with built-in support for Google, Facebook, LinkedIn, Twitter, Instagram, GitHub, Bitbucket, Yahoo, Twitch, and Microsoft (Windows Live) accounts.

In this article, we will build a very simple webapp similar to the one here which allows you to login and see current user’s information.
Authentication vs Authorization
These are 2 scary words that you often encounter once your app starts integrating a user system. According to Wikipedia:
Authentication is the act of confirming the truth of an attribute of a single piece of data (a datum) claimed true by an entity.
Authorization is the function of specifying access rights to resources related to information security and computer security in general and to access control in particular.
In layman terms, let’s take an example of a blog website with some people working on it. The bloggers write articles and the manager validates the content. Each person can authenticate (login) into the system but their rights (authorisation) are different, so the blogger cannot validate content whereas the manager can.
Why Satellizer
You can create your own authentication system in AngularJS by following some tutorials such as this very detailed one: JSON Web Token Tutorial: An Example in Laravel and AngularJS. I suggest reading this article as it explains JWT (JSON Web Token) very well, and shows a simple way to implement authentication in AngularJS using directly the local storage and HTTP interceptors.
So why Satellizer? The principal reason is that it supports a handful of social network logins such as Facebook, Twitter, etc. Nowadays, especially for websites used on mobile, typing username and password is quite cumbersome and users expect to be able to use your website with little hindrance by using social logins. As integrating the SDK of each social network and following their documentations is quite repetitive, it would be nice to support these social logins with minimal effort.
Moreover Satellizer is an active project on Github. Active is key here as these SDKs change quite frequently and you don’t want to read their documentation every now and then (anyone working with Facebook SDK knows how annoying it is)
AngularJS App with Facebook Login
This is where things start to become interesting.
We will build a web app that has regular login/register (i.e. using username, password) mechanism and supports social logins as well. This webapp is very simple as it has only 3 pages:
- Home page: anyone can see
- Login page: to enter username/password
- Secret page: that only logged in users can see
For backend, we will use Python and Flask. Python and the framework Flask are quite expressive so I hope porting the code to other languages/frameworks will not be very hard. We will, of course, use AngularJS for front-end. And for the social logins, we will integrate with Facebook only as it is the most popular social network at this time.
Let’s start!
Step #1: Bootstrap Project
Here is how we will structure our code:
- app.py
- static/
	- index.html
- app.js
	- bower.json
	- partials/
		- login.tpl.html
		- home.tpl.html
		- secret.tpl.html
All the back-end code is in app.py. The front-end code is put in static/ folder. By default, Flask will automatically serve the contents of static/ folder. All the partial views are in static/partials/ and handled by the ui.router module.
To start coding the back-end, we’ll need Python 2.7.* and install the required libraries using pip. You can of course use virtualenv to isolate a Python environment. Below is the list of required Python modules to put in requirements.txt:
Flask==0.10.1
PyJWT==1.4.0
Flask-SQLAlchemy==1.0
requests==2.7.0
To install all these dependencies:
pip install -r requirements.txt
In app.py we have some initial code to bootstrap Flask (import statements are omitted for brevity):
app = Flask(__name__)

@app.route('/')
def index():
    return flask.redirect('/static/index.html')

if __name__ == '__main__':
    app.run(debug=True)
Next we init bower and install AngularJS and ui.router:
bower init # here you will need to answer some question. when in doubt, just hit enter :)
bower install angular angular-ui-router --save # install and save these dependencies into bower.json
Once these libraries are installed, we need to include AngularJS and ui-router in index.html and create routings for 3 pages: home, login, and secret.
<body ng-app="DemoApp">

<a ui-sref="home">Home</a>
<a ui-sref="login">Login</a>
<a ui-sref="secret">Secret</a>
<div ui-view></div>

<script src="bower_components/angular/angular.min.js"></script>
<script src="bower_components/angular-ui-router/release/angular-ui-router.min.js"></script>
<script src="main.js"></script>
</body>
Below is the code that we need in main.js to configure routing:
var app = angular.module('DemoApp', ['ui.router']);

app.config(function ($stateProvider, $urlRouterProvider) {
  $stateProvider
    .state('home', {
      url: '/home',
      templateUrl: 'partials/home.tpl.html'
    })
    .state('secret', {
      url: '/secret',
      templateUrl: 'partials/secret.tpl.html',
    })
    .state('login', {
      url: '/login',
      templateUrl: 'partials/login.tpl.html'
    });
  $urlRouterProvider.otherwise('/home');

});
At this point if you run the server python app.py, you should have this basic interface at http://localhost:5000

The links Home, Login, and Secret should work at this point and show the content of the corresponding templates.
Congratulation, you just finished setting up the skeleton! If you encounter any error, please check out thecode on GitHub
Step #2: Login and Register
At the end of this step, you’ll have a webapp that you can register/login using email and password.
The first step is to configure the backend. We need a User model and a way to generate the JWT token for a given user. The User model shown below is really simplified and does not perform even any basic checks such as if field email contains “@”, or if field password contains at least 6 characters, etc.
class User(db.Model):
    id = db.Column(db.Integer, primary_key=True)
    email = db.Column(db.String(100), nullable=False)
    password = db.Column(db.String(100))

    def token(self):
        payload = {
            'sub': self.id,
            'iat': datetime.utcnow(),
            'exp': datetime.utcnow() + timedelta(days=14)
        }
        token = jwt.encode(payload, app.config['TOKEN_SECRET'])
        return token.decode('unicode_escape')
We use the jwt module in python to generate the payload part in JWT. The iat and exp part correspond to the timestamp that token is created and expired. In this code, the token will be expired in 2 weeks.
After the model User was created, we can add the “login” and “register” endpoints. The code for both are quite similar, so here I will just show the “register” part. Please note that by default, Satellizer will call the endpoints /auth/login and /auth/signup for the “login” and “register” respectively.
@app.route('/auth/signup', methods=['POST'])
def signup():
    data = request.json

    email = data["email"]
    password = data["password"]

    user = User(email=email, password=password)
    db.session.add(user)
    db.session.commit()

    return jsonify(token=user.token())
Let’s check the endpoint using curl first:
curl localhost:5000/auth/signup -H "Content-Type: application/json" -X POST -d '{"email":"[email protected]","password":"xyz"}'
The result should look like this:
{
  "token": "very long string…."
}
Now that the back-end part is ready, let’s attack the front-end! First, we need to install satellizer and add it as a dependency in main.js:
bower install satellizer --save
Add satellizer as dependency:
var app = angular.module('DemoApp', ['ui.router', 'satellizer']);
Login and signup in satellizer is actually quite simple in comparison to all the setup until now:
$scope.signUp = function () {
    $auth
      .signup({email: $scope.email, password: $scope.password})
      .then(function (response) {
        // set the token received from server
        $auth.setToken(response);
        // go to secret page
        $state.go('secret');
      })
      .catch(function (response) {
        console.log("error response", response);
      })
  };
If you have any difficulty setting up the code, you can take a look at the code on GitHub.
Step #3: But Secret View Is Not Really Secret, Because Anyone Can See It!
Yes, that is correct! Until now, anyone can go to secret page without logging in.
It’s time to add some interceptor in AngularJS to make sure that if someone goes to secret page and if this user is not logged in, they will be redirected to the login page.
First, we should add a flag requiredLogin to distinguish secret page from other ones.
    .state('secret', {
      url: '/secret',
      templateUrl: 'partials/secret.tpl.html',
      controller: 'SecretCtrl',
      data: {requiredLogin: true}
    })
The “data” part will be used in the $stateChangeStart event which is fired each time the routing changes:
app.run(function ($rootScope, $state, $auth) {
  $rootScope.$on('$stateChangeStart',
    function (event, toState) {
      var requiredLogin = false;
      // check if this state need login
      if (toState.data && toState.data.requiredLogin)
        requiredLogin = true;

      // if yes and if this user is not logged in, redirect him to login page
      if (requiredLogin && !$auth.isAuthenticated()) {
        event.preventDefault();
        $state.go('login');
      }
    });
});
Now, the user cannot go directly to the secret page without logging in. Hooray!
As usual, the code of this step can be found here.
Step #4: It’s Time to Get Something Really Secret!
At this moment, there’s nothing really secret in the secret page. Let’s put something personal there.
This step starts by creating an endpoint in the back-end which is only accessible for an authenticated user, such as having a valid token. The endpoint /user below returns the user_id and email of the user corresponding to the token.
@app.route('/user')
def user_info():
    # the token is put in the Authorization header
    if not request.headers.get('Authorization'):
        return jsonify(error='Authorization header missing'), 401

    # this header looks like this: “Authorization: Bearer {token}”
    token = request.headers.get('Authorization').split()[1]
    try:
        payload = jwt.decode(token, app.config['TOKEN_SECRET'])
    except DecodeError:
        return jsonify(error='Invalid token'), 401
    except ExpiredSignature:
        return jsonify(error='Expired token'), 401
    else:
        user_id = payload['sub']
        user = User.query.filter_by(id=user_id).first()
        if user is None:
            return jsonify(error='Should not happen ...'), 500
        return jsonify(id=user.id, email=user.email), 200
    return jsonify(error="never reach here..."), 500
Again, we make use of the module jwt to decode the JWT token included in the ‘Authorization’ header and to handle the case when the token is expired or not valid.
Let’s test this endpoint using curl. First, we need to get a valid token:
curl localhost:5000/auth/signup -H "Content-Type: application/json" -X POST -d '{"email":"[email protected]","password":"xyz"}'
Then with this token:
curl localhost:5000/user -H "Authorization: Bearer {put the token here}"
Which gives this result:
{
  "email": "[email protected]",
  "id": 1
}
Now we need to include this endpoint in the Secret Controller. This is quite simple as we just need to call the endpoint using the regular $http module. The token is automatically inserted to the header by Satellizer, so we don’t need to bother with all the details of saving the token and then putting it in the right header.
  getUserInfo();

  function getUserInfo() {
    $http.get('/user')
      .then(function (response) {
        $scope.user = response.data;
      })
      .catch(function (response) {
        console.log("getUserInfo error", response);
      })
  }
Finally, we have something truly personal in the secret page!

The code of this step is on GitHub.
Step #5: Facebook Login with Satellizer
A nice thing about Satellizer, as mentioned at the beginning, is it makes integrating social login a lot easier. At the end of this step, users can login using their Facebook account!

First thing to do is to create an application on Facebook developers page in order to have an application_idand a secret code. Please follow developers.facebook.com/docs/apps/register to create a Facebook developer account if you don’t have one already and create a website app. After that, you will have the application ID and application secret as in the screenshot below.

Once the user chooses to connect with Facebook, Satellizer will send an authorization code to the endpoint/auth/facebook. With this authorization code, the back-end can retrieve an access token from Facebook/oauth endpoint that allows the call to Facebook Graph API to get user information such as location, user_friends, user email, etc.
We also need to keep track of whether a user account is created with Facebook or through regular signup. To do so, we add facebook_id to our User model.
facebook_id = db.Column(db.String(100))
The facebook secret is configured via env variables FACEBOOK_SECRET that we add to app.config.
app.config['FACEBOOK_SECRET'] = os.environ.get('FACEBOOK_SECRET')
So to launch the app.py, you should set this env variable:
FACEBOOK_SECRET={your secret} python app.py
Here is the method which handles Facebook logins. By default Satellizer will call the endpoint /auth/facebook.
@app.route('/auth/facebook', methods=['POST'])
def auth_facebook():
    access_token_url = 'https://graph.facebook.com/v2.3/oauth/access_token'
    graph_api_url = 'https://graph.facebook.com/v2.5/me?fields=id,email'

    params = {
        'client_id': request.json['clientId'],
        'redirect_uri': request.json['redirectUri'],
        'client_secret': app.config['FACEBOOK_SECRET'],
        'code': request.json['code']
    }

    # Exchange authorization code for access token.
    r = requests.get(access_token_url, params=params)
    # use json.loads instead of urlparse.parse_qsl
    access_token = json.loads(r.text)

    # Step 2. Retrieve information about the current user.
    r = requests.get(graph_api_url, params=access_token)
    profile = json.loads(r.text)

    # Step 3. Create a new account or return an existing one.
    user = User.query.filter_by(facebook_id=profile['id']).first()
    if user:
        return jsonify(token=user.token())

    u = User(facebook_id=profile['id'], email=profile['email'])
    db.session.add(u)
    db.session.commit()
    return jsonify(token=u.token())
To send a request to the Facebook server, we use the handy module requests. Now the difficult part on the back-end is done. On the front-end, adding Facebook login is quite simple. First, we need to tell Satellizer ourfacebook_id by adding this code into app.config function:
$authProvider.facebook({
    clientId: {your facebook app id},
    // by default, the redirect URI is http://localhost:5000
    redirectUri: 'http://localhost:5000/static/index.html'
  });
To login using Facebook, we can just call:
$auth.authenticate(“facebook”)
As usual, you can check the code on GitHub
At this time, the webapp is complete in terms of functionality. The user can login/register using regular email and password or by using Facebook. Once logged in, the user can see his secret page.
Make a Pretty Interface
The interface is not very pretty at this point, so let’s add a little bit of Bootstrap for the layout and the angular toaster module to handle an error message nicely, such as when login fails.
The code for this beautifying part can be found here.
Conclusion
This article shows a step-by-step integration of Satellizer in a (simple) AngularJS webapp. With Satellizer, we can easily add other social logins such as Twitter, Linkedin, and more. The code on the front-end is quite the same as in the article. However, the back-end varies as social network SDKs have different endpoints with different protocols. You can take a look at https://github.com/sahat/satellizer/blob/master/examples/server/python/app.py which contains examples for Facebook, Github, Google, Linkedin, Twiter and Bitbucket. When in doubt, you should take a look at the documentation on https://github.com/sahat/satellizer.
This article was written by Son Nguyen Kim, a Toptal freelance developer.
Persisting Data Across Page Reloads: Cookies, IndexedDB and Everything In-Between
The following article is a guest post from Toptal. Toptal is an elite network of freelancers that enables businesses to connect with the top 3% of software engineers and designers in the world.
Suppose I’m visiting a web site. I right-click on one of the navigation links and select to open the link in a new window. What should happen? If I’m like most users, I expect the new page to have the same content as if I had clicked the link directly. The only difference should be that the page appears in a new window. But if your web site is a single-page application (SPA), you may see weird results unless you’ve carefully planned for this case.
Recall that in an SPA, a typical navigation link is often a fragment identifier, starting with a hash mark (#). Clicking the link directly does not reload the page, so all the data stored in JavaScript variables are retained. But if I open the link in a new tab or window, the browser does reload the page, reinitializing all the JavaScript variables. So any HTML elements bound to those variables will display differently, unless you’ve taken steps to preserve that data somehow.

There’s a similar issue if I explicitly reload the page, such as by hitting F5. You may think I shouldn’t ever need to hit F5, because you’ve set up a mechanism to push changes from the server automatically. But if I’m a typical user, you can bet I’m still going to reload the page. Maybe my browser seems to have repainted the screen incorrectly, or I just want to be certain I have the very latest stock quotes.
APIs May Be Stateless, Human Interaction Is Not
Unlike an internal request via a RESTful API, a human user’s interaction with a web site is not stateless. As a web user, I think of my visit to your site as a session, almost like a phone call. I expect the browser to remember data about my session, in the same way that when I call your sales or support line, I expect the representative to remember what was said earlier in the call.

An obvious example of session data is whether I’m logged in, and if so, as which user. Once I go through a login screen, I should be able to navigate freely through the user-specific pages of the site. If I open a link in a new tab or window and I’m presented with another login screen, that’s not very user friendly.
Another example is the contents of the shopping cart in an e-commerce site. If hitting F5 empties the shopping cart, users are likely to get upset.
In a traditional multi-page application written in PHP, session data would be stored in the $_SESSION superglobal array. But in an SPA, it needs to be somewhere on the client side. There are four main options for storing session data in an SPA:
- Cookies
- Fragment identifier
- Web storage
- IndexedDB
Four Kilobytes of Cookies
Cookies are an older form of web storage in the browser. They were originally intended to store data received from the server in one request and send it back to the server in subsequent requests. But from JavaScript, you can use cookies to store just about any kind of data, up to a size limit of 4 KB per cookie. AngularJS offers the ngCookies module for managing cookies. There is also a js-cookies package that provides similar functionality in any framework.

Keep in mind that any cookie you create will be sent to the server on every request, whether it’s a page reload or an Ajax request. But if the main session data you need to store is the access token for the logged-in user, you want this sent to the server on every request anyway. It’s natural to try to use this automatic cookie transmission as the standard means of specifying the access token for Ajax requests.
You may argue that using cookies in this manner is incompatible with RESTful architecture. But in this case it is just fine as each request via the API is still stateless, having some inputs and some outputs. It’s just that one of the inputs is being sent in a funny way, via a cookie. If you can arrange for the login API request to send the access token back in a cookie also, then your client side code hardly needs to deal with cookies at all. Again, it’s just another output from the request being returned in an unusual way.
Cookies offer one advantage over web storage. You can provide a “keep me logged in” checkbox on the login form. With the semantics, I expect if I leave it unchecked then I will remain logged in if I reload the page or open a link in a new tab or window, but I’m guaranteed to be logged out once I close the browser. This is an important safety feature if I’m using a shared computer. As we’ll see later, web storage does not support this behavior.
So how might this approach work in practice? Suppose you’re using LoopBack on the server side. You’ve defined a Person model, extending the built-in User model, adding the properties you want to maintain for each user. You’ve configured the Person model to be exposed over REST. Now you need to tweak server/server.js to achieve the desired cookie behavior. Below is server/server.js, starting from what was generated by slc loopback, with the marked changes:
var loopback = require('loopback');
var boot = require('loopback-boot');

var app = module.exports = loopback();

app.start = function() {
  // start the web server
  return app.listen(function() {
    app.emit('started');
    var baseUrl = app.get('url').replace(/\/$/, '');
    console.log('Web server listening at: %s', baseUrl);
    if (app.get('loopback-component-explorer')) {
      var explorerPath = app.get('loopback-component-explorer').mountPath;
      console.log('Browse your REST API at %s%s', baseUrl, explorerPath);
    }
  });
};

// start of first change
app.use(loopback.cookieParser('secret'));
// end of first change

// Bootstrap the application, configure models, datasources and middleware.
// Sub-apps like REST API are mounted via boot scripts.
boot(app, __dirname, function(err) {
  if (err) throw err;

  // start of second change
  app.remotes().after('Person.login', function (ctx, next) {
    if (ctx.result.id) {
      var opts = {signed: true};
      if (ctx.req.body.rememberme !== false) {
        opts.maxAge = 1209600000;
      }
      ctx.res.cookie('authorization', ctx.result.id, opts);
    }
    next();
  });
  app.remotes().after('Person.logout', function (ctx, next) {
    ctx.res.cookie('authorization', '');
    next();
  });
  // end of second change

  // start the server if `$ node server.js`
  if (require.main === module)
    app.start();
});
The first change configures the cookie parser to use ‘secret’ as the cookie signing secret, thereby enabling signed cookies. You need to do this because although LoopBack looks for an access token in either of the cookies ‘authorization’ or ‘access_token’, it requires that such a cookie be signed. Actually, this requirement is pointless. Signing a cookie is intended to ensure that the cookie hasn’t been modified. But there’s no danger of you modifying the access token. After all, you could have sent the access token in unsigned form, as an ordinary parameter. Thus, you don’t need to worry about the cookie signing secret being hard to guess, unless you’re using signed cookies for something else.
The second change sets up some postprocessing for the Person.login and Person.logout methods. For Person.login, you want to take the resulting access token and send it to the client as the signed cookie ‘authorization’ also. The client may add one more property to the credentials parameter, rememberme, indicating whether to make the cookie persistent for 2 weeks. The default is true. The login method itself will ignore this property, but the postprocessor will check it.
For Person.logout, you want to clear out this cookie.
You can see the results of these changes right away in the StrongLoop API Explorer. Normally after a Person.login request, you would have to copy the access token, paste it into the form at the top right, and click Set Access Token. But with these changes, you don’t have to do any of that. The access token is automatically saved as the cookie ‘authorization’, and sent back on each subsequent request. When the Explorer is displaying the response headers from Person.login, it omits the cookie, because JavaScript is never allowed to see Set-Cookie headers. But rest assured, the cookie is there.
On the client side, on a page reload you would see if the cookie ‘authorization’ exists. If so, you need to update your record of the current userId. Probably the easiest way to do this is to store the userId in a separate cookie on successful login, so you can retrieve it on a page reload.
The Fragment Identifier
As I’m visiting a web site that has been implemented as an SPA, the URL in my browser’s address bar might look something like “https://example.com/#/my-photos/37”. The fragment identifier portion of this, “#/my-photos/37”, is already a collection of state information that could be viewed as session data. In this case, I’m probably viewing one of my photos, the one whose ID is 37.

You may decide to embed other session data within the fragment identifier. Recall that in the previous section, with the access token stored in the cookie ‘authorization’, you still needed to keep track of the userId somehow. One option is to store it in a separate cookie. But another approach is to embed it in the fragment identifier. You could decide that while I’m logged in, all the pages I visit will have a fragment identifier beginning with “#/u/XXX”, where XXX is the userId. So in the previous example, the fragment identifier might be “#/u/59/my-photos/37” if my userId is 59.
Theoretically, you could embed the access token itself in the fragment identifier, avoiding any need for cookies or web storage. But that would be a bad idea. My access token would then be visible in the address bar. Anyone looking over my shoulder with a camera could take a snapshot of the screen, thereby gaining access to my account.
One final note: it is possible to set up an SPA so that it doesn’t use fragment identifiers at all. Instead it uses ordinary URLs like “http://example.com/app/dashboard” and “http://example.com/app/my-photos/37”, with the server configured to return the top level HTML for your SPA in response to a request for any of these URLs. Your SPA then does its routing based on the path (e.g. “/app/dashboard” or “/app/my-photos/37”) instead of the fragment identifier. It intercepts clicks on navigation links, and uses History.pushState() to push the new URL, then proceeds with routing as usual. It also listens for popstate events to detect the user clicking the back button, and again proceeds with routing on the restored URL. The full details of how to implement this are beyond the scope of this article. But if you use this technique, then obviously you can store session data in the path instead of the fragment identifier.
Web Storage
Web storage is a mechanism for JavaScript to store data within the browser. Like cookies, web storage is separate for each origin. Each stored item has a name and a value, both of which are strings. But web storage is completely invisible to the server, and it offers much greater storage capacity than cookies. There are two types of web storage: local storage and session storage.

An item of local storage is visible across all tabs of all windows, and persists even after the browser is closed. In this respect, it behaves somewhat like a cookie with an expiration date very far in the future. Thus, it is suitable for storing an access token in the case where the user has checked “keep me logged in” on the login form.
An item of session storage is only visible within the tab where it was created, and it disappears when that tab is closed. This makes its lifetime very different from that of any cookie. Recall that a session cookie is still visible across all tabs of all windows.
If you use the AngularJS SDK for LoopBack, the client side will automatically use web storage to save both the access token and the userId. This happens in the LoopBackAuth service in js/services/lb-services.js. It will use local storage, unless the rememberMe parameter is false (normally meaning the “keep me logged in” checkbox was unchecked), in which case it will use session storage.
The result is that if I log in with “keep me logged in” unchecked, and I then open a link in a new tab or window, I won’t be logged in there. Most likely I’ll see the login screen. You can decide for yourself whether this is acceptable behavior. Some might consider it a nice feature, where you can have several tabs, each logged in as a different user. Or you might decide that hardly anyone uses shared computers any more, so you can just omit the “keep me logged in” checkbox altogether.
So how would the session data handling look if you decide to go with the AngularJS SDK for LoopBack? Suppose you have the same situation as before on the server side: you’ve defined a Person model, extending the User model, and you’ve exposed the Person model over REST. You won’t be using cookies, so you won’t need any of the changes described earlier.
On the client side, somewhere in your outermost controller, you probably have a variable like $scope.currentUserId which holds the userId of the currently logged in user, or null if the user is not logged in. Then to handle page reloads properly, you just include this statement in the constructor function for that controller:
$scope.currentUserId = Person.getCurrentId();
It’s that easy. Add ‘Person’ as a dependency of your controller, if it isn’t already.
IndexedDB
IndexedDB is a newer facility for storing large amounts of data in the browser. You can use it to store data of any JavaScript type, such as an object or array, without having to serialize it. All requests against the database are asynchronous, so you get a callback when the request is completed.
You might use IndexedDB to store structured data that’s unrelated to any data on the server. An example might be a calendar, a to-do list, or saved games that are played locally. In this case, the application is really a local one, and your web site is just the vehicle for delivering it.
At present, Internet Explorer and Safari only have partial support for IndexedDB. Other major browsers support it fully. One serious limitation at the moment, though, is that Firefox disables IndexedDB entirely in private browsing mode.
As a concrete example of using IndexedDB, let’s take the sliding puzzle application by Pavol Daniš, and tweak it to save the state of the first puzzle, the Basic 3×3 sliding puzzle based on the AngularJS logo, after each move. Reloading the page will then restore the state of this first puzzle.
I’ve set up a fork of the repository with these changes, all of which are in app/js/puzzle/slidingPuzzle.js. As you can see, even a rudimentary usage of IndexedDB is quite involved. I’ll just show the highlights below. First, the function restore gets called during page load, to open the IndexedDB database:
/*
 * Tries to restore game
 */
this.restore = function(scope, storekey) {
    this.storekey = storekey;
    if (this.db) {
        this.restore2(scope);
    }
    else if (!window.indexedDB) {
        console.log('SlidingPuzzle: browser does not support indexedDB');
        this.shuffle();
    }
    else {
        var self = this;
        var request = window.indexedDB.open('SlidingPuzzleDatabase');
        request.onerror = function(event) {
            console.log('SlidingPuzzle: error opening database, ' + request.error.name);
            scope.$apply(function() { self.shuffle(); });
        };
        request.onupgradeneeded = function(event) {
            event.target.result.createObjectStore('SlidingPuzzleStore');
        };
        request.onsuccess = function(event) {
            self.db = event.target.result;
            self.restore2(scope);
        };
    }
};
The request.onupgradeneeded event handles the case where the database doesn’t exist yet. In this case, we create the object store.
Once the database is open, the function restore2 is called, which looks for a record with a given key (which will actually be the constant ‘Basic’ in this case):
/*
 * Tries to restore game, once database has been opened
 */
this.restore2 = function(scope) {
    var transaction = this.db.transaction('SlidingPuzzleStore');
    var objectStore = transaction.objectStore('SlidingPuzzleStore');
    var self = this;
    var request = objectStore.get(this.storekey);
    request.onerror = function(event) {
        console.log('SlidingPuzzle: error reading from database, ' + request.error.name);
        scope.$apply(function() { self.shuffle(); });
    };
    request.onsuccess = function(event) {
        if (!request.result) {
            console.log('SlidingPuzzle: no saved game for ' + self.storekey);
            scope.$apply(function() { self.shuffle(); });
        }
        else {
            scope.$apply(function() { self.grid = request.result; });
        }
    };
}
If such a record exists, its value replaces the grid array of the puzzle. If there is any error in restoring the game, we just shuffle the tiles as before. Note that grid is a 3×3 array of tile objects, each of which is fairly complex. The great advantage of IndexedDB is that you can store and retrieve such values without having to serialize them.
We use $apply to inform AngularJS that the model has been changed, so the view will be updated appropriately. This is because the update is happening inside a DOM event handler, so AngularJS wouldn’t otherwise be able to detect the change. Any AngularJS application using IndexedDB will probably need to use $apply for this reason.
After any action that would change the grid array, such as a move by the user, the function save is called which adds or updates the record with the appropriate key, based on the updated grid value:
/*
 * Tries to save game
 */
this.save = function() {
    if (!this.db) {
        return;
    }
    var transaction = this.db.transaction('SlidingPuzzleStore', 'readwrite');
    var objectStore = transaction.objectStore('SlidingPuzzleStore');
    var request = objectStore.put(this.grid, this.storekey);
    request.onerror = function(event) {
        console.log('SlidingPuzzle: error writing to database, ' + request.error.name);
    };
    request.onsuccess = function(event) {
        // successful, no further action needed
    };
}
The remaining changes are to call the above functions at appropriate times. You can review the commitshowing all of the changes. Note that we are calling restore only for the basic puzzle, not for the three advanced puzzles. We exploit the fact that the three advanced puzzles have an api attribute, so for those we just do the normal shuffling.
What if we wanted to save and restore the advanced puzzles also? That would require some restructuring. In each of the advanced puzzles, the user can adjust the image source file and the puzzle dimensions. So we’d have to enhance the value stored in IndexedDB to include this information. More importantly, we’d need a way to update them from a restore. That’s a bit much for this already lengthy example.
Conclusion
In most cases, web storage is your best bet for storing session data. It’s fully supported by all major browsers, and it offers much greater storage capacity than cookies.
You would use cookies if your server is already set up to use them, or if you need the data to be accessible across all tabs of all windows, but you also want to ensure it will be deleted when the browser is closed.
You already use the fragment identifier to store session data that’s specific to that page, such as the ID of the photo the user is looking at. While you could embed other session data in the fragment identifier, this doesn’t really offer any advantage over web storage or cookies.
Using IndexedDB is likely to require a lot more coding than any of the other techniques. But if the values you’re storing are complex JavaScript objects that would be difficult to serialize, or if you need a transactional model, then it may be worthwhile. Source: Toptal.
REST Security with JWT using Java and Spring Security
The following article is a guest post from Toptal. Toptal is an elite network of freelancers that enables businesses to connect with the top 3% of software engineers and designers in the world.
Security
Security is the enemy of convenience, and vice versa. This statement is true for any system, virtual or real, from the physical house entrance to web banking platforms. Engineers are constantly trying to find the right balance for the given use case, leaning to one side or the other. Usually, when a new threat appears, we move towards security and away from convenience. Then, we see if we can recover some lost convenience without reducing the security too much. Moreover, this vicious circle goes on forever.

Let’s try to see where REST services currently stand regarding security and convenience. REST (which stands for Representational State Transfer) services started off as an extremely simplified approach to Web Services that had huge specifications and cumbersome formats, such as WSDL for describing the service, or SOAP for specifying the message format. In REST, we have none of those. We can describe the REST service in a plain text file and use any message format we want, such as JSON, XML or even plain text again. The simplified approach was applied to the security of REST services as well; no defined standard imposes a particular way to authenticate users.
Although REST services do not have much specified, an important one is the lack of state. It means the server does not keep any client state, with sessions as a good example. Thus, the server replies to each request as if it was the first the client has made. However, even now, many implementations still use cookie based authentication, which is inherited from standard website architectural design. The stateless approach of REST makes session cookies inappropriate from the security standpoint, but nevertheless, they are still widely used. Besides ignoring the required statelessness, simplified approach came as an expected security trade-off. Compared to the WS-Security standard used for Web Services, it is much easier to create and consume REST services, hence convenience went through the roof. The trade-off is pretty slim security; session hijacking and cross-site request forgery (XSRF) are the most common security issues.
In trying to get rid of client sessions from the server, some other methods have been used occasionally, such as Basic or Digest HTTP authentication. Both use an Authorization header to transmit user credentials, with some encoding (HTTP Basic) or encryption (HTTP Digest) added. Of course, they carried the same flaws found in websites: HTTP Basic had to be used over HTTPS since username and password are sent in easily reversible base64 encoding, and HTTP Digest forced the use of obsolete MD5 hashing that is proven to be insecure.
Finally, some implementations used arbitrary tokens to authenticate clients. This option seems to be the best we have, for now. If implemented properly, it fixes all the security problems of HTTP Basic, HTTP Digest or session cookies, it is simple to use, and it follows the stateless pattern.
However, with such arbitrary tokens, there’s little standard involved. Every service provider had his or her idea of what to put in the token, and how to encode or encrypt it. Consuming services from different providers required additional setup time, just to adapt to the specific token format used. The other methods, on the other hand (session cookie, HTTP Basic and HTTP Digest) are well known to developers, and almost all browsers on all devices work with them out of the box. Frameworks and languages are ready for these methods, having built-in functions to deal with each seamlessly.
JWT
JWT (shortened from JSON Web Token) is the missing standardization for using tokens to authenticate on the web in general, not only for REST services. Currently, it is in draft status as RFC 7519. It is robust and can carry a lot of information, but is still simple to use even though its size is relatively small. Like any other token, JWT can be used to pass the identity of authenticated users between an identity provider and a service provider (which are not necessarily the same systems). It can also carry all the user’s claim, such as authorization data, so the service provider does not need to go into the database or external systems to verify user roles and permissions for each request; that data is extracted from the token.
Here is how JWT is designed to work:

- Clients logs in by sending their credentials to the identity provider.
- The identity provider verifies the credentials; if all is OK, it retrieves the user data, generates a JWT containing user details and permissions that will be used to access the services, and it also sets the expiration on the JWT (which might be unlimited).
- Identity provider signs, and if needed, encrypts the JWT and sends it to the client as a response to the initial request with credentials.
- Client stores the JWT for a limited or unlimited amount of time, depending on the expiration set by the identity provider.
- Client sends the stored JWT in an Authorization header for every request to the service provider.
- For each request, the service provider takes the JWT from the
Authorizationheader and decrypts it, if needed, validates the signature, and if everything is OK, extracts the user data and permissions. Based on this data solely, and again without looking up further details in the database or contacting the identity provider, it can accept or deny the client request. The only requirement is that the identity and service providers have an agreement on encryption so that service can verify the signature or even decrypt which identity was encrypted.
This flow allows for great flexibility while still keeping things secure and easy to develop. By using this approach, it is easy to add new server nodes to the service provider cluster, initializing them with only the ability to verify the signature and decrypt the tokens by providing them a shared secret key. No session replication, database synchronization or inter-node communication is required. REST in its full glory.
The main difference between JWT and other arbitrary tokens is the standardization of the token’s content. Another recommended approach is to send the JWT token in the Authorization header using the Bearer scheme. The content of the header should look like this:
Authorization: Bearer <token>
Implementation
For REST services to work as expected, we need a slightly different authorization approach compared to classic, multi-page websites.
Instead of triggering the authentication process by redirecting to a login page when a client requests a secured resource, the REST server authenticates all requests using the data available in the request itself, the JWT token in this case. If such an authentication fails, redirection makes no sense. The REST API simply sends an HTTP code 401 (Unauthorized) response and clients should know what to do; for example, a browser will show a dynamic div to allow the user to supply the username and password.
On the other hand, after a successful authentication in classic, multi-page websites, the user is redirected by using HTTP code 301 (Moved permanently), usually to a home page or, even better, to the page the user initially requested that triggered the authentication process. With REST, again this makes no sense. Instead we would simply continue with the execution of the request as if the resource was not secured at all, return HTTP code 200 (OK) and expected response body.
Spring Security

Now, let’s see how can we implement the JWT token based REST API using Java and Spring, while trying to reuse the Spring security default behavior where we can. As expected, Spring Security framework comes with many ready to plug-in classes that deal with “old” authorization mechanisms: session cookies, HTTP Basic, and HTTP Digest. However, it lacks the native support for JWT, and we need to get our hands dirty to make it work.
First, we start with the usual Spring Security filter definition in web.xml:
<filter>
	<filter-name>springSecurityFilterChain</filter-name>
	<filter-class>org.springframework.web.filter.DelegatingFilterProxy</filter-class>
</filter>
<filter-mapping>
	<filter-name>springSecurityFilterChain</filter-name>
	<url-pattern>/*</url-pattern>
</filter-mapping>
Note that the name of the filter must be exactly springSecurityFilterChain for the rest of the Spring config to work out of the box.
Next comes the XML declaration of the Spring beans related to security. In order to simplify the XML, we will set the default namespace to security by adding xmlns="http://www.springframework.org/schema/security" to the root XML element. The rest of the XML looks like this:
    <global-method-security pre-post-annotations="enabled" />  (1)

    <http pattern="/api/login" security="none"/>   (2)
    <http pattern="/api/signup" security="none"/>

    <http pattern="/api/**" entry-point-ref="restAuthenticationEntryPoint" create-session="stateless"> (3)
        <csrf disabled="true"/>  (4)
        <custom-filter before="FORM_LOGIN_FILTER" ref="jwtAuthenticationFilter"/>  (5)
    </http>

    <beans:bean id="jwtAuthenticationFilter" class="com.toptal.travelplanner.security.JwtAuthenticationFilter">  (6)
        <beans:property name="authenticationManager" ref="authenticationManager" />
        <beans:property name="authenticationSuccessHandler" ref="jwtAuthenticationSuccessHandler" />  (7)
    </beans:bean>

    <authentication-manager alias="authenticationManager">
        <authentication-provider ref="jwtAuthenticationProvider" />  (8)
    </authentication-manager>
- (1) In this line, we activate
@PreFilter,@PreAuthorize,@PostFilter,@PostAuthorizeannotations on any spring beans in the context. - (2) We define the login and signup endpoints to skip security; even “anonymous” should be able to do these two operations.
- (3) Next, we define the filter chain applied to all requests while adding two important configs: Entry point reference and setting the session creation to
stateless(we do not want the session created for security purposes as we are using tokens for each request). - (4) We do not need
csrfprotection because our tokens are immune to it. - (5) Next, we plug in our special authentication filter within the Spring’s predefined filter chain, just before the form login filter.
- (6) This bean is the declaration of our authentification filter; since it is extending Spring’s
AbstractAuthenticationProcessingFilter, we need to declare it in XML to wire its properties (auto wire does not work here). We will explain later what the filter does. - (7) The default success handler of
AbstractAuthenticationProcessingFilteris not good enough for REST purposes because it redirects the user to a success page; that is why we set our own here. - (8) The declaration of the provider created by the
authenticationManageris used by our filter to authenticate users.
Now let’s see how we implement the specific classes declared in the XML above. Note that Spring will wire them for us. We start with the simplest ones.
RestAuthenticationEntryPoint.java
public class RestAuthenticationEntryPoint implements AuthenticationEntryPoint {

    @Override
    public void commence(HttpServletRequest request, HttpServletResponse response, AuthenticationException authException) throws IOException {
        // This is invoked when user tries to access a secured REST resource without supplying any credentials
        // We should just send a 401 Unauthorized response because there is no 'login page' to redirect to
        response.sendError(HttpServletResponse.SC_UNAUTHORIZED, "Unauthorized");
    }
}
As explained above, this class just returns HTTP code 401 (Unauthorized) when authentication fails, overriding default Spring’s redirecting.
JwtAuthenticationSuccessHandler.java
public class JwtAuthenticationSuccessHandler implements AuthenticationSuccessHandler {

    @Override
    public void onAuthenticationSuccess(HttpServletRequest request, HttpServletResponse response, Authentication authentication) {
        // We do not need to do anything extra on REST authentication success, because there is no page to redirect to
    }

}
This simple override removes the default behavior of a successful authentication (redirecting to home or any other page the user requested). If you are wondering why we do not need to override the AuthenticationFailureHandler, it is because default implementation will not redirect anywhere if its redirect URL is not set, so we just avoid setting the URL, which is good enough.
JwtAuthenticationFilter.java
public class JwtAuthenticationFilter extends AbstractAuthenticationProcessingFilter {

    public JwtAuthenticationFilter() {
        super("/**");
    }

    @Override
    protected boolean requiresAuthentication(HttpServletRequest request, HttpServletResponse response) {
        return true;
    }

    @Override
    public Authentication attemptAuthentication(HttpServletRequest request, HttpServletResponse response) throws AuthenticationException {

        String header = request.getHeader("Authorization");

        if (header == null || !header.startsWith("Bearer ")) {
            throw new JwtTokenMissingException("No JWT token found in request headers");
        }

        String authToken = header.substring(7);

        JwtAuthenticationToken authRequest = new JwtAuthenticationToken(authToken);

        return getAuthenticationManager().authenticate(authRequest);
    }

    @Override
    protected void successfulAuthentication(HttpServletRequest request, HttpServletResponse response, FilterChain chain, Authentication authResult)
            throws IOException, ServletException {
        super.successfulAuthentication(request, response, chain, authResult);

        // As this authentication is in HTTP header, after success we need to continue the request normally
        // and return the response as if the resource was not secured at all
        chain.doFilter(request, response);
    }
}
This class is the entry point of our JWT authentication process; the filter extracts the JWT token from the request headers and delegates authentication to the injected AuthenticationManager. If the token is not found, an exception is thrown that stops the request from processing. We also need an override for successful authentication because the default Spring flow would stop the filter chain and proceed with a redirect. Keep in mind we need the chain to execute fully, including generating the response, as explained above.
JwtAuthenticationProvider.java
public class JwtAuthenticationProvider extends AbstractUserDetailsAuthenticationProvider {

    @Autowired
    private JwtUtil jwtUtil;

    @Override
    public boolean supports(Class<?> authentication) {
        return (JwtAuthenticationToken.class.isAssignableFrom(authentication));
    }

    @Override
    protected void additionalAuthenticationChecks(UserDetails userDetails, UsernamePasswordAuthenticationToken authentication) throws AuthenticationException {
    }

    @Override
    protected UserDetails retrieveUser(String username, UsernamePasswordAuthenticationToken authentication) throws AuthenticationException {
        JwtAuthenticationToken jwtAuthenticationToken = (JwtAuthenticationToken) authentication;
        String token = jwtAuthenticationToken.getToken();

        User parsedUser = jwtUtil.parseToken(token);

        if (parsedUser == null) {
            throw new JwtTokenMalformedException("JWT token is not valid");
        }

        List<GrantedAuthority> authorityList = AuthorityUtils.commaSeparatedStringToAuthorityList(parsedUser.getRole());

        return new AuthenticatedUser(parsedUser.getId(), parsedUser.getUsername(), token, authorityList);
    }

}
In this class, we are using Spring’s default AuthenticationManager, but we inject it with our own AuthenticationProvider that does the actual authentication process. To implement this, we extend the AbstractUserDetailsAuthenticationProvider, which requires us only to return UserDetails based on the authentication request, in our case, the JWT token wrapped in the JwtAuthenticationToken class. If the token is not valid, we throw an exception. However, if it is valid and decryption by JwtUtil is successful, we extract the user details (we will see exactly how in the JwtUtil class), without accessing the database at all. All the information about the user, including his or her roles, is contained in the token itself.
JwtUtil.java
public class JwtUtil {

    @Value("${jwt.secret}")
    private String secret;

    /**
     * Tries to parse specified String as a JWT token. If successful, returns User object with username, id and role prefilled (extracted from token).
     * If unsuccessful (token is invalid or not containing all required user properties), simply returns null.
     *
     * @param token the JWT token to parse
     * @return the User object extracted from specified token or null if a token is invalid.
     */
    public User parseToken(String token) {
        try {
            Claims body = Jwts.parser()
                    .setSigningKey(secret)
                    .parseClaimsJws(token)
                    .getBody();

            User u = new User();
            u.setUsername(body.getSubject());
            u.setId(Long.parseLong((String) body.get("userId")));
            u.setRole((String) body.get("role"));

            return u;

        } catch (JwtException | ClassCastException e) {
            return null;
        }
    }

    /**
     * Generates a JWT token containing username as subject, and userId and role as additional claims. These properties are taken from the specified
     * User object. Tokens validity is infinite.
     *
     * @param u the user for which the token will be generated
     * @return the JWT token
     */
    public String generateToken(User u) {
        Claims claims = Jwts.claims().setSubject(u.getUsername());
        claims.put("userId", u.getId() + "");
        claims.put("role", u.getRole());

        return Jwts.builder()
                .setClaims(claims)
                .signWith(SignatureAlgorithm.HS512, secret)
                .compact();
    }
}
Finally, JwtUtil class is in charge of parsing the token into User object and generating the token from the User object. It is straightforward since it uses the jjwt library to do all the JWT work. In our example, we simply store the username, user ID and user roles in the token. We could also store more arbitrary stuff and add more security features, such as the token’s expiration. Parsing of the token is used in the AuthenticationProvider as shown above. The generateToken() method is called from login and signup REST services, which are unsecured and will not trigger any security checks or require a token to be present in the request. In the end, it generates the token that will be returned to the clients, based on the user.
Conclusion
Although the old, standardized security approaches (session cookie, HTTP Basic, and HTTP Digest) will work with REST services as well, they all have problems that would be nice to avoid by using a better standard. JWT arrives just in time to save the day, and most importantly it is very close to becoming an IETF standard.
JWT’s main strength is handling user authentication in a stateless, and therefore scalable, way, while keeping everything secure with up-to-date cryptography standards. Storing claims (user roles and permissions) in the token itself creates huge benefits in distributed system architectures where the server that issues the request has no access to the authentication data source.
5 Golden Rules for Great Web API Design
http://www.toptal.com/#explore-competent-developers-today
The following article is a guest post from Toptal. Toptal is an elite network of freelancers that enables businesses to connect with the top 3% of software engineers and designers in the world.
Ever found yourself wondering “what were they thinking?” when integrating a web service via its API? If not, you’ve been far luckier than I have.
Any software developer knows how easy it is to let a project devolve into spaghetti code, and web APIs are no less prone to resulting in a tangled web. But it doesn’t need to be that way. In truth, it’s possible to design great web APIs that people will actually enjoy using, and that you’ll enjoy creating as well. But how? The answer to that question is what this post is all about.
Perspective
Most of the time when you’re building solutions, you’re designing for end users who are not programmers, or who are generally not technically sophisticated. You’re giving them a graphical interface and, if you’ve been doing your job right, you’ve gleaned a pretty good idea from them of what they need the interface to do.
But API development is different. You’re designing an interface for programmers, probably without even knowing who they are. And whoever they are, they will have the technical sophistication (or at least will think they have the technical sophistication) to point out every little flaw in your software. Your users are likely to be as critical of your API as you would be of theirs, and will thoroughly enjoy critiquing it.
And therein lies part of the irony, by the way. If anyone should understand how to make a web API that’s easy-to-use, it’s you. After all, you’re a software engineer just like the users of your API, so you share their perspective. Don’t you?
Well, while you certainly understand their perspective, you don’t necessarily share their perspective. When you’re developing or enhancing your API, you have the perspective of an API designer whereas they have the perspective of an API user.
API designers typically focus on questions like “What does this service need to do?” or “What does this service need to provide?”, while API users are focused on “How can I use this API to do what I need?”, or more accurately, “How can I spend the bare minimum of effort to get what I need out of this API?”.
These different questions lead to two vastly different perspectives. As a result, the necessary prerequisite to designing a great API is to shift your perspective from that of the API designer to that of the API user. In other words, continually ask yourself the questions you would naturally ask if you were your own user. Rather than thinking about what your API can do, think about the different ways it may need or want to be used and then focus on making those tasks as easy as possible for your API’s users.
While this may sound easy and obvious, it’s astounding how infrequently APIs appear to be designed this way. Think about the APIs you’ve encountered in your career. How frequently do they appear to have been designed with this perspective in mind? Web API design can be challenging.
So with that said, let’s proceed and talk about the 5 Golden Rules for Designing a Great Web API, namely:

Rule 1: Documentation
Documentation. Yes, I’m starting here.
Do you hate documentation? Well, I can empathize, but put on your “user perspective” hat and I’ll bet that the one thing you hate more than having to write documentation is having to try to use an undocumented API. I rest my case.
The bottom line is that, if you want anyone to use your API, documentation is essential. You’ve simply got to get this right. It’s the first thing users will see, so in some ways it’s like the gift wrap. Present well, and people are more likely to use your API and put up with any idiosyncrasies.
So how do we write good documentation?
The relatively easy part is documenting the API methods themselves; i.e., example requests and responses, along with descriptions of each of the elements in both. Fortunately, there are an increasing number of software tools that facilitate and simplify the task of generating documentation. Or you can write something yourself that introspects your API, endpoints, and functions, and generates the corresponding documentation for you.
But what separates great documentation from adequate documentation is the inclusion of usage examples and, ideally, tutorials. This is what helps the user understand your API and where to start. It orients them and helps them load your API into their brain.
For example, if the developers of Twilio were to list out every class, every method, and every possible response to their API, but didn’t bother to mention that you can send an SMS, track a call, or buy a phone number through their API, it would take a really long time for the API user to find that information and understand it cohesively. Can you imagine sorting through a giant tree of classes and methods without any insight into what they were used for, other than their name? Sounds terrible right? But that’s exactly what so many API providers do, thereby leaving their APIs opaque to anybody but themselves. The Rackspace CloudFiles developer and API guide is one such example; it’s difficult to get your bearings unless you already understand what they’re doing and what they’re providing.
So write concise tutorials that help get the developer up and running quickly, with at least a skeleton of what they’re trying to do, and then point them in the direction of the more detailed, fully-documented list of functionality so they can expand on what they have.
Once you’re done with your documentation, be sure to validate that it makes sense to people other than yourself. Send it out to other developers in your network, give them no instruction other than pointing them to the documentation, and ask them to follow a tutorial or build something really basic in about 15 minutes. If they can’t have a basic integration with your API in 15 minutes, you have more work to do.
For some noteworthy examples of excellent and detailed documentation, check out Twilio, Django, and MailChimp. None of these products are necessarily the best in their markets (although they are all good products), yet they do distinguish themeselves by providing some of the best documentation within their markets, which has certainly facilitated their wide acceptance and market share.
Rule 2: Stability and Consistency
If you’ve ever used Facebook’s API, you know how often they deprecate and completely rewrite their APIs. No matter how much you respect their hacker culture, or their product, their’s is not a developer-friendly perspective. The reason they are still successful is because they have a billion users, not because their API is great.
But you probably don’t have the luxury of such a mammoth user base and market share, so you’re going to need have a much less volatile API, keeping old versions running and supported for quite a long period of time. Maybe even years. So toward that end, here are some tips and tricks.
Let’s say, for example, that your API is accessible via the URL http://myapisite.com/api/widgets and provides its response in JSON format. While this may seem fine at first blush, what happens when you need to modify the format of the JSON response? Everyone that’s already integrated with you is going to break. Oops.
So do some planning ahead, and version your API from the outset, explicitly incorporating a version number into the URL (e.g., http://myapisite.com/api/widgets?version=1 or http://myapisite.com/api/widgets/v1) so that people can rely on version 1 working and can upgrade to any subsequent version when they’re ready to do so. If you need to phase out a prior version at some point, go ahead, but give plenty of notice and offer some sort of transition plan.
A good URL scheme will include major versions in the URL. Any change to the output format or supported data types should result in bumping up to a new major version. Generally, it’s acceptable to keep the same version if all you are doing is adding keys or nodes to your output, but to be on the safe side, any time the output changes, bump a version.
In addition to being stable over time, APIs need to be internally consistent. I’ve seen many APIs that change parameter names or methods of POSTing data, depending on the endpoint that is being used. Instead, you should handle common parameters globally within your API and use inheritance or a shared architecture to reuse the same naming conventions and data handling consistently throughout your API.
Finally, you need to record and publish a changelog to show differences between versions of your API so that users know exactly how to upgrade.
Rule 3: Flexibility
Garbage in, garbage out (GIGO) is a well known mantra to most programmers. As applied to web API design, this guiding principle tends to dictate a fairly rigid approach to request validation. Sounds great, right? No mess, no problem.
Yet as with everything, there needs to be some balance. As it is not possible to anticipate every way that users will want to employ your service, and since not every client platform is consistent (i.e., not every platform has very good JSON support, a decent OAuth library, etc.), it’s good to have at least some degree of flexibility or tolerance with regard to your input and output constraints.
For example, many APIs will support a variety of output formats, like JSON, YAML, XML, et. al., but will only support specifying the format in the URL itself. In the spirit of remaining flexible, you could allow this to also be specified in the URL (e.g., /api/v1/widgets.json), or you might also read and recognize an Accept: application/json HTTP header, or support a querystring variable such as ?format=JSON, and so on.
And while we’re at it, why not allow for the format specified to be case-insensitive, so the user could specify ?format=json as well? That’s a classic example of a way to alleviate unnecessary frustration for the user of your API.
Another example is allowing for different ways of inputting variables. So, just like you have a variety of output formats, allow for a variety of input formats as well (e.g., plain POST variables, JSON, XML, etc.). You should at least be supporting standard POST variables, and many modern applications support JSON as well, so those two are a good place to start.
The point here is that you shouldn’t assume that everyone shares your technical preferences. With a little research into how other APIs work, and through dialog with other developers, you can glean other valuable alternatives that are useful and include them in your API.
Rule 4: Security
Security is obviously one of the most important things to build into your web service, but so many developers make it ridiculously hard to use. As the API provider, you should be offering usable examples of how to authenticate and authorize when accessing your API. This should not be a difficult issue that an end user spends hours working on. Make it your goal that they either don’t have to write any code, or it takes them less than 5 minutes to write it.
For most APIs, I prefer a simple token-based authentication, where the token is a random hash assigned to the user and they can reset it at any point if it has been stolen. Allow the token to be passed in through POST or an HTTP header. For example, the user could (and should) send an SHA-1 token as a POST variable, or as a header in a format such as “Authorization: da39a3ee5e6b4b0d3255bfef95601890afd80709”.
Also, choose a secure token, not a short numeric identifier. Something irreversible is best. For example, it’s relatively simple to just generate out an SHA token during user creation and store it in the database. Then, you can simply query your database for any users matching that token. You could also do a token generated with a unique identifier and a salt value, something like SHA(User.ID + "abcd123"), and then query for any user that matches; e.g., where TokenFromPost = SHA(User.ID + "abcd123").
Another very good option is OAuth 2 + SSL. You should be using SSL anyway, but OAuth 2 is reasonably simple to implement on the server side, and libraries are available for many common programming languages.
If the API you have made is supposed to be accessible on a public website via JavaScript, you need to also make sure you validate a list of URLs per-account for the token. That way, nobody can go inspect the calls to your API, steal the token from your user, and go use it for themselves.
Here are some other important things to keep in mind:
- Whitelisting Functionality. APIs generally allow you to do basic create, read, update, and delete operations on data. But you don’t want to allow these operations for every entity, so make sure each has a whitelist of allowable actions. Make sure, for example, that only authorized users can run commands like
/user/delete/<id>. Similarly, all useful headers that are sent in the user’s request need to be validated against a whitelist as well. If you are allowing Content-type headers, verify that whatever the user sends in actually matches a whilelist of supported content types. If it doesn’t, then send back an error message such as a 406 Not Acceptable response. Whitelisting is important as a lot of APIs are automatically generated, or use a blacklist instead, which means you have to be explicit about what you don’t want. However, the golden rule of security is to start with absolutely nothing, and only explicitly allow what you do want. - Protect yourself against Cross-Site Request Forgery (CSRF). If you are allowing session or cookie authentication, you need to make sure that you’re protecting yourself from CSRF attacks. The Open Web Application Security Project (OWASP) provides useful guidance on ways to preclude these vulnerabilities.
- Validate access to resources. In every request, you need to verify that a user is in fact allowed access to the specific item they are referencing. So, if you have an endpoint to view a user’s credit card details (e.g.,
/account/card/view/152423), be sure that the ID “152423” is referencing a resource that the user really is authorized to access. - Validate all input. All input from a user needs to be securely parsed, preferably using a well-known library if you are using complicated input like XML or JSON. Don’t build your own parser, or you’re in for a world of hurt.
Rule 5: Ease Of Adoption
This is really the most important rule in the bunch, and builds on all the others. As I mentioned during the documentation rule, try this out with people that are new to your API. Make sure that they can get up and running with at least a basic implementation of your API, even if it’s just following a tutorial, within a few minutes. I think 15 minutes is a good goal.
Here are some specific recommendations to ease and facilitate adoption of your API:
- Make sure people can actually use your API and that it works the first time, every time. Have new people try to implement your API occasionally to verify that it’s not confusing in some way that you’ve become immune to.
- Keep it simple. Don’t do any fancy authentication. Don’t do some crazy custom URL scheme. Don’t reinvent SOAP, or JSON, or REST, or anything. Use all the tools you can that have already been implemented and are widely accepted, so that developers only have to learn your API, not your API + 10 obscure new technologies.
- Provide language-specific libraries to interface with your service. There are some nice tools to automatically generate a library for you, such as Alpaca or Apache Thrift. Currently Alpaca supports Node, PHP, Python, and Ruby. Thrift supports C++, Java, Python, PHP, Ruby, Erlang, Perl, Haskell, C#, Cocoa, JavaScript, Node.js, Smalltalk, OCaml, Delphi and more.
- Simplify any necessary signup. If you are not developing an open source API, or if there is a signup process of any sort, make sure that upon signup, a user is very quickly directed to a tutorial. And make the signup process completely automated without any need for human interaction on your part.
- Provide excellent support. A big barrier to adoption is lack of support. How will you handle and respond to a bug report? What about unclear documentation? An unsophisticated user? Forums, bug trackers, and email support are fantastic starts, but do make sure that when someone posts a bug, you really address it. Nobody wants to see a ghost town forum or a giant list of bugs that haven’t been addressed.
Web API Wrap-up
Web services and their APIs abound. Unfortunately, the vast majority are difficult to use. Reasons range from poor design, to lack of documentation, to volatility, to unresolved bugs, or, in some cases, all of the above.
Following the guidance in this post will help ensure that your web API is clean, well-documented, and easy-to-use. Such APIs are truly rare and are therefore that much more likely to be widely adopted and used.
