Introduction to Day 2 Serverless Operations – Part 2
In part 1 of this series, I introduced some of the most common Day 2 serverless operations, focusing on Function as a Service.
In this part, I will focus on serverless application integration services commonly used in event-driven architectures.
For this post, I will look into message queue services, event routing services, and workflow orchestration services for building event-driven architectures.
Message queue services
Message queues enable asynchronous communication between different components in an event-driven architecture (EDA). This means that producers (systems or services generating events) can send messages to the queue and continue their operations without waiting for consumers (systems or services processing events) to respond or be available.
Security and Access Control
Security should always be the priority, as it protects your data, controls access, and ensures compliance from the outset. This includes data protection, limiting permissions, and enforcing least privilege policies.
- When using Amazon SQS, manage permissions using AWS IAM policies to restrict access to queues and follow the principle of least privilege, as explained here:
- When using Amazon SQS, enable server-side encryption (SSE) for sensitive data at rest, as explained here:
- When using Amazon SNS, manage topic policies and IAM roles to control who can publish or subscribe, as explained here:
https://docs.aws.amazon.com/sns/latest/dg/security_iam_id-based-policy-examples.html
- When using Amazon SNS, enable server-side encryption (SSE) for sensitive data at rest, as explained here:
https://docs.aws.amazon.com/sns/latest/dg/sns-server-side-encryption.html
- When using Azure Service Bus, use managed identities and configure roles, following the principle of least privileged, as explained here:
https://learn.microsoft.com/en-us/azure/service-bus-messaging/service-bus-managed-service-identity
- When using Azure Service Bus, enable encryption at rest using customer-managed keys, as explained here:
https://learn.microsoft.com/en-us/azure/service-bus-messaging/configure-customer-managed-key
- When using Google Cloud Pub/Sub, tighten and review IAM policies to ensure only authorized users and services can publish or subscribe to topics, as explained here:
https://cloud.google.com/pubsub/docs/access-control
- When using Google Cloud Pub/Sub, configure encryption at rest using customer-managed encryption keys, as explained here:
https://cloud.google.com/pubsub/docs/encryption
Monitoring and Observability
Once security is in place, implement comprehensive monitoring and observability to gain visibility into system health, performance, and failures. This enables proactive detection and response to issues.
- When using Amazon SQS, monitor queue metrics such as message count, age of oldest message, and queue length using Amazon CloudWatch, as explained here:
- When using Amazon SQS, set up CloudWatch alarms for thresholds (e.g., high message backlog or processing latency), as explained here:
- When using Amazon SNS, use CloudWatch to track message delivery status, failure rates, and subscription metrics, as explained here:
https://docs.aws.amazon.com/sns/latest/dg/sns-monitoring-using-cloudwatch.html
- When using Azure Service Bus, use Azure Monitor to track metrics such as queue length, message count, dead-letter messages, and throughput. Set up alerts for abnormal conditions (e.g., message backlog, high latency), as explained here:
https://learn.microsoft.com/en-us/azure/service-bus-messaging/monitor-service-bus
- When using Azure Service Bus, monitor and manage message sessions for ordered processing when required, as explained here:
https://learn.microsoft.com/en-us/azure/service-bus-messaging/message-sequencing
- When using Google Cloud Pub/Sub, monitor message throughput, error rates, and latency, and set up alerts for operational anomalies, as explained here:
https://cloud.google.com/pubsub/docs/monitoring
Error Handling
With monitoring established, set up robust error handling mechanisms, including alerts, retries, and dead-letter queues, to ensure reliability and rapid remediation of failures.
- When using Amazon SQS, configure Dead Letter Queues (DLQs) to capture messages that fail processing repeatedly for later analysis and remediation, as explained here:
- When using Amazon SNS, integrate with DLQs (using SQS as a DLQ) for messages that cannot be delivered to endpoints, as explained here:
https://docs.aws.amazon.com/sns/latest/dg/sns-dead-letter-queues.html
- When using Azure Service Bus, regularly review and process messages in dead-letter queues to ensure failed messages are not ignored, as explained here:
https://learn.microsoft.com/en-us/azure/service-bus-messaging/service-bus-dead-letter-queues
https://learn.microsoft.com/en-us/azure/service-bus-messaging/enable-dead-letter
- When using Google Cloud Pub/Sub, monitor for undelivered or unacknowledged messages and set up dead-letter topics if needed, as explained here:
https://cloud.google.com/pubsub/docs/handling-failures
Scaling and Performance
After ensuring security, visibility, and error resilience, focus on scaling and performance. Monitor throughput, latency, and resource utilization, and configure auto-scaling to match demand efficiently.
- When using Amazon SQS, adjust queue settings or consumer concurrency as traffic patterns change, as explained here:
- When using Amazon SQS, monitor usage for unexpected spikes, as explained here:
- When using Azure Service Bus, adjust throughput units, use partitioned queues/topics, and implement batching or parallel processing to handle varying loads, as explained here:
https://learn.microsoft.com/en-us/azure/service-bus-messaging/service-bus-performance-improvements
- When using Google Cloud Pub/Sub, adjust quotas and scaling policies as message volumes change to avoid service interruptions, as explained here:
https://cloud.google.com/pubsub/quotas
Maintenance
Finally, establish ongoing maintenance routines such as regular reviews, updates, cost optimization, and compliance audits to sustain operational excellence and adapt to evolving needs.
- When using Amazon SQS, purge queues as needed and archive messages if required for compliance, as explained here:
- When using Amazon SNS, review and clean up unused topics and subscriptions, as explained here:
https://docs.aws.amazon.com/sns/latest/dg/sns-delete-subscription-topic.html
- When using Azure Service Bus, delete unused messages, as explained here:
https://learn.microsoft.com/en-us/azure/service-bus-messaging/batch-delete
- When using Google Cloud Pub/Sub, delete unused messages, as explained here:
https://cloud.google.com/pubsub/docs/replay-overview
Event routing services
Event routing services act as the central hub in event-driven architectures, receiving events from producers and distributing them to the appropriate consumers. This decouples producers from consumers, allowing each to operate, scale, and fail independently without direct awareness of each other.
Monitoring and Observability
Serverless event routing services require robust monitoring and observability to track event flows, detect anomalies, and ensure system health; this is typically achieved through metrics, logs, and dashboards that provide real-time visibility into event processing and failures.
- When using Amazon EventBridge, set up CloudWatch metrics and logs to monitor event throughput, failures, latency, and rule matches. Use CloudWatch Alarms to alert on anomalies or failures in event delivery, as explained here:
https://docs.aws.amazon.com/eventbridge/latest/userguide/eb-monitoring.html
- When using Azure Event Grid, use Azure Monitor and Event Grid metrics to track event delivery, failures, and latency, as explained here:
https://learn.microsoft.com/en-us/azure/event-grid/monitor-namespaces
- When using Azure Event Grid, set up alerts for undelivered events or high failure rates, as explained here:
https://learn.microsoft.com/en-us/azure/event-grid/set-alerts
- When using Google Eventarc, monitor for event delivery status, trigger activity, and errors, as explained here:
https://cloud.google.com/eventarc/standard/docs/monitor
Error Handling and Dead-Letter Management
Effective error handling uses mechanisms like retries and circuit breakers to manage transient failures, while dead-letter queues (DLQs) capture undelivered or failed events for later analysis and remediation, preventing data loss and supporting troubleshooting.
- When using Amazon EventBridge, configure dead-letter queues (DLQ) for failed event deliveries. Set retry policies and monitor DLQ for undelivered events to ensure no data loss, as explained here:
https://docs.aws.amazon.com/eventbridge/latest/userguide/eb-rule-dlq.html
- When using Azure Event Grid, Configure retry policies and use dead-lettering for events that cannot be delivered after multiple attempts, as explained here:
https://learn.microsoft.com/en-us/azure/event-grid/manage-event-delivery
- When using Google Eventarc, use Pub/Sub dead letter topics for failed event deliveries, as explained here:
https://cloud.google.com/eventarc/docs/retry-events
Security and Access Management
Security and access management involve configuring fine-grained permissions to control which users and services can publish, consume, or manage events, ensuring that only authorized entities interact with event routing resources and that sensitive data remains protected.
- When using Amazon EventBridge, review and update IAM policies for event buses, rules, and targets. Use resource-based policies to restrict who can publish or subscribe to events, as explained here:
https://docs.aws.amazon.com/eventbridge/latest/userguide/eb-manage-iam-access.html
https://docs.aws.amazon.com/eventbridge/latest/userguide/eb-use-resource-based.html
- When using Azure Event Grid, use managed identity to an Event Grid topic and configure a role, following the principle of least privilege, as explained here:
https://learn.microsoft.com/en-us/azure/event-grid/enable-identity-custom-topics-domains
https://learn.microsoft.com/en-us/azure/event-grid/add-identity-roles
- When using Google Eventarc, manage IAM permissions for triggers, event sources, and destinations, following the principle of least privilege, as explained here:
https://cloud.google.com/eventarc/standard/docs/access-control
- When using Google Eventarc, encrypt sensitive data at rest using customer-managed encryption keys, as explained here:
https://cloud.google.com/eventarc/docs/use-cmek
Scaling and Performance
Serverless platforms automatically scale event routing services in response to workload changes, spinning up additional resources during spikes and scaling down during lulls, while performance optimization involves tuning event patterns, batching, and concurrency settings to minimize latency and maximize throughput.
- When using Amazon EventBridge, monitor event throughput and adjust quotas or request service limit increases as needed. Optimize event patterns and rules for efficiency, as explained here:
https://docs.aws.amazon.com/eventbridge/latest/userguide/eb-quota.html
- When using Azure Event Grid, monitor for throttling or delivery issues, as explained here:
https://learn.microsoft.com/en-us/azure/event-grid/monitor-push-reference
- When using Google Eventarc, monitor quotas and usage (e.g., triggers per location), as explained here:
https://cloud.google.com/eventarc/docs/quotas
Workflow orchestration services
Workflow services are designed to coordinate and manage complex sequences of tasks or business processes that involve multiple steps and services. They act as orchestrators, ensuring each step in a process is executed in the correct order, handling transitions, and managing dependencies between steps.
Monitoring and Observability
Set up and review monitoring dashboards, logs, and alerts to ensure workflows are running correctly and to quickly detect anomalies or failures.
- When using AWS Step Functions, monitor executions, check logs, and set up CloudWatch metrics and alarms to ensure workflows run as expected, as explained here:
https://docs.aws.amazon.com/step-functions/latest/dg/monitoring-logging.html
- When using Azure Logic Apps, use Azure Monitor and built-in diagnostics to track workflow runs and troubleshoot failures, as explained here:
https://learn.microsoft.com/en-us/azure/logic-apps/monitor-logic-apps-overview
- When using Google Workflows, use Cloud Logging and Monitoring to observe workflow executions and set up alerts for failures or anomalies, as explained here:
https://cloud.google.com/workflows/docs/monitor
Error Handling and Retry
Investigate failed workflow executions, enhance error handling logic (such as retries and catch blocks), and resubmit failed runs where appropriate. This is crucial for maintaining workflow reliability and minimizing manual intervention.
- When using AWS Step Functions, review failed executions, configure retry/catch logic, and update workflows to handle errors gracefully, as explained here:
https://docs.aws.amazon.com/step-functions/latest/dg/concepts-error-handling.html
- When using Azure Logic Apps, handle failed runs, configure error actions, and resubmit failed instances as needed, as explained here:
https://learn.microsoft.com/en-us/azure/logic-apps/error-exception-handling
- When using Google Workflows, inspect failed executions, define retry policies, and update error handling logic in workflow definitions, as explained here:
https://cloud.google.com/workflows/docs/reference/syntax/catching-errors
Security and Access Management
Workflow orchestration services require continuous enforcement of granular access controls and the principle of least privilege, ensuring that each function and workflow has only the permissions necessary for its specific tasks.
- When using AWS Step Functions, use AWS Identity and Access Management (IAM) for fine-grained control over who can access and manage workflows, as explained here:
https://docs.aws.amazon.com/step-functions/latest/dg/auth-and-access-control-sfn.html
- When using Azure Logic Apps, use Azure Role-Based Access Control (RBAC) and managed identities for secure access to resources and connectors, as explained here:
https://learn.microsoft.com/en-us/azure/logic-apps/authenticate-with-managed-identity
- When using Google Workflows, use Google Cloud IAM for permissions and access management, which allows you to define who can execute, view, or manage workflows, as explained here:
https://cloud.google.com/workflows/docs/use-iam-for-access
Versioning and Updates
Workflow orchestration services use versioning to track and manage different iterations of workflows or services, allowing multiple versions to coexist and enabling users to select, test, or revert to specific versions as needed.
- When using AWS Step Functions, update state machines, manage versions, and test changes before deploying to production, as explained here:
https://docs.aws.amazon.com/step-functions/latest/dg/concepts-state-machine-version.html
- When using Azure Logic Apps, manage deployment slots, and use versioning for rollback if needed, as explained here:
https://learn.microsoft.com/en-us/azure/logic-apps/manage-logic-apps-with-azure-portal
- When using Google Workflows, update workflows, test changes in staging, and deploy updates with minimal disruption, as explained here:
https://cloud.google.com/workflows/docs/best-practice
Cost Optimization
Regularly review usage and billing data, optimize workflow design (e.g., reduce unnecessary steps or external calls), and adjust resource allocation to control operational costs.
- When using AWS Step Functions, analyze usage and optimize workflow design to reduce execution and resource costs, as explained here:
https://docs.aws.amazon.com/step-functions/latest/dg/sfn-best-practices.html#cost-opt-exp-workflows
- When using Azure Logic Apps, monitor consumption, review billing, and optimize triggers/actions to control costs, as explained here:
https://learn.microsoft.com/en-us/azure/logic-apps/plan-manage-costs
- When using Google Workflows, analyze workflow usage, optimize steps, and monitor billing to reduce costs, as explained here:
https://cloud.google.com/workflows/docs/best-practice#optimize-usage
Summary
In this blog post, I presented the most common Day 2 serverless operations when using application integration services (message queues, event routing services, and workflow orchestrations) to build modern applications.
I looked at aspects such as observability, error handling, security, performance, etc.
Building event-driven architectures requires time to grasp which services best support this approach. However, gaining a foundational understanding of key areas is essential for effective day 2 serverless operations.
About the author
Eyal Estrin is a cloud and information security architect, an AWS Community Builder, and the author of the books Cloud Security Handbook and Security for Cloud Native Applications, with more than 25 years in the IT industry.
You can connect with him on social media (https://linktr.ee/eyalestrin).
Opinions are his own and not the views of his employer.
Introduction to Day 2 Serverless Operations — Part 1
In April 2023, I published a blog post called “Introduction to Day 2 Kubernetes”, discussing the challenges of managing Kubernetes workloads in mature environments, once applications were already running in production.
In the software lifecycle there are usually three distinct stages:
- Day 0 — Planning and design
- Day 1 — Configuration and deployment
- Day 2 — Operations
Serverless services are a cloud-native application development and delivery model where developers can build and run code without having to provision, configure, or manage server infrastructure themselves. Many cloud-native services are considered serverless — from compute (such as Function as a Service), storage (such as object storage), database, etc.
In this series of blog posts, I will review common day 2 serverless operations.
Part 1 will focus on common operations for Function as a Service (FaaS), and part 2 will focus on application integration services.
Configuration and Revision Management
At this stage, you set the functions runtime version to be deployed, so you will be able to revert to a previous version in case of problems with the deployment or with your application.
- When using AWS Lambda, use versions to manage the deployment of your Lambda functions, and use aliases as a pointer to the version you would like to deploy, as explained here: https://docs.aws.amazon.com/lambda/latest/dg/configuration-versions.html
- When using Azure Functions, you can manage various aspects of the functions configuration such as hosting plan types, memory quota, scale, environment variables, network settings, etc., as explained here: https://learn.microsoft.com/en-us/azure/azure-functions/functions-how-to-use-azure-function-app-settings
- When using Google Cloud Run Functions, you can configure settings such as memory, concurrency, environment variables, network settings, etc., as explained here: https://cloud.google.com/run/docs/deploy-functions
Runtime engine updates
The base assumption at this stage is that the function was already configured and had its initial deployment, but as time goes by, there will be newer versions of the function runtime engine versions.
Although the recommendation is to use the latest stable version of the runtime engine, changing between major versions may require code adjustments and rigorous testing.
- When using AWS Lambda, the default setting is set to “Auto”, which means AWS will make sure customers are using the latest runtime version whenever customers create or update a function, and later on automatically update all existing functions that haven’t been updated to the latest runtime version. For container-based Lambda functions, customers need to manually rebuild the base container, using the latest runtime version, and redeploy the Lambda function, as explained here: https://docs.aws.amazon.com/lambda/latest/dg/runtimes-update.html
- When using Azure Functions, and using the FUNCTIONS_EXTENSION_VERSION setting to select a major version, when minor updates are available, the function will automatically update the runtime minor version. Upgrade of major runtime versions of Azure Functions will require manual work, including testing before deploying, as explained here:
https://learn.microsoft.com/en-us/azure/azure-functions/set-runtime-version
- When using Google Cloud Run Functions, minor updates are done automatically, however, upgrading to a new major version of the runtime engine will require redeploying of the functions, as explained here: https://cloud.google.com/functions/docs/runtime-support
Security, Networking, and Access Control
At this stage, you configure network and security settings to protect your functions, before exposing them to clients.
This includes reviewing network access control lists, deployment location (inside or outside your cloud virtual network, according to resources the function needs access to), identity and access management (according to resources in the cloud environment that the function needs access to such as storage, database, etc.)
- When using AWS Lambda, in case the function needs access to private AWS resources, deploy the function inside your VPC, as explained here: https://docs.aws.amazon.com/lambda/latest/dg/configuration-vpc.html
- To grant a Lambda function access to other AWS resources, configure the Lambda function with an IAM role for its execution role, following the principle of least privilege, as explained here: https://docs.aws.amazon.com/lambda/latest/dg/lambda-intro-execution-role.html
- In case the Lambda function needs access to resources using static credentials (such as API keys), configure the Lambda to pull the secrets from AWS Secrets Manager, as explained here: https://docs.aws.amazon.com/lambda/latest/dg/with-secrets-manager.html
- When using Azure Functions, in case the function needs access to private Azure resources, use virtual network integration, and enforce access to the function using Network Security Groups, as explained here: https://learn.microsoft.com/en-us/azure/azure-functions/functions-networking-options
- To grant an Azure Function access to other Azure resources, configure managed identity, following the principle of least privilege, as explained here: https://learn.microsoft.com/en-us/azure/app-service/overview-managed-identity
- In case the Azure Function needs access to resources using static credentials (such as secrets), use Azure Key Vault references, as explained here: https://learn.microsoft.com/en-us/azure/app-service/app-service-key-vault-references
- When using Google Cloud Run Functions, in case the function needs access to private GCP resources, use Serverless VPC Access, as explained here: https://cloud.google.com/functions/1stgendocs/networking/connecting-vpc
- To grant a Cloud Run Function access to other GCP resources, configure a function identity, and grant the identity minimal permissions, following the principle of least privileged, as explained here: https://cloud.google.com/functions/docs/securing/function-identity
Audit and Compliance
At this stage, you need to make sure your functions automatically send their audit logs to a central system, combined with threat intelligent services that regularly review the audit logs, you can get alerted on security-related topics (such as anomalous behavior).
- When using AWS Lambda, configure a trail to send CloudTrail events to a central S3 bucket (in a central AWS account), as explained here: https://docs.aws.amazon.com/lambda/latest/dg/logging-using-cloudtrail.html
- To detect security threats in Lambda functions, configure Lambda function protection in Amazon GuardDuty, as explained here: https://docs.aws.amazon.com/guardduty/latest/ug/lambda-protection.html
- When using Azure Functions, to be able to collect audit logs into Azure Monitor, configure diagnostic settings (in a central Azure subscription), and select “Audit” and “AuditEvent” as explained here: https://learn.microsoft.com/en-us/azure/azure-monitor/platform/create-diagnostic-settings
- In case the Azure Function is deployed inside an App Service plan, use Defender for App Service (part of Microsoft Defender for Cloud), to identify security threats, as explained here: https://learn.microsoft.com/en-us/azure/defender-for-cloud/defender-for-app-service-introduction
- When using Google Cloud Run Functions, configure a log bucket and send all functions audit logs to a central Google Cloud Storage (in a central GCP project), as explained here: https://cloud.google.com/logging/docs/audit
- To detect security threats in Google Cloud Run Functions, use the Google SecOps, as explained here: https://cloud.google.com/chronicle/docs/ingestion/default-parsers/collect-audit-logs
Monitoring, Logging, Observability and Alerting
Continuously track application health, performance, and security events using tools for real-time insights. This includes setting up dashboards and alerts to detect anomalies and issues before they impact users.
- When using AWS Lambda, send all function logs to CloudWatch logs, as explained here: https://docs.aws.amazon.com/lambda/latest/dg/monitoring-cloudwatchlogs.html
- To gain visibility into Lambda performance, use CloudWatch Lambda Insights, as explained here: https://docs.aws.amazon.com/lambda/latest/dg/monitoring-insights.html
- When using Azure Functions, to be able to collect all logs and metrics into Azure Monitor, configure diagnostic settings (in a central Azure subscription), as explained here:
https://learn.microsoft.com/en-us/azure/azure-monitor/platform/create-diagnostic-settings
https://learn.microsoft.com/en-us/azure/azure-functions/functions-monitoring
- To gain visibility into Azure Functions, use Application Insights (part of Azure Monitor), as explained here: https://learn.microsoft.com/en-us/azure/azure-functions/configure-monitoring
- When using Google Cloud Run Functions, configure a log bucket and send all functions logs through Google Cloud Logging to a central Google Cloud Storage (in a central GCP project), as explained here: https://cloud.google.com/logging/docs/central-log-storage
- To gain insights into Google Cloud Run Functions, use Google Cloud Observability, as explained here: https://cloud.google.com/monitoring/docs/monitoring-overview
Error Reporting, Troubleshooting, Diagnostics and Debugging
Any running function will generate errors at some point, or you might need to troubleshoot or debug issues with running (or failed) functions. For this purpose, you need to collect errors and diagnostic logs from your functions and store them in a central service.
Implement error-handling strategies within your code (e.g., retries with exponential backoff) to minimize user impact during failures.
- When using AWS Lambda, use CloudWatch metrics to build graphs and dashboards, and to send alerts in response to changes in Lambda function activities (such as performance, error rates, etc.), as explained here: https://docs.aws.amazon.com/lambda/latest/dg/monitoring-metrics.html
- To troubleshoot issues with Lambda functions, refer to the documentation here: https://docs.aws.amazon.com/lambda/latest/dg/lambda-troubleshooting.html
- To display errors related to Azure Functions, refer to the documentation here: https://learn.microsoft.com/en-us/azure/azure-functions/functions-bindings-error-pages
- To troubleshoot issues with Azure Functions, refer to the documentation here:
https://learn.microsoft.com/en-us/azure/azure-functions/functions-diagnostics
- To display errors related to Google Cloud Run Functions, use Error Reporting, as explained here: https://cloud.google.com/run/docs/error-reporting
- To troubleshoot issues with Google Cloud Run Functions, refer to the documentation here: https://cloud.google.com/run/docs/troubleshooting
Scaling, Resource Management, Performance Tuning and Optimization
Analyze function performance metrics (duration/memory usage) to identify bottlenecks and adjust concurrency settings or provisioned capacity as needed for optimal resource utilization.
- When using AWS Lambda, use AWS Lambda Power Tunning to get the optimal Lambda size to suit your workload, as explained here: https://github.com/alexcasalboni/aws-lambda-power-tuning
- Be aware of Lambda quotas — runtime resource limits are often affected by factors like payload size, file descriptors, and /tmp storage space, which are frequently overlooked. For more information see: https://docs.aws.amazon.com/lambda/latest/dg/gettingstarted-limits.html
- In case you need to maintain consistent performance for a Lambda function, consider configuring reserved concurrency, as explained here: https://docs.aws.amazon.com/lambda/latest/dg/configuration-concurrency.html
- To reduce cold starts of Lambda functions, consider configuring provisioned concurrency, as explained here: https://docs.aws.amazon.com/lambda/latest/dg/lambda-runtime-environment.html#cold-starts-pc
- When using Azure Functions, consider changing the hosting plan to gain better performance or isolation, as explained here: https://learn.microsoft.com/en-us/azure/azure-functions/functions-scale
- To improve your Azure Functions performance, follow the guide below: https://learn.microsoft.com/en-us/azure/azure-functions/performance-reliability
- To reduce cold starts of Azure Functions, consider using the Premium plan, as explained here: https://learn.microsoft.com/en-us/azure/azure-functions/functions-premium-plan#eliminate-cold-starts
- When using Google Cloud Run Functions, use Recommender to gain recommendations for configuring Google Cloud Run Functions, as explained here: https://cloud.google.com/run/docs/recommender
- To reduce cold starts of Google Cloud Run Functions, consider setting a minimum number of instances, as explained here: https://cloud.google.com/run/docs/configuring/min-instances
- Be aware of Google Cloud Run Functions limits — runtime resource limits are often affected by factors like maximum deployment size, memory size, number of running functions, etc. For more information see: https://cloud.google.com/functions/quotas
Summary
In this blog post, I presented the most common Day 2 serverless operations when using Functions as a Service to build modern applications.
Transitioning from traditional to serverless development can be challenging, but I encourage readers to keep practicing and gaining hands-on experience. Moving beyond the initial deployment to focus on ongoing operations and maintenance is crucial, and I hope the topics covered here will prove valuable for managing serverless environments in daily work.
In the second part of this series, we will deep dive into serverless application integration services, so stay tuned.
Additional reference materials
About the author
Eyal Estrin is a cloud and information security architect, an AWS Community Builder, and the author of the books Cloud Security Handbook and Security for Cloud Native Applications, with more than 25 years in the IT industry.
You can connect with him on social media (https://linktr.ee/eyalestrin).
Opinions are his own and not the views of his employer.
Resource-based Scaling vs. Request-based Scaling in the Cloud
When designing modern applications in the cloud, one of the topics we need to consider is how to configure scalability policies for adding or removing resources according to the load on our application.
In this blog post, I will review resource-based and request-based scaling and try to explain the advantages and disadvantages of both alternatives.
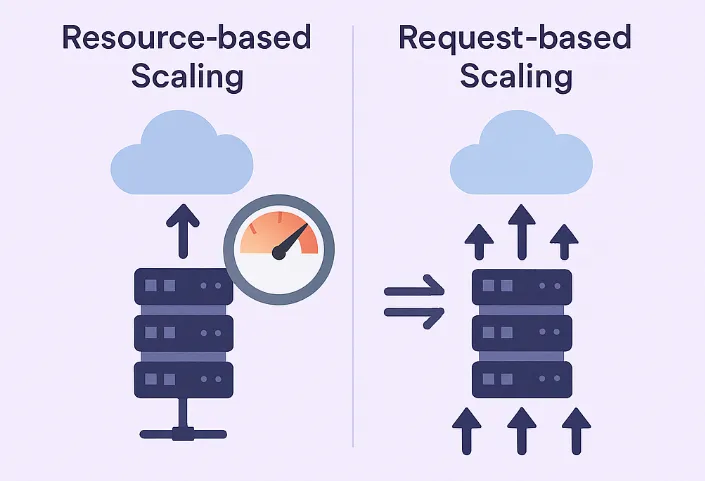
What is resource-based scaling?
Using resource-based scaling, resources are allocated and scaled based on how much CPU or memory is being used by an application or a service.
The system monitors metrics like CPU utilization (e.g., percentage used) or memory usage. When these metrics exceed predefined thresholds, the service scales up (adds more resources); when they fall below thresholds, it scales down.
This method is effective for applications where resource usage directly correlates with workload, such as compute-intensive or memory-heavy tasks.
In the example sample Terraform code below, we can see CloudWatch alarm is triggered once the average CPU utilization threshold is above 70%:
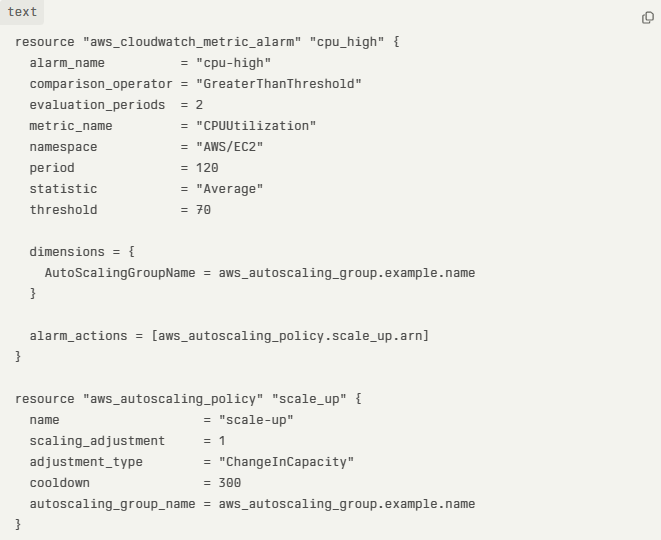
In the example sample Terraform code below, we can see CloudWatch alarm triggers once the average memory usage is above 80%:

Advantages of using resource-based scaling
- Automatically adjust resources based on required CPU or memory, which decreases the chance of over-provisioning (wasting money) or underutilizing (potential performance issues).
- Decrease the chance of an outage due to a lack of CPU or memory resources.
- Once a policy is configured, there is no need to manually adjust the required resources.
Disadvantages of using resource-based scaling
- Autoscaling may respond slowly in case of a sudden spike in resource requirements.
- When the autoscaling policy is not properly tuned, it may lead to resource over-provisioning or underutilization, which may increase the chance of high resource cost.
- Creating an effective autoscaling policy may be complex and requires planning, monitoring, and expertise.
What is request-based scaling?
Using request-based scaling, resources are allocated and scaled based on the actual number of incoming requests (such as HTTP requests to a website or API calls to an API gateway).
In this method, the system counts the number of incoming requests. When the number of requests crosses a pre-defined threshold, it triggers a scaling action (i.e., adding or removing resources).
Suited for applications where each request is relatively uniform in resource consumption, or where user experience is tightly coupled to request volume (e.g., web APIs, serverless functions).
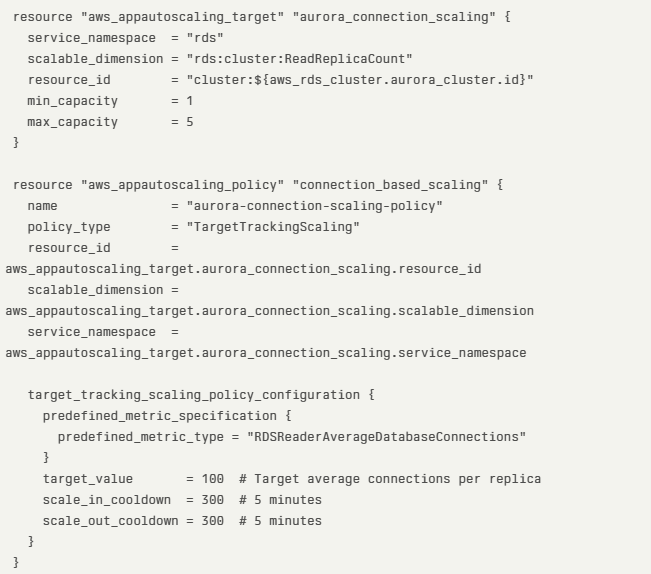
In the example sample Terraform code below, we can see Amazon Aurora request-based scaling using the average number of database connections as the scaling metric:
Advantages of using request-based scaling
- Immediate or predictable scaling in response to user demand.
- Align resource allocation to user activity, which increases application responsiveness.
- Align cost to resource allocation, which is useful in SaaS applications when we want to charge-back customers to their actual resource usage (such as HTTP requests, API calls, etc.).
Disadvantages of using request-based scaling
- Potential high cost during peak periods, due to the fast demand for resource allocation.
- To gain the full benefit of request-based scaling, it is required to design stateless applications.
- Creating a request-based scaling policy may be a complex task due to the demand to manage multiple nodes or instances (including load-balancing, synchronization, and monitoring).
- During spikes, there may be temporary performance degradation due to the time it takes to allocate the required resources.
How do we decide on the right scaling alternative?
When designing modern (or SaaS) applications, no one solution fits all.
It depends on factors such as:
- Application’s architecture or services in use — Resource-based scaling is more suitable for architectures based on VMs or containers, while request-based scaling is more suitable for architectures using serverless functions (such as Lambda functions) or APIs.
- Workload patterns — Workloads that rely heavily on resources (such as back-end services or batch jobs), compared to workloads designed for real-time data processing based on APIs (such as event-driven applications processing messages or HTTP requests).
- Business requirements — Resource-based scaling is more suitable for predictable or steady workloads (where scale based on CPU/Memory is more predictable), for legacy or monolithic applications. Request-based scaling is more suitable for applications experiencing frequent spikes or for scenarios where the business would like to optimize cost per customer request (also known as pay-for-use).
- Organization/workload maturity — When designing early-stage SaaS, it is recommended to begin with resource-based scaling due to the ease of implementation. Once the SaaS matures and adds front-end or API services, it is time to begin using request-based scaling (for services that support this capability). For mature SaaS applications using microservices architecture, it is recommended to implement advanced monitoring and dynamically adjust scaling policies according to the target service (front-end/API vs. back-end/heavy compute resources).
Summary
Choosing the most suitable scaling alternative requires careful design of your workloads, understanding demands (customer facing/API calls, vs. heavy back-end compute), careful monitoring (to create the most suitable policies) and understanding how important responsiveness to customers behavior is (from adjusting required resources to ability to charge-back customers per their actual resource usage).
I encourage you to learn about the different workload patterns, to be able to design highly scalable modern applications in the cloud, to meet customers’ demand, and to be cost cost-efficient as possible.
About the author
Eyal Estrin is a cloud and information security architect, an AWS Community Builder, and the author of the books Cloud Security Handbook and Security for Cloud Native Applications, with more than 20 years in the IT industry.
You can connect with him on social media (https://linktr.ee/eyalestrin).
Opinions are his own and not the views of his employer.
Kubernetes Troubleshooting in the Cloud
Kubernetes has been used by organizations for nearly a decade — from wrapping applications inside containers, pushing them to a container repository, to full production deployment.
At some point, we need to troubleshoot various issues in Kubernetes environments.
In this blog post, I will review some of the common ways to troubleshoot Kubernetes, based on the hyperscale cloud environments.
Common Kubernetes issues
Before we deep dive into Kubernetes troubleshooting, let us review some of the common Kubernetes errors:
- CrashLoopBackOff — A container in a pod keeps failing to start, so Kubernetes tries to restart it over and over, waiting longer each time. This usually means there’s a problem with the app, something important is missing, or the setup is wrong.
- ImagePullBackOff — Kubernetes can’t download the container image for a pod. This might happen if the image name or tag is wrong, there’s a problem logging into the image registry, or there are network issues.
- CreateContainerConfigError — Kubernetes can’t set up the container because there’s a problem with the settings like wrong environment variables, incorrect volume mounts, or security settings that don’t work.
- PodInitializing — A pod is stuck starting up, usually because the initial setup containers are failing, taking too long, or there are problems with the network or attached storage.
Kubectl for Kubernetes troubleshooting
Kubectl is the native and recommended way to manage Kubernetes, and among others to assist in troubleshooting various aspects of Kubernetes.
Below are some examples of using kubectl:
- View all pods and their statuses:
kubectl get pods
- Get detailed information and recent events for a specific pod:
kubectl describe pod <pod-name>
- View logs from a specific container in a multi-container pod:
kubectl logs <pod-name> -c <container-name>
- Open an interactive shell inside a running pod:
kubectl exec -it <pod-name> — /bin/bash
- Check the status of cluster nodes:
kubectl get nodes
- Get detailed information about a specific node:
kubectl describe node <node-name>
Additional information about kubectl can be found at:
https://kubernetes.io/docs/reference/kubectl
Remote connectivity to Kubernetes nodes
In rare cases, you may need to remotely connect a Kubernetes node as part of troubleshooting. Some of the reasons to do so may be troubleshooting hardware failures, collecting system-level logs, cleaning up disk space, restarting services, etc.
Below are secure ways to remotely connect to Kubernetes nodes:
- To connect to an Amazon EKS node using AWS Systems Manager Session Manager from the command line, use the following command:
aws ssm start-session — target <instance-id>
For more details, see: https://docs.aws.amazon.com/eks/latest/best-practices/protecting-the-infrastructure.html
- To connect to an Azure AKS node using Azure Bastion from the command line, run the commands below to get the private IP address of the AKS node and SSH from a bastion connected environment:
az aks machine list — resource-group <myResourceGroup> — cluster-name <myAKSCluster> \
— nodepool-name <nodepool1> -o table
ssh -i /path/to/private_key.pem azureuser@<node-private-ip>
For more details, see: https://learn.microsoft.com/en-us/azure/aks/node-access
- To connect to a GKE node using the gcloud command combined with Identity-Aware Proxy (IAP), use the following command:
gcloud compute ssh <GKE_NODE_NAME> — zone <ZONE> — tunnel-through-iap
For more details, see: https://cloud.google.com/compute/docs/connect/ssh-using-iap#gcloud
Monitoring and observability
To assist in troubleshooting, Kubernetes has various logs, some are enabled by default (such as container logs) and some need to be explicitly enabled (such as Control Plane logs).
Below are some of the ways to collect logs in managed Kubernetes services.
Amazon EKS
To collect EKS node and application logs, use CloudWatch Container Insights (including resource utilization), as explained below:
To collect EKS Control Plane logs to CloudWatch logs, follow the instructions below:
https://docs.aws.amazon.com/eks/latest/userguide/control-plane-logs.html
To collect metrics from the EKS cluster, use Amazon Managed Service for Prometheus, as explained below:
https://docs.aws.amazon.com/eks/latest/userguide/prometheus.html
Azure AKS
To collect AKS node and application logs (including resource utilization), use Azure Monitor Container Insights, as explained below:
To collect AKS Control Plane logs to Azure Monitor, configure the diagnostic setting, as explained below:
https://docs.azure.cn/en-us/aks/monitor-aks?tabs=cilium#aks-control-planeresource-logs
To collect metrics from the AKS cluster, use Azure Monitor managed service for Prometheus, as explained below:
Google GKE
GKE node and Pod logs are sent automatically to Google Cloud Logging, as documented below:
https://cloud.google.com/kubernetes-engine/docs/concepts/about-logs#collecting_logs
GKE Control Plane logs are not enabled by default, as documented below:
https://cloud.google.com/kubernetes-engine/docs/how-to/view-logs
To collect metrics from the GKE cluster, use Google Cloud Managed Service for Prometheus, as explained below:
https://cloud.google.com/stackdriver/docs/managed-prometheus/setup-managed
Enable GKE usage metering to collect resource utilization, as documented below:
https://cloud.google.com/kubernetes-engine/docs/how-to/cluster-usage-metering#enabling
Troubleshooting network connectivity issues
There may be various network-related issues when managing Kubernetes clusters. Some of the common network issues are nodes or pods not joining the cluster, inter-pod communication failures, connectivity to the Kubernetes API server, etc.
Below are some of the ways to troubleshoot network issues in managed Kubernetes services.
Amazon EKS
Enable network policy logs to investigate network connection through Amazon VPC CNI, as explained below:
https://docs.aws.amazon.com/eks/latest/userguide/network-policies-troubleshooting.html
Use the guide below for monitoring network performance issues in EKS:
Temporary enable VPC flow logs (due to high storage cost in large production environments) to query network traffic of EKS clusters deployed in a dedicated subnet, as explained below:
Azure AKS
Use the guide below to troubleshoot connectivity issues to the AKS API server:
Use the guide below to troubleshoot outbound connectivity issues from the AKS cluster:
Use the guide below to troubleshoot connectivity issues to applications deployed on top of AKS:
Use Container Network Observability to troubleshoot connectivity issues within an AKS cluster, as explained below:
https://learn.microsoft.com/en-us/azure/aks/container-network-observability-concepts
Google GKE
Use the guide below to troubleshoot network connectivity issues in GKE:
https://cloud.google.com/kubernetes-engine/docs/troubleshooting/connectivity-issues-in-cluster
Temporary enable VPC flow logs (due to high storage cost in large production environments) to query network traffic of GKR clusters deployed in a dedicated subnet, as explained below:
https://cloud.google.com/vpc/docs/using-flow-logs
Summary
I am sure there are many more topics to cover when troubleshooting problems with Kubernetes clusters, however, in this blog post, I highlighted the most common cases.
Kubernetes by itself is an entire domain of expertise and requires many hours to deep dive into and understand.
I strongly encourage anyone using Kubernetes to read vendors’ documentation, and practice in development environments, until you gain hands-on experience running production environments.
About the author
Eyal Estrin is a cloud and information security architect, an AWS Community Builder, and the author of the books Cloud Security Handbook and Security for Cloud Native Applications, with more than 20 years in the IT industry.
You can connect with him on social media (https://linktr.ee/eyalestrin).
Opinions are his own and not the views of his employer.
Kubernetes and Container Portability: Navigating Multi-Cloud Flexibility
For many years we have been told that one of the major advantages of using containers is portability, meaning, the ability to move our application between different platforms or even different cloud providers.
In this blog post, we will review some of the aspects of designing an architecture based on Kubernetes, allowing application portability between different cloud providers.
Before we begin the conversation, we need to recall that each cloud provider has its opinionated way of deploying and consuming services, with different APIs and different service capabilities.
There are multiple ways to design a workload, from traditional use of VMs to event-driven architectures using message queues and Function-as-a-Service.
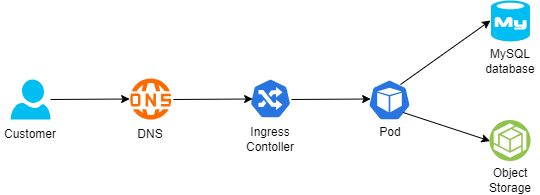
Below is an example of architecture:
- A customer connecting from the public Internet, resolving the DNS name from a global DNS service (such as Cloudflare)
- The request is sent to an Ingress controller, who forwards the traffic to a Kubernetes Pod exposing an application
- For static content retrieval, the application is using an object storage service through a Kubernetes CSI driver
- For persistent data storage, the application uses a backend-managed MySQL database
The 12-factor app methodology angle
When talking about the portability and design of modern applications, I always like to look back at the 12-factor app methodology:
Config
To be able to deploy immutable infrastructure on different cloud providers, we should store variables (such as SDLC stage, i.e., Dev, Test, Prod) and credentials (such as API keys, passwords, etc.) outside the containers.
Some examples:
- AWS Systems Manager Parameter Store (for environment variables or static credentials) or AWS Secrets Manager (for static credentials)
- Azure App Configuration (for environment variables or configuration settings) or Azure Key Vault (for static credentials)
- Google Config Controller (for configuration settings), Google Secret Manager (for static credentials), or GKE Workload Identity (for access to Cloud SQL or Google Cloud Storage)
- HashiCorp Vault (for environment variables or static credentials)
Backing services
To truly design for application portability between cloud providers, we need to architect our workload where a Pod can be attached and re-attached to a backend service.
For storage services, it is recommended to prefer services that Pods can connect via CSI drivers.
Some examples:
- Amazon S3 (for object storage), Amazon EBS (for block storage), or Amazon EFS (for NFS storage)
- Azure Blob (for object storage), Azure Disk (for block storage), or Azure Files (for NFS or CIFS storage)
- Google Cloud Storage (for object storage), Compute Engine Persistent Disks (for block storage), or Google Filestore (for NFS storage)
For database services, it is recommended to prefer open-source engines deployed in a managed service, instead of cloud opinionated databases.
Some examples:
- Amazon RDS for MySQL (for managed MySQL) or Amazon RDS for PostgreSQL (for managed PostgreSQL)
- Azure Database for MySQL (for managed MySQL) or Azure Database for PostgreSQL (for managed PostgreSQL)
- Google Cloud SQL for MySQL (for managed MySQL) or Google Cloud SQL for PostgreSQL (for managed PostgreSQL)
Port binding
To allow customers access to our application, Kubernetes exports a URL (i.e., DNS name) and a network port.
Since load-balancers offered by the cloud providers are opinionated to their eco-systems, we should use an open-source or third-party solution that will allow us to replace the ingress controller and enforce network policies (for example to be able to enforce both inbound and pod-to-pod communication), or a service mesh solution (for mTLS and full layer 7 traffic inspection and enforcement).
Some examples:
- NGINX (an open-source ingress controller), supported by Amazon EKS, Azure AKS, or Google GKE
- Calico CNI plugin (for enforcing network policies), supported by Amazon EKS, Azure AKS, or Google GKE
- Cilium CNI plugin (for enforcing network policies), supported by Amazon EKS, Azure AKS, or Google GKE
- Istio (for service mesh capabilities), supported by Amazon EKS, Azure AKS, or Google GKE
Logs
Although not directly related to container portability, logs are an essential part of application and infrastructure maintenance — to be specific observability, i.e., the ability to collect logs, metrics, and traces), to be able to anticipate issues before they impact customers.
Although each cloud provider has its own monitoring and observability services, it is recommended to consider open-source solutions, supported by all cloud providers, and stream logs to a central service, to be able to continue monitoring the workloads, regardless of the cloud platform.
Some examples:
- Prometheus — monitoring and alerting solution
- Grafana — visualization and alerting solution
- OpenTelemetry — a collection of tools for exporting telemetry data
Immutability
Although not directly mentioned in the 12 factors app methodology, to allow portability of containers between different Kubernetes environments, it is recommended to build a container image from scratch (i.e., avoid using cloud-specific container images), and package the minimum number of binaries and libraries. As previously mentioned, to create an immutable application, you should avoid storing credentials, or any other unique identifiers (including unique configurations) or data inside the container image.
Infrastructure as Code
Deployment of workloads using Infrastructure as Code, as part of a CI/CD pipeline, will allow deploying an entire workload (from pulling the latest container image, backend infrastructure, and Kubernetes deployment process) in a standard way between different cloud providers, and different SDLC stages (Dev, Test, Prod).
Some examples:
- OpenTofu — An open-source fork of Terraform, allows deploying entire cloud environments using Infrastructure as Code
- Helm Charts — An open-source solution for software deployment on top of Kubernetes
Summary
In this blog post, I have reviewed the concept of container portability for allowing organizations the ability to decrease the reliance on cloud provider opinionated solutions, by using open-source solutions.
Not all applications are suitable for portability, and there are many benefits of using cloud-opinionated solutions (such as serverless services), but for simple architectures, it is possible to design for application portability.
About the author
Eyal Estrin is a cloud and information security architect, an AWS Community Builder, and the author of the books Cloud Security Handbook and Security for Cloud Native Applications, with more than 20 years in the IT industry.
You can connect with him on social media (https://linktr.ee/eyalestrin).
Opinions are his own and not the views of his employer.
Understanding Cloud Data Protection: Best Practices for 2025

Introduction
Cloud storage solutions are becoming more and more popular among businesses due to their ease of use and flexibility, but they also come with a significant risk to the security of sensitive data. Because of the sharp rise in data breaches and cyberthreats, protecting data stored on cloud servers is now more crucial than ever. Despite the fact that 94% of businesses use cloud storage, many of them struggle to maintain strong security protocols. Let’s look at the best procedures for protecting sensitive data kept on cloud servers.
What is Cloud Data Protection?
Cloud data protection refers to securing an organization’s data contained in a cloud environment (controlled by the business or a third party) while the data is either in transit or at rest. While rapid adoption of cloud technology is revolutionizing the way businesses operate, it has also made cloud settings more vulnerable to assaults. It is not only critical to secure your cloud environment; it is a business imperative.
Components of Cloud Architecture
- Compute: This is the processing power needed to run apps that serves as the structural heart of the cloud. Depending on demand, its size can be controlled to guarantee that it is delivered at the most cost-effective and maximum performance.
- Storage: Cloud storage services provide data storage that is always available and accessible from any location and to protect sensitive data from breaches and unauthorized access.
- Network: Connecting the apps, data and people A secure network protects the data from being eavesdropping or manipulation while it travels.
Why is Cloud Protection Challenging?
Securing data in the cloud is not an easy job. The cloud has strong security features, but it comes with many challenges:
- Evolve Cyber Threats: Cloud infrastructures face many significant security threats. Cloud providers can be targeted in Distributed Denial-of-Service (DDOS) attacks, which overwhelm the cloud provider and temporarily take the services of customers offline. Ransomware attacks can affect cloud services and make them inaccessible until ransoms are paid. Access gateways can be bypassed in the case of credential theft-driven attacks and attackers can obtain sharable private information or sensitive tasks.
- Compliance Standards: Businesses are required to protect data privacy, and that requires them to secure every sensitive information they are collecting. Laws like HIPAA, GDPR, and PCI-DSS have a component of cloud data compliance. Security teams need tools that meet compliance requirements and provide evidence that their organizations are achieving audit goals.
- Insider Threats: Insiders might use their access to a company’s cloud data to perpetrate cybercrimes. Since the cloud data is easily accessible, it becomes easier for malicious actors to gain unauthorized access, which will also be an issue in on-premises systems.
- Clear Visibility: Cloud providers might obfuscate information at the infrastructure level, keeping end users in the dark about security blind spots of considerable magnitude. There is a possibility for enterprises to lose visibility into user behavior, code-base changes, and even the size of their cloud deployments.
About 70% of businesses that face cloud violations observe a clear drop in customer trust, with a big part of those firms directly feeling the impact by losing clients.
Cloud Data Protection Best Practices 2025
The following list of recommended practices outlines how businesses can drastically lower risk and guarantee a more secure cloud environment:
- Shared-Responsibility Model: The security of cloud environments depends on combined efforts between cloud service providers and their users in a two-way structure. Cloud providers take responsibility for the security of cloud infrastructure while users must protect their data, applications and access controls within the cloud environment. The key to developing a strong cloud security approach lies in knowing how these functions work.
- Data Backup: One primary way to use the cloud involves backing up files from physical hard drives. Scheduled backups ensure that data can be retrieved swiftly with minimal disruption after a loss from accidental deletion, cyberattacks or system disruptions. Through regular backups businesses can reduce downtime and data unavailability because they enable quick recovery from data loss situations.
- Encryption of Data: Protecting data during storage and transmission through encryption prevents unauthorized access and stops data interception attempts. The privacy of data remains protected by means of encryption. Data cannot be accessed without the decryption key regardless of any security breach occurrence.
- Regular Audits: The security best practices for cloud environments may become inconsistent as their growth and development continue. Routine audits simplify the process of identifying and correcting security deviations. Regular security audits help maintain compliance with security standards to reduce the risk of configuration-based security breaches.
- Enable MFA: Multi-Factor Authentication adds another layer of barrier beyond the password window. Even if some one’s credentials may have been compromised, unwanted access is still mitigated. The need for multi-factor verification in the cloud, especially administrator accounts, is essential. Protecting data in the cloud also entails ensuring users are informed about garnering the power of multi-factor authentication, reviewing and refreshing the configurations for multi-factor settings and authentication regularly to align with changes, and setting up new frameworks.
- Network Security: Cyberattacks should be kept at a distance and preventing them is the main design of a network. Any gaps pose a risk and are a concern. Otherwise known, shielded network security posture consisting of private virtual clouds (VPC), keeps firewalls, and every other instrument working to ensure no unauthorized movement of traffic is allowed to your resources while hostile range is kept at bay.
- Knowledge of Compliance: Standards of compliance encompasses a guideline for safeguarding personal and sensitive data or checking off legal requirements and using them as boundaries. Regulative measures, as far as the principles are to a business, mandates evaluating the trust from the regulators and consumers for safeguarding the cloud environment. To avoid exposing gaps and correcting them before they spiral into an issue, compliance postures should be examined regularly.
- Monitor Cloud Activity: Continuously tracking cloud infrastructure is essential for mitigating potential risks in the ever-changing cloud environments. Real-time monitoring streamlines the detection of security breaches such as suspicious logins, unauthorized access, and tampering with critical configurations. Without proactive measures, these activities may go undetected until it’s too late. Monitoring this information allows alerts to concentrate on the most significant threats.
- Conduct Incident Response: This process includes organizing regular incident response actions to check the organization’s readiness and imitate real security breach situations. Interdisciplinary groups like IT, security, and legal would also be added to ensure a joined reply in case of an accident. The outcome of every activity should be reviewed to determine deficiencies and modify the incident response plan accordingly.
- Train Employees: Employees of the organization should be given training about the cloud security procedures. Regular training sessions should make people aware of phishing and other online threats. Along with this, there is a requirement to establish special training for IT groups, which means providing DevOps and IT teams with appropriate facilities to manage security issues related specifically to the cloud.
Conclusion
As the cloud security landscape continues to evolve, it is important to stay abreast of technology trends and emerging threats. Making cloud data security a top priority will go a long way in helping you safeguard your data and ensure compliance with all applicable laws. Remember, proactive cloud security is not just about being required but also about being committed to preserving the confidentiality and integrity of your critical information.
Author bio
Aidan Simister
At Lepide, a leading provider of compliance and data security solutions, Aidan Simister serves as CEO. He has more than 20 years of experience in the IT sector and is well known for his proficiency in cybersecurity and dedication to assisting businesses in protecting their private information.
Navigating Brownfield Environments in AWS: Steps for Successful Cloud Use

In an ideal world, we would have the luxury of building greenfield cloud environments, however, this is not always the situation we as cloud architects have to deal with.
Greenfield environments allow us to design our cloud environment following industry (or cloud vendor) best practices, setting up guardrails, selecting an architecture to meet the business requirements (think about event-driven architecture, scale, managed services, etc.), backing cost into architecture decisions, etc.
In many cases, we inherit an existing cloud environment due to mergers and acquisitions or we just stepped into the position of a cloud architect in a new company, that already serves customers, and there are almost zero chances that the business will grant us the opportunity to fix mistakes already been taken.
In this blog post, I will try to provide some steps for handling brownfield cloud environments, based on the AWS platform.
Step 1 – Create an AWS Organization
If you have already inherited multiple AWS accounts, the first thing you need to do is create a new AWS account (without any resources) to serve as the management account and create an AWS organization, as explained in the AWS documentation.
Once the new AWS organization is created, make sure you select an email address (from your organization’s SMTP domain), select a strong password for the Root AWS user account, revoke and remove all AWS access keys (if there are any), and configure an MFA for the Root AWS user account.
Update the primary and alternate contact details for the AWS organization (recommend using an SMTP mailing list instead of a single-user email address).
The next step is to design an OU structure for the AWS organization. There are various ways to structure the organization, and perhaps the most common one is by lines of business, and underneath, a similar structure by SDLC stage – i.e., Dev, Test, and Prod, as discussed in the AWS documentation.
Step 2 – Handle Identity and Access management
Now that we have an AWS organization, we need to take care of identity and access management across the entire organization.
To make sure all identities authenticate against the same identity provider (such as the on-prem Microsoft Active Directory), enable AWS IAM Identity Center, as explained in the AWS documentation.
Once you have set up the AWS IAM Identity Center, it is time to avoid using the Root AWS user account and create a dedicated IAM user for all administrative tasks, as explained in the AWS documentation.
Step 3 – Moving AWS member accounts to the AWS Organization
Assuming we have inherited multiple AWS accounts, it is now the time to move the member AWS accounts into the previously created OU structure, as explained in the AWS documentation.
Once all the member accounts have been migrated, it is time to remove the Root AWS user account, as explained in the AWS documentation.
Step 4 – Manage cost
The next thing we need to consider is cost. If a workload was migrated from the on-prem using a legacy data center mindset, or if a temporary or development environment became a production environment over time, designed by an inexperienced architect or engineer, there is a good chance that cost was not a top priority from day 1.
Even before digging into cost reduction or right-sizing, we need to have visibility into cost aspects, at least to be able to stop wasting money regularly.
Define the AWS management account as the payer account for the entire AWS organization, as explained in the AWS documentation.
Create a central S3 bucket to store the cost and usage report for the entire AWS organization, as explained in the AWS documentation.
Create a budget for each AWS account, create alerts once a certain threshold of the monthly budget has been reached (for example at 75%, 85%, and 95%), and send alerts once a pre-defined threshold has been reached.
Create a monthly report for each of the AWS accounts in the organization and review the reports regularly.
Enforce tagging policy across the AWS organization (such as tags by line of business, by application, by SDLC stage, etc.), to be able to track resources and review their cost regularly, as explained in the AWS documentation.
Step 5 – Creating a central audit and logging
To have central observability across our AWS organization, it is recommended to create a dedicated AWS member account for logging.
Create a central S3 bucket to store CloudTrail logs from all AWS accounts in the organization, as explained in the AWS documentation.
Make sure access to the CloudTrail bucket is restricted to members of the SOC team only.
Create a central S3 bucket to store CloudWatch logs from all AWS accounts in the organization, and export CloudWatch logs to the central S3 bucket, as explained in the AWS documentation.
Step 6 – Manage security posture
Now that we become aware of the cost, we need to look at our entire AWS organization security posture, and a common assumption is that we have public resources, or resources that are accessible by external identities (such as third-party vendors, partners, customers, etc.)
To be able to detect access to our resources by external identities, we should run the IAM Access Analyzer, generate access reports, and regularly review the report (or send their output to a central SIEM system), as explained in the AWS documentation.
We should also use the IAM Access Analyzer to detect excessive privileges, as explained in the AWS documentation.
Begin assigning Service control policies (SCPs) to OUs in the AWS organizations, with guardrails such as denying the ability to create resources in certain regions (due to regulations) or preventing Internet access.
Use tools such as Prowler, to generate security posture reports for every AWS account in the organization, as mentioned in the AWS documentation – focus on misconfigurations such as resources with public access.
Step 7 – Observability into cloud resources
The next step is visibility into our resources.
To have a central view of logs, metrics, and traces across AWS organizations, we can leverage the CloudWatch cross-account capability, as explained in the AWS documentation. This capability will allow us to create dashboards and perform queries to better understand how our applications are performing, but we need to recall that the more logs we store, has cost implications, so for the first stage, I recommend selecting production applications (or at least the applications that produces the most value to our organization).
To have central visibility over vulnerabilities across the AWS organizations (such as vulnerabilities in EC2 instances, container images in ECR, or Lambda functions), we can use Amazon Inspector, to regularly scan and generate findings from all members in our AWS organizations, as explained in the AWS documentation. With the information from Amazon Inspector, we can later use the AWS SSM to deploy missing security patches, as explained in the AWS documentation.
Summary
In this blog post, I have reviewed some of the most common recommendations I believe should grant you better control and visibility into existing brownfield AWS environments.
I am sure there are many more recommendations and best practices, and perhaps next steps such as resource rightsizing, re-architecting existing workloads, adding third-party solutions for observability and security posture, and more.
I encourage readers of this blog post, to gain control over existing AWS environments, question past decisions (for topics such as cost, efficiency, sustainability, etc.), and always look for the next level in taking full benefit of the AWS environment.
About the author
Eyal Estrin is a cloud and information security architect, an AWS Community Builder, and the author of the books Cloud Security Handbook and Security for Cloud Native Applications, with more than 20 years in the IT industry.
You can connect with him on social media (https://linktr.ee/eyalestrin).
Opinions are his own and not the views of his employer.
Navigating AWS Anti-Patterns: Common Pitfalls and Strategies to Avoid Them

Before beginning the conversation about AWS anti-patterns, we should ask ourselves — what is an anti-pattern?
I have searched the web, and found the following quote:
“An antipattern is just like a pattern, except that instead of a solution, it gives something that looks superficially like a solution but isn’t one” (“Patterns and Antipatterns” by Andrew Koenig)
Key characteristics of antipatterns include:
- They are commonly used processes, structures, or patterns of action.
- They initially seem appropriate and effective.
- They ultimately produce more negative consequences than positive results.
- There exists a better, documented, and proven alternative solution.
In this blog post, I will review some of the common anti-patterns we see on AWS environments, and how to properly use AWS services.
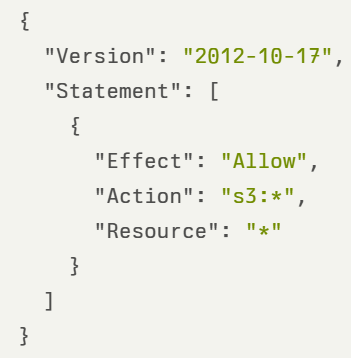
Using a permissive IAM policy
This is common for organizations migrating from the on-prem to AWS, and lack the understanding of how IAM policy works, or in development environments, where “we are just trying to check if some action will work and we will fix the permissions later…” (and in many cases, we fail to go back and limit the permissions).
In the example below, we see an IAM policy allowing access to all S3 buckets, including all actions related to S3:
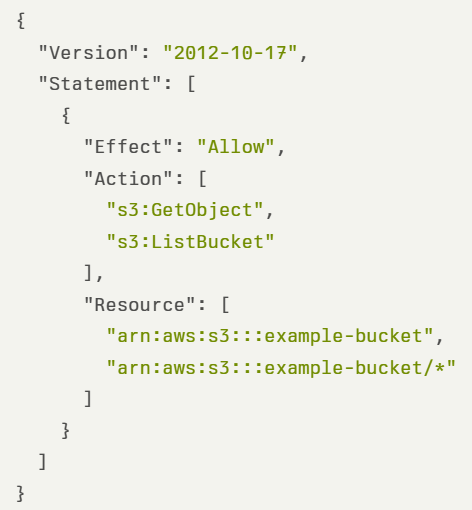
In the example below, we see a strict IAM policy allowing access to specific S3 buckets, with specific S3 actions:
Publicly accessible resources
For many years, deploying resources such as S3 buckets, an EC2 instance, or an RDS database, caused them to be publicly accessible, which made them prone to attacks from external or unauthorized parties.
In production environments, there are no reasons for creating publicly accessible resources (unless we are talking about static content accessible via a CDN). Ideally, EC2 instances will be deployed in a private subnet, behind an AWS NLB or AWS ALB, and RDS / Aurora instances will be deployed in a private subnet (behind a strict VPC security group).
In the case of EC2 or RDS, it depends on the target VPC you are deploying the resources — the default VPC assigns a public IP while creating custom VPC allows us to decide if we need a public subnet or not.
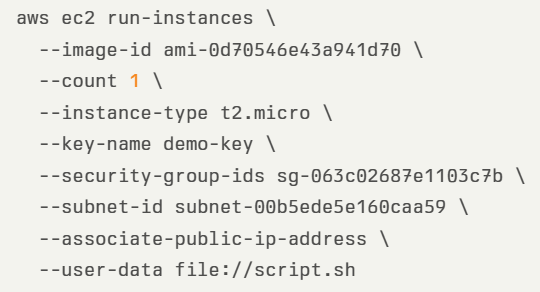
In the example below, we see an AWS CLI command for deploying an EC2 instance with public IP:
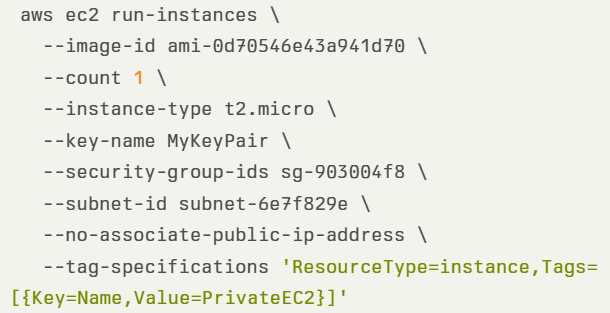
In the example below, we see an AWS CLI command for deploying an EC2 instance without a public IP:
In the case of the S3 bucket, since April 2023, when creating a new S3 bucket, by default the “S3 Block Public Access” is enabled, making it private.
In the example below, we see an AWS CLI command for creating an S3 bucket, while enforcing private access:

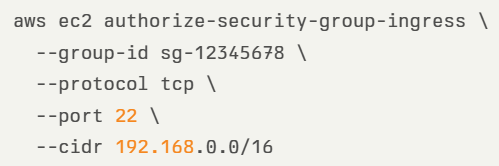
Using permissive network access
By default, when launching an EC2 instance, the only default rule is port 22 for SSH access for Linux instances, accessible from 0.0.0.0/0 (i.e., all IPs), which makes all Linux instances (such as EC2 instances or Kubernetes Pods), publicly accessible from the Internet.
As a rule of thumb — always implement the principle of least privilege, meaning, enforce minimal network access according to business needs.
In the case of EC2 instances, there are a couple of alternatives:
- Remotely connect to EC2 instances using EC2 instance connect or using AWS Systems Manager Session Manager.
- If you insist on connecting to a Linux EC2 instance using SSH, make sure you configure a VPC security group to restrict access through SSH protocol from specific (private) CIDR. In the example below, we see an AWS CLI command for creating a strict VPC security group:
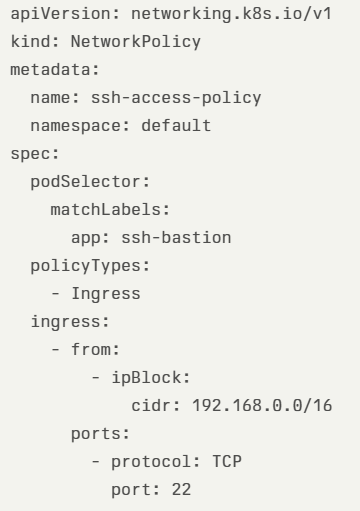
- In the case of Kubernetes Pods, one of the alternatives is to create a network security policy, to restrict access to SSH protocol from specific (private) CIDR, as we can see in the example below:
Using hard-coded credentials
This is a common pattern organizations have been doing for many years. Storing (cleartext) static credentials in application code, configuration files, automation scripts, code repositories, and more.
Anyone with read access to the mentioned above will gain access to the credentials and will be able to use them to harm the organization (from data leakage to costly resource deployment such as VMs for Bitcoin mining).
Below are alternatives for using hard-coded credentials:
- Use an IAM role to gain temporary access to resources, instead of using static (or long-lived credentials)
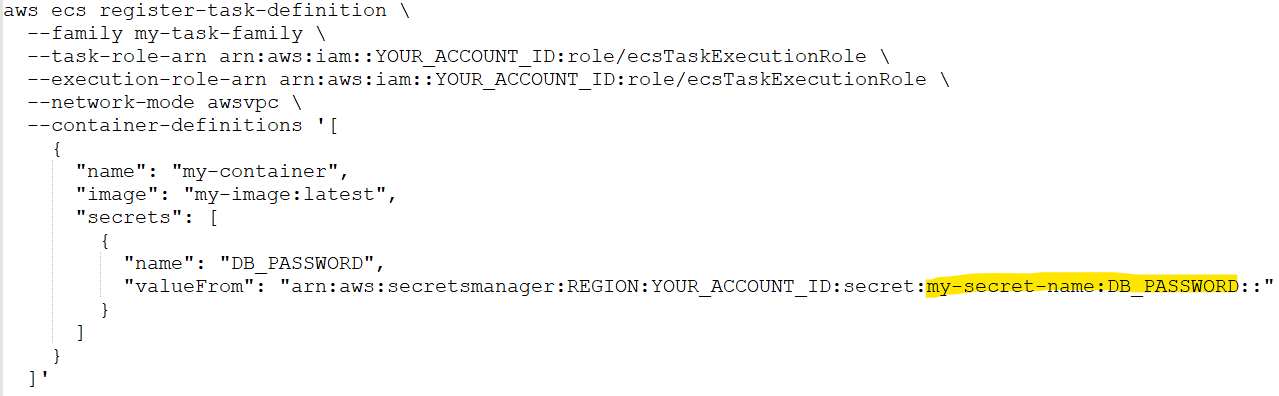
- Use AWS Secrets Manager or AWS Systems Manager Parameter Store to generate, store, retrieve, rotate, and revoke any static credentials. Connect your applications and CI/CD processes to AWS Secrets Manager, to pull the latest credentials. In the example below we see an AWS CLI command for an ECS task pulling a database password from AWS Secrets Manager:
Ignoring service cost
Almost any service in AWS has its pricing, which we need to be aware of while planning an architecture. Sometimes it is fairly easy to understand the pricing — such as EC2 on-demand (pay by the time an instance is running), and sometimes the cost estimation can be fairly complex, such as Amazon S3 (storage cost per storage class, actions such as PUT or DELETE, egress data, data retrieval from archive, etc.)
When deploying resources in an AWS environment, we may find ourselves paying thousands of dollars every month, simply because we ignore the cost factor.
There is no good alternative for having visibility into cloud costs — we still have to pay for the services we deploy and consume, but with simple steps, we will have at least basic visibility into the costs, before we go bankrupt.
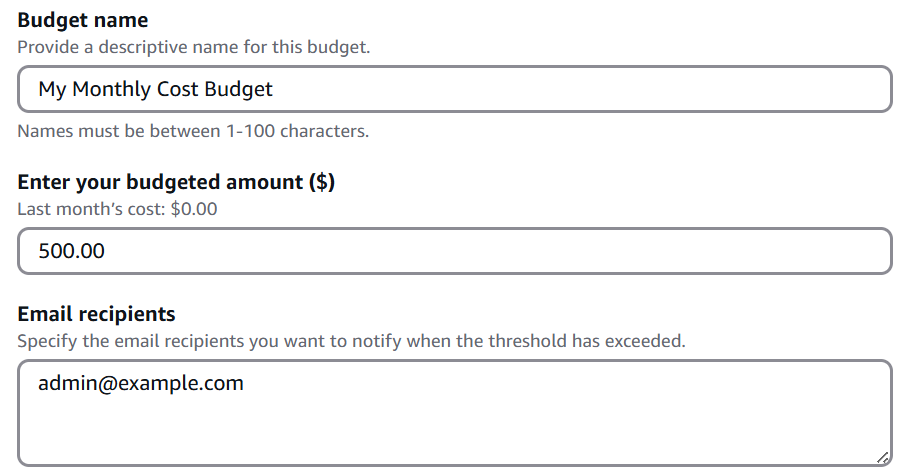
In the example below, we can see a monthly budget created in an AWS account to send email notifications when the monthly budget reaches 500$:
Naturally, the best advice is to embed cost in any design consideration, as explained in “The Frugal Architect” (https://www.thefrugalarchitect.com/)
Failing to use auto-scaling
One of the biggest benefits of the public cloud and modern applications is the use of auto-scaling capabilities to add or remove resources according to customer demands.
Without autoscaling, our applications will reach resource limits (such as CPU, memory, or network), and availability issues (in case an application was deployed on a single EC2 instance or single RDS node) which will have a direct impact on customers, or high cost (in case we have provisioned more compute resources than required).
Many IT veterans think of auto-scaling as the ability to add more compute resources such as additional EC2 instances, ECS tasks, DynamoDB tables, Aurora replicas, etc.
Autoscaling is not just about adding resources, but also the ability to adjust the number of resources (i.e., compute instances/replicas) to the actual customer’s demand.
A good example of a scale-out scenario (i.e., adding more compute resources), is a scenario where a publicly accessible web application is under a DDoS attack. An autoscale capability will allow us to add more compute resources, to keep the application accessible to legitimate customers’ requests, until the DDoS is handled by the ISP, or by AWS (through the Advanced Shield service).
A good example of a scale-down scenario (i.e., removing compute resources) is 24 hours after Black Friday or Cyber Monday when an e-commerce website receives less traffic from customers, and fewer resources are required. It makes sense when we think about the number of required VMs, Kubernetes Pods, or ECS tasks, but what about databases?
Some services, such as Aurora Serverless v2, support scaling to 0 capacity, which automatically pauses after a period of inactivity by scaling down to 0 Aurora Capacity Units (ACUs), allowing you to benefit from cost reduction for workloads with inactivity periods.
Failing to leverage storage class
A common mistake when building applications in AWS is to choose the default storage alternative (such as Amazon S3 or Amazon EFS), without considering data access patterns, and as a result, we may be paying a lot of money every month, while storing objects/files (such as logs or snapshots), which are not accessed regularly.
As with any work with AWS services, we need to review the service documentation, understand the data access patterns for each workload that we design, and choose the right storage service and storage class.
Amazon S3 is the most commonly used storage solution for cloud-native applications (from logs, static content, AI/ML, data lakes, etc.
When using S3, consider the following:
- For unpredictable data access patterns (for example when you cannot determine when or how often objects will be accessed), choose Amazon S3 Intelligent-Tiering.
- If you know the access pattern of your data (for example logs accessed for 30 days and then archived) choose S3 lifecycle policies.
Amazon EFS is commonly used when you need to share file storage with concurrent access (such as multiple EC2 instances reading from a shared storage, or multiple Kubernetes Pods writing data to a shared storage).
When using EFS, consider the following:
- For unpredictable data access patterns (for example if files are moved between performance-optimized tiers and cost-optimized tiers), choose Amazon EFS Intelligent Tiering.
- If you know the access pattern of your data (for example logs older than 30 days), configure lifecycle policies.
Summary
The more we deep dive into application design and architecture, the more anti-patterns we will find. Our applications will run, but they will be inefficient, costly, insecure, and more.
In this blog post, we have reviewed anti-patterns from various domains (such as security, cost, and resource optimization).
I encourage the readers to read AWS documentation (including the AWS Well-Architected Framework and the AWS Decision Guides), consider what are you trying to achieve, and design your architectures accordingly.
Embrace a dynamic mindset — Always question your past decisions — there might be better or more efficient ways to achieve similar goals.
About the author
Eyal Estrin is a cloud and information security architect, an AWS Community Builder, and the author of the books Cloud Security Handbook and Security for Cloud Native Applications, with more than 20 years in the IT industry.
You can connect with him on social media (https://linktr.ee/eyalestrin).
Opinions are his own and not the views of his employer.
Hosting Services — The Short and Mid-Term Solution Before Transition to the Public Cloud
Anyone who follows my posts on social networks knows that I am an advocate of the public cloud and cloud adoption.
According to Synergy Research Group, by 2029, “hyperscale operators will account for over 60% of all capacity, while on-premise will drop to just 20%”.
In this blog post, I will share my personal opinion on where I see the future of IT infrastructure.
Before we begin the conversation, I believe we can all agree that many organizations are still maintaining on-prem data centers and legacy applications, and they are not going away any time in the foreseeable future.
Another thing I hope we can agree on is that IT infrastructure aims to support the business, but it does not produce direct revenue for the organization.
Now, let us talk about how I see the future of IT infrastructure in the short or mid-term, and in the long term.
Short or Mid-term future — Hosting or co-location services
Many organizations are still maintaining on-prem data centers of various sizes. There are many valid reasons to keep maintaining on-prem data centers, to name a few:
- Keeping investment in purchased hardware (physical servers, network equipment, storage arrays, etc.)
- Multi-year software license agreements to commercial vendors (such as virtualization, operating systems, databases, etc.)
- Legacy application constraints (from license bound to a physical CPU to monolith applications that were developed many years ago and simply were not developed to run in cloud environments, least not efficient)
- Regulatory constraints requiring to keep data (such as customer data) in a specific country/region.
- Large volumes of data are generated and stored for many years, and the cost/time constraints to move it to the public cloud.
- Employee knowledge — many IT veterans have already invested years over years learning how to deploy hardware/virtualization, how to maintain network or storage equipment, and let us be honest — they may be afraid of making a change, learning something new such as moving to the public cloud.
Regardless of how organizations see on-prem data centers, they will never have the expertise that large-scale hosting providers have, to name a few:
- Ability to deploy high-scale and redundant data centers, in multiple locations (think about primary and DR data centers or active-active data centers)
- Invest in physical security (i.e., who has physical access to the data center and specific cage), while providing services to multiple different customers.
- Build and maintain sustainable data centers, using the latest energy technologies, while keeping the carbon footprint to the minimum.
- Ability to recruit highly skilled personnel (from IT, security, DevOps, DBA, etc.) to support multiple customers of the hosting service data centers.
What are the benefits of hosting services?
Organizations debating about migration to the cloud, and the efforts required to re-architect or adjust their applications and infrastructure to make them efficient to run in the public cloud, could use hosting services.
Here are a few examples for using hosting services:
- Keeping legacy hardware that still produces value for the business, such as Mainframe servers (for customers such as banks or government agencies). Organizations would still be able to consume their existing applications, without having to take care of the ongoing maintenance of legacy hardware.
- Cloud local alternative on-prem — Several CSPs are offering their hardware racks for local or hosting facilities deployment, such as AWS Outposts, Azure Local, or Oracle Cloud@Customer, allowing customers to consume hardware identical to the hardware that the CSPs offer (managed remotely by the CSPs), while using the same APIs, but locally.
- Many organizations are limited by their Internet bandwidth. By using hosting services, organizations can leverage the network bandwidth of their hosting provider, and the ability to have multiple ISPs, allowing them both inbound and outbound network connectivity.
- Many organizations would like to begin developing GenAI applications, which requires them an invest in expensive GPU hardware. The latest hardware costs a lot of money, requires dedicated cooling and it gets outdated over time. Instead, hosting service provider can purchase and maintain a large number of GPUs, offering their customers the ability to consume GPU to AI/ML workloads, while paying for the time they used the hardware.
- Modern pricing model — Hosting services can offer customers modern pricing plans, such as paying for the actual amount of storage consumed, paying for the time a machine was running (or offering to purchase hardware for several years in advance), Internet bandwidth (or traffic consumed on the network equipment), etc.
Hosting services and the future of modern applications
Just because organizations will migrate from their on-prem to hosting services, does not mean they cannot begin developing modern applications.
Although hosting services do not offer all the capabilities of the public cloud (such as infinite scale, perform actions, and consumption information via API calls, etc.), there are still many things organizations can begin today, to name a few:
- Deploy applications inside containers — a hosting provider can deploy and maintain Kubernetes control plane for his customers, allowing them to consume Kubernetes, without having to take care of the burden related to Kubernetes maintenance. A common example of Kubernetes that can be deployed locally at a hosting provider facility, and later on can be used in public cloud environments is OpenShift.
- Consume object storage — a hosting provider can deploy and maintain object storage services (such as Min.io), offering his customers to begin consuming storage capabilities that exist in cloud-native environments.
- Consume open-source queuing services — customers can deploy message brokers such as ActiveMQ or RabbitMQ, to develop asynchronous applications, and when moving to the public cloud, use the cloud providers managed services alternatives.
- Consume message streaming services — customers can begin deploying event-driven architectures using Apache Kafka, to stream a large number of messages, in near real-time, and when moving to the public cloud, use the cloud providers managed services alternatives.
- Deploy components using Infrastructure as Code. Some of the common IaC alternatives such as Terraform and Pulumi, already support providers from the on-prem environment (such as Kubernetes), which allows organizations to already begin using modern deployment capabilities.
Note — perhaps the biggest downside of hosting services in the area of modern applications is the lack of function-as-a-service capabilities. Most FaaS are vendor-opinionated, and I have not heard of many customers using FaaS locally.
Transitioning from on-prem to hosting services
The transition between the on-prem and a hosting facility should be straightforward, after all, you are keeping your existing hardware (from Mainframe servers to physical appliances) and simply have the hosting provider take care of the ongoing maintenance.
Hosting services will allow organizations access to managed infrastructure (similar to the Infrastructure as a Service model in the public cloud), and some providers will also offer you managed services (such as storage, WAF, DDoS protection, and perhaps even managed Kubernetes or databases).
Similarly to the public cloud, the concept of shared responsibility is still relevant. The hosting provider is responsible for all the lower layers (from physical security, physical hardware, network, and storage equipment, up until the virtualization layer), and organizations are responsible for whatever happens within their virtual servers (such as who has access, what permissions are granted, what data is being stored, etc.). In case an organization needs to comply with regulations (such as PCI-DSS, FedRAMP, etc.), the organization needs to work with the hosting provider to figure out how to comply with the regulation end-to-end (do not assume that if your hosting provider’s physical layer is compliant, so does your OS and data layers).
Long-term future — The public cloud
I have been a cloud advocate for many years, so my opinion about the public cloud is a little bit biased.
The public cloud brings agility into the traditional IT infrastructure — when designing an architecture, you have multiple ways to achieve similar goals — from traditional architecture based on VMs to modern designs such as microservice architecture built on top of containers, FaaS, or event-driven architecture.
One of the biggest benefits of using the public cloud is the ability to consume managed services (such as managed database services, managed Kubernetes services, managed load-balancers, etc.), where from a customer point of view, you do not need to take care of compute scale (i.e., selecting the underlying compute hardware resources or number of deployed compute instances), or the ongoing maintenance of the underlying layers.
Elasticity and infinite resource scale are huge benefits of the public cloud (at least for the hyper-scale cloud providers), which no data center can compete with. Organizations can design architectures that will dynamically adjust the number of resources according to customers’ load (up or down).
For many IT veterans, moving to the public cloud requires a long learning curve (among others, switching from being a specialist in a certain domain to becoming a generalist in multiple domains). Organizations need to invest resources in employee training and knowledge sharing.
Another important topic that organizations need to focus on while moving to the public cloud is cost — it should be embedded in any architecture or design decision. Engineers and architects need to understand the pricing model for each service they are planning to use and try to select the most efficient service alternative (such as storage tier, compute size, database type, etc.)
Summary
The world of IT infrastructure as we currently know it is constantly changing. Organizations would still like to gain value from their past investment in hardware and legacy applications. In my personal opinion, using legacy applications that still produce value (until they finally reach the decommission phase), simply does not worth the burden of having to maintain on-prem data centers.
Organizations should focus on what brings them value, such as developing new products or providing better services for their customers, and shift the ongoing maintenance to providers who specialize in this field.
For startups who were already born in the cloud, the best alternative is building cloud-native applications in the public cloud.
For traditional organizations, that still maintain legacy hardware and applications, the most suitable alternative for the short or mid-term is to move away from their existing data centers, to one of the hyper-scale or dedicated hosting providers in their local country.
In the long term, organizations should assess all their existing applications and infrastructure, and either decommission old applications, or re-architect / modernize to be deployed in the public cloud, using managed services, modern architectures (microservices, containers, FaaS, event-driven architecture, etc.), using modern deployment methods (i.e., Infrastructure as Code).
The future will probably be a mix of hyper-clouds (hosting facilities combined with one or more public clouds), and single or multiple public cloud providers.
About the author
Eyal Estrin is a cloud and information security architect, an AWS Community Builder, and the author of the books Cloud Security Handbook and Security for Cloud Native Applications, with more than 20 years in the IT industry.
You can connect with him on social media (https://linktr.ee/eyalestrin).
Opinions are his own and not the views of his employer.
Stop bringing old practices to the cloud

When organizations migrate to the public cloud, they often mistakenly look at the cloud as “somebody else’s data center”, or “a suitable place to run a disaster recovery site”, hence, bringing old practices to the public cloud.
In the blog, I will review some of the common old (and perhaps bad) practices organizations are still using today in the cloud.
Mistake #1 — The cloud is cheaper
I often hear IT veterans comparing the public cloud to the on-prem data center as a cheaper alternative, due to versatile pricing plans and cost of storage.
In some cases, this may be true, but focusing on specific use cases from a cost perspective is too narrow, and missing the benefits of the public cloud — agility, scale, automation, and managed services.
Don’t get me wrong — cost is an important factor, but it is time to look at things from an efficiency point of view and embed it as part of any architecture decision.
Begin by looking at the business requirements and ask yourself (among others):
- What am I trying to achieve, what capabilities do I need, and then figure out which services will allow you to accomplish your needs?
- Do you need persistent storage? Great. What are your data access patterns? Do you need the data to be available in real time, or can you store data in an archive tier?
- Your system needs to respond to customers’ requests — does your application need to provide a fast response to API calls, or is it ok to provide answers from a caching service, while calls are going through an asynchronous queuing service to fetch data?
Mistake #2 — Using legacy architecture components
Many organizations are still using legacy practices in the public cloud — from moving VMs in a “lift & shift” pattern to cloud environments, using SMB/CIFS file services (such as Amazon FSx for Windows File Server, or Azure Files), deploying databases on VMs and manually maintaining them, etc.
For static and stable legacy applications, the old practices will work, but for how long?
Begin by asking yourself:
- How will your application handle unpredictable loads? Autoscaling is great, but can your application scale down when resources are not needed?
- What value are you getting by maintaining backend services such as storage and databases?
- What value are you getting by continuing to use commercial license database engines? Perhaps it is time to consider using open-source or community-based database engines (such as Amazon RDS for PostgreSQL, Azure Database for MySQL, or OpenSearch) to have wider community support and perhaps be able to minimize migration efforts to another cloud provider in the future.
Mistake #3 — Using traditional development processes
In the old data center, we used to develop monolith applications, having a stuck of components (VMs, databases, and storage) glued together, making it challenging to release new versions/features, upgrade, scale, etc.
The more organizations began embracing the public cloud, the shift to DevOps culture, allowed organizations the ability to develop and deploy new capabilities much faster, using smaller teams, each own specific component, being able to independently release new component versions, and take the benefit of autoscaling capability, responding to real-time load, regardless of other components in the architecture.
Instead of hard-coded, manual configuration files, pruning to human mistakes, it is time to move to modern CI/CD processes. It is time to automate everything that does not require a human decision, handle everything as code (from Infrastructure as Code, Policy as Code, and the actual application’s code), store everything in a central code repository (and later on in a central artifact repository), and be able to control authorization, auditing, roll-back (in case of bugs in code), and fast deployments.
Using CI/CD processes, allows us to minimize changes between different SDLC stages, by using the same code (in code repository) to deploy Dev/Test/Prod environments, by using environment variables to switch between target environments, backend services connection settings, credentials (keys, secrets, etc.), while using the same testing capabilities (such as static code analysis, vulnerable package detection, etc.)
Mistake #4 — Static vs. Dynamic Mindset
Traditional deployment had a static mindset. Applications were packed inside VMs, containing code/configuration, data, and unique characteristics (such as session IDs). In many cases architectures kept a 1:1 correlation between the front-end component, and the backend, meaning, a customer used to log in through a front-end component (such as a load-balancer), a unique session ID was forwarded to the presentation tier, moving to a specific business logic tier, and from there, sometimes to a specific backend database node (in the DB cluster).
Now consider what will happen if the front tier crashes or is irresponsive due to high load. What will happen if a mid-tier or back-end tier is not able to respond on time to a customer’s call? How will such issues impact customers’ experience having to refresh, or completely re-login again?
The cloud offers us a dynamic mindset. Workloads can scale up or down according to load. Workloads may be up and running offering services for a short amount of time, and decommission when not required anymore.
It is time to consider immutability. Store session IDs outside compute nodes (from VMs, containers, and Function-as-a-Service).
Still struggling with patch management? It’s time to create immutable images, and simply replace an entire component with a newer version, instead of having to pet each running compute component.
Use CI/CD processes to package compute components (such as VM or container images). Keep artifacts as small as possible (to decrease deployment and load time).
Regularly scan for outdated components (such as binaries and libraries), and on any development cycle update the base images.
Keep all data outside the images, on a persistent storage — it is time to embrace object storage (suitable for a variety of use cases from logging, data lakes, machine learning, etc.)
Store unique configuration inside environment variables, loaded at deployment/load time (from services such as AWS Systems Manager Parameter Store or Azure App Configuration), and for variables containing sensitive information use secrets management services (such as AWS Secrets Manager, Azure Key Vault, or Google Secret Manager).
Mistake #5 — Old observability mindset
Many organizations migrated workloads to the public cloud, still kept their investment in legacy monitoring solutions (mostly built on top of deployed agents), and shipping logs (from application, performance, security, etc.) from the cloud environment back to on-prem, without considering the cost of egress data from the cloud, or the cost to store vast amounts of logs generated by the various services in the cloud, in many cases still based on static log files, and sometimes even based on legacy protocols (such as Syslog).
It is time to embrace a modern mindset. It is fairly easy to collect logs from various services in the cloud (as a matter of fact, some logs such as audit logs are enabled for 90 days by default).
Time to consider cloud-native services — from SIEM services (such as Microsoft Sentinel or Google Security Operations) to observability services (such as Amazon CloudWatch, Azure Monitor, or Google Cloud Observability), capable of ingesting (almost) infinite amount of events, streaming logs and metrics in near real-time (instead of still using log files), and providing an overview of entire customers service (made out of various compute, network, storage and database services).
Speaking about security — the dynamic nature of cloud environments does not allow us to keep legacy systems scanning configuration and attack surface in long intervals (such as 24 hours or several days) just to find out that our workload is exposed to unauthorized parties, that we made a mistake leaving configuration in a vulnerable state (still deploying resources expose to the public Internet?), or kept our components outdated?
It is time to embrace automation and continuously scan configuration and authorization, and gain actionable insights on what to fix, as soon as possible (and what is vulnerable, but not directly exposed from the Internet, and can be taken care of at lower priority).
Mistake #6 — Failing to embrace cloud-native services
This is often due to a lack of training and knowledge about cloud-native services or capabilities.
Many legacy workloads were built on top of 3-tier architecture since this was the common way most IT/developers knew for many years. Architectures were centralized and monolithic, and organizations had to consider scale, and deploy enough compute resources, many times in advance, failing to predict spikes in traffic/customer requests.
It is time to embrace distributed systems, based on event-driven architectures, using managed services (such as Amazon EventBridge, Azure Event Grid, or Google Eventarc), where the cloud provider takes care of load (i.e., deploying enough back-end compute services), and we can stream events, and be able to read events, without having to worry whether the service will be able to handle the load.
We can’t talk about cloud-native services without mentioning functions (such as AWS Lambda, Azure Functions, or Cloud Run functions). Although functions have their challenges (from vendor opinionated, maximum amount of execution time, cold start, learning curve, etc.), they have so much potential when designing modern applications. To name a few examples where FaaS is suitable we can look at real-time data processing (such as IoT sensor data), GenAI text generation (such as text response for chatbots, providing answers to customers in call centers), video transcoding (such as converting videos to different formats of resolutions), and those are just small number of examples.
Functions can be suitable in a microservice architecture, where for example one microservice can stream logs to a managed Kafka, some microservices can be trigged to functions to run queries against the backend database, and some can store data to a persistent datastore in a fully-managed and serverless database (such as Amazon DynamoDB, Azure Cosmos DB, or Google Spanner).
Mistake #7 — Using old identity and access management practices
No doubt we need to authenticate and authorize every request and keep the principle of least privileged, but how many times we have seen bad malpractices such as storing credentials in code or configuration files? (“It’s just in the Dev environment; we will fix it before moving to Prod…”)
How many times we have seen developers making changes directly on production environments?
In the cloud, IAM is tightly integrated into all services, and some cloud providers (such as the AWS IAM service) allow you to configure fine-grained permissions up to specific resources (for example, allow only users from specific groups, who performed MFA-based authentication, access to specific S3 bucket).
It is time to switch from using static credentials to using temporary credentials or even roles — when an identity requires access to a resource, it will have to authenticate, and its required permissions will be reviewed until temporary (short-lived / time-based) access is granted.
It is time to embrace a zero-trust mindset as part of architecture decisions. Assume identities can come from any place, at any time, and we cannot automatically trust them. Every request needs to be evaluated, authorized, and eventually audited for incident response/troubleshooting purposes.
When a request to access a production environment is raised, we need to embrace break-glass processes, making sure we authorize the right number of permissions (usually for members of the SRE or DevOps team), and permissions will be automatically revoked.
Mistake #8 — Rushing into the cloud with traditional data center knowledge
We should never ignore our team’s knowledge and experience.
Rushing to adopt cloud services, while using old data center knowledge is prone to failure — it will cost the organization a lot of money, and it will most likely be inefficient (in terms of resource usage).
Instead, we should embrace the change, learn how cloud services work, gain hands-on practice (by deploying test labs and playing with the different services in different architectures), and not be afraid to fail and quickly recover.
To succeed in working with cloud services, you should be a generalist. The old mindset of specialty in certain areas (such as networking, operating systems, storage, database, etc.) is not sufficient. You need to practice and gain wide knowledge about how the different services work, how they communicate with each other, what are their limitations, and don’t forget — what are their pricing options when you consider selecting a service for a large-scale production system.
Do not assume traditional data center architectures will be sufficient to handle the load of millions of concurrent customers. The cloud allows you to create modern architectures, and in many cases, there are multiple alternatives for achieving business goals.
Keep learning and searching for better or more efficient ways to design your workload architectures (who knows, maybe in a year or two there will be new services or new capabilities to achieve better results).
Summary
There is no doubt that the public cloud allows us to build and deploy applications for the benefit of our customers while breaking loose from the limitations of the on-prem data center (in terms of automation, scale, infinite resources, and more).
Embrace the change by learning how to use the various services in the cloud, adopt new architecture patterns (such as event-driven architectures and APIs), prefer managed services (to allow you to focus on developing new capabilities for your customers), and do not be afraid to fail — this is the only way you will gain knowledge and experience using the public cloud.
About the author
Eyal Estrin is a cloud and information security architect, an AWS Community Builder, and the author of the books Cloud Security Handbook and Security for Cloud Native Applications, with more than 20 years in the IT industry.
You can connect with him on social media (https://linktr.ee/eyalestrin).
Opinions are his own and not the views of his employer.
