Archive for the ‘Containers’ Category
Confidential Computing and the Public Cloud

What exactly is “confidential computing” and what are the reasons and benefits for using it in the public cloud environment?
Introduction to data encryption
To protect data stored in the cloud, we usually use one of the following methods:
· Encryption at transit — Data transferred over the public Internet can be encrypted using the TLS protocol. This method prohibits unwanted participants from entering the conversation.
· Encryption at rest — Data stored at rest, such as databases, object storage, etc., can be encrypted using symmetric encryption which means using the same encryption key to encrypt and decrypt the data. This commonly uses the AES256 algorithm.
When we wish to access encrypted data, we need to decrypt the data in the computer’s memory to access, read and update the data.
This is where confidential computing comes in — trying to protect the gap between data at rest and data at transit.
Confidential Computing uses hardware to isolate data. Data is encrypted in use by running it in a trusted execution environment (TEE).
As of November 2020, confidential computing is supported by Intel Software Guard Extensions (SGX) and AMD Secure Encrypted Virtualization (SEV), based on AMD EPYC processors.
Comparison of the available options
| Intel SGX | Intel SGX2 | AMD SEV 1 | AMD SEV 2 | |
| Purpose | Microservices and small workloads | Machine Learning and AI | Cloud and IaaS workloads (above the hypervisor), suitable for legacy applications or large workloads | Cloud and IaaS workloads (above the hypervisor), suitable for legacy applications or large workloads |
| Cloud VM support (November 2020) | – | |||
| Cloud containers support (November 2020) | – | – | ||
| Operating system supported | Windows, Linux | Linux | Linux | Linux |
| Memory limitation | Up to 128MB | Up to 1TB | Up to available RAM | Up to available RAM |
| Software changes | Require software rewrite | Require software rewrite | Not required | – |
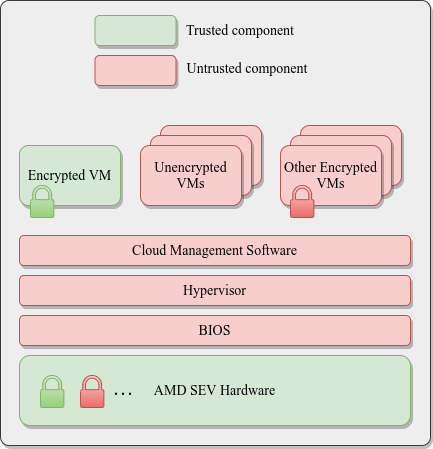
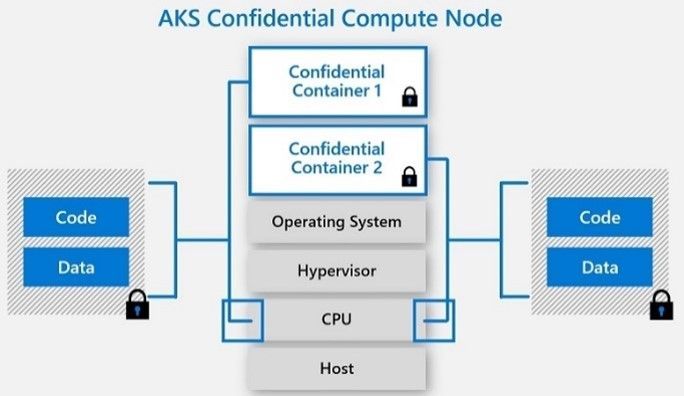
Reference Architecture
AMD SEV Architecture:
Azure Kubernetes Service (AKS) Confidential Computing:
References
· Confidential Computing: Hardware-Based Trusted Execution for Applications and Data
· Google Cloud Confidential VMs vs Azure Confidential Computing
https://msandbu.org/google-cloud-confidential-vms-vs-azure-confidential-computing/
· A Comparison Study of Intel SGX and AMD Memory Encryption Technology
https://caslab.csl.yale.edu/workshops/hasp2018/HASP18_a9-mofrad_slides.pdf
· SGX-hardware listhttps://github.com/ayeks/SGX-hardware
· Performance Analysis of Scientific Computing Workloads on Trusted Execution Environments
https://arxiv.org/pdf/2010.13216.pdf
· Helping Secure the Cloud with AMD EPYC Secure Encrypted Virtualization
https://developer.amd.com/wp-content/resources/HelpingSecuretheCloudwithAMDEPYCSEV.pdf
· Azure confidential computing
https://azure.microsoft.com/en-us/solutions/confidential-compute/
· Azure and Intel commit to delivering next generation confidential computing
· DCsv2-series VM now generally available from Azure confidential computing
· Confidential computing nodes on Azure Kubernetes Service (public preview)
https://docs.microsoft.com/en-us/azure/confidential-computing/confidential-nodes-aks-overview
· Expanding Google Cloud’s Confidential Computing portfolio
· A deeper dive into Confidential GKE Nodes — now available in preview
https://cloud.google.com/blog/products/identity-security/confidential-gke-nodes-now-available
· Using HashiCorp Vault with Google Confidential Computing
https://www.hashicorp.com/blog/using-hashicorp-vault-with-google-confidential-computing
· Confidential Computing is cool!
https://medium.com/google-cloud/confidential-computing-is-cool-1d715cf47683
· Data-in-use protection on IBM Cloud using Intel SGX
https://www.ibm.com/cloud/blog/data-use-protection-ibm-cloud-using-intel-sgx
· Why IBM believes Confidential Computing is the future of cloud security
· Alibaba Cloud Released Industry’s First Trusted and Virtualized Instance with Support for SGX 2.0 and TPM
Best Practices for Deploying New Environments in the Cloud for the First Time

When organizations take their first steps to use public cloud services, they tend to look at a specific target.
My recommendation – think scale!
Plan a couple of steps ahead instead of looking at single server that serves just a few customers. Think about a large environment comprised of hundreds or thousands of servers, serving 10,000 customers concurrently.
Planning will allow you to manage the environment (infrastructure, information security and budget) when you do reach a scale of thousands of concurrent customers. The more we plan the deployment of new environments in advance, according to their business purposes and required resources required for each environment, it will be easier to plan to scale up, while maintaining high level security, budget and change management control and more.
In this three-part blog series, we will review some of the most important topics that will help avoid mistakes while building new cloud environments for the first time.
Resource allocation planning
The first step in resources allocation planning is to decide how to divide resources based on an organizational structure (sales, HR, infrastructure, etc.) or based on environments (production, Dev, testing, etc.)
In-order to avoid mixing resources (or access rights) between various environments, the best practice is to separate the environments as follows:
- Share resource account (security products, auditing, billing management, etc.)
- Development environment account (consider creating separate account for test environment purposes)
- Production environment account
Separating different accounts or environments can be done using:
- Azure Subscriptions or Azure Resource Groups
- AWS Accounts
- GCP Projects
- Oracle Cloud Infrastructure Compartments
Tagging resources
Even when deploying a single server inside a network environment (AWS VPC, Azure Resource Group, GCP VPC), it is important to tag resources. This allows identifying which resources belong to which projects / departments / environments, for billing purposes.
Common tagging examples:
- Project
- Department
- Environment (Prod, Dev, Test)
Beyond tagging, it is recommended to add a description to resources that support this kind of meta-data, in-order to locate resources by their target use.
Authentication, Authorization and Password Policy
In-order to ease the management of working with accounts in the cloud (and in the future, multiple accounts according to the various environments), the best practice is to follow the rules below:
- Central authentication – In case the organization isn’t using Active Directory for central account management and access rights, the alternative is to use managed services such as AWS IAM, Google Cloud IAM, Azure AD, Oracle Cloud IAM, etc.
If managed IAM service is chosen, it is critical to set password policy according to the organization’s password policy (minimum password length, password complexity, password history, etc.)
- If the central directory service is used by the organization, it is recommended to connect and sync the managed IAM service in the cloud to the organizational center directory service on premise (federated authentication).
- It is crucial to protect privileged accounts in the cloud environment (such as AWS Root Account, Azure Global Admin, Azure Subscription Owner, GCP Project Owner, Oracle Cloud Service Administrator, etc.), among others, by limiting the use of privileged accounts to the minimum required, enforcing complex passwords, and password rotation every few months. This enables multi-factor authentication and auditing on privileged accounts, etc.
- Access to resources should be defined according to the least privilege principle.
- Access to resources should be set to groups instead of specific users.
- Access to resources should be based on roles in AWS, Azure, GCP, Oracle Cloud, etc.
Audit Trail
It is important to enable auditing in all cloud environments, in-order to gain insights on access to resources, actions performed in the cloud environment and by whom. This is both security and change management reasons.
Common managed audit trail services:
- AWS CloudTrail – It is recommended to enable auditing on all regions and forward the audit logs to a central S3 bucket in a central AWS account (which will be accessible only for a limited amount of user accounts).
- Working with Azure, it is recommended to enable the use of Azure Monitor for the first phase, in-order to audit all access to resources and actions done inside the subscription. Later on, when the environment expands, you may consider using services such as Azure Security Center and Azure Sentinel for auditing purposes.
- Google Cloud Logging – It is recommended to enable auditing on all GCP projects and forward the audit logs to the central GCP project (which will be accessible only for a limited amount of user accounts).
- Oracle Cloud Infrastructure Audit service – It is recommended to enable auditing on all compartments and forward the audit logs to the Root compartment account (which will be accessible only for a limited amount of user accounts).
Budget Control
It is crucial to set a budget and budget alerts for any account in the cloud at in the early stages of working with in cloud environment. This is important in order to avoid scenarios in which high resource consumption happens due to human error, such as purchasing or consuming expensive resources, or of Denial of Wallet scenarios, where external attackers breach an organization’s cloud account and deploys servers for Bitcoin mining.
Common examples of budget control management for various cloud providers:
- AWS Consolidated Billing – Configure central account among all the AWS account in the organization, in-order to forward billing data (which will be accessible only for a limited amount of user accounts).
- GCP Cloud Billing Account – Central repository for storing all billing data from all GCP projects.
- Azure Cost Management – An interface for configuring budget and budget alerts for all Azure subscriptions in the organization. It is possible to consolidate multiple Azure subscriptions to Management Groups in-order to centrally control budgets for all subscriptions.
- Budget on Oracle Cloud Infrastructure – An interface for configuring budget and budget alerts for all compartments.
Secure access to cloud environments
In order to avoid inbound access from the Internet to resources in cloud environments (virtual servers, databases, storage, etc.), it is highly recommended to deploy a bastion host, which will be accessible from the Internet (SSH or RDP traffic) and will allow access and management of resources inside the cloud environment.
Common guidelines for deploying Bastion Host:
- Linux Bastion Hosts on AWS
- Create an Azure Bastion host using the portal
- Securely connecting to VM instances on GCP
- Setting Up the Basic Infrastructure for a Cloud Environment, based on Oracle Cloud
The more we expand the usage of cloud environments, we can consider deploying a VPN tunnel from the corporate network (Site-to-site VPN) or allow client VPN access from the Internet to the cloud environment (such as AWS Client VPN endpoint, Azure Point-to-Site VPN, Oracle Cloud SSL VPN).
Managing compute resources (Virtual Machines and Containers)
When selecting to deploy virtual machines in cloud environment, it is highly recommended to follow the following guidelines:
- Choose an existing image from a pre-defined list in the cloud providers’ marketplace (operating system flavor, operating system build, and sometimes an image that includes additional software inside the base image).
- Configure the image according to organizational or application demands.
- Update all software versions inside the image.
- Store an up-to-date version of the image (“Golden Image”) inside the central image repository in the cloud environment (for reuse).
- In case the information inside the virtual machines is critical, consider using managed backup services (such as AWS Backup or Azure Backup).
- When deploying Windows servers, it is crucial to set complex passwords for the local Administrator’s account, and when possible, join the Windows machine to the corporate domain.
- When deploying Linux servers, it is crucial to use SSH Key authentication and store the private key(s) in a secure location.
- Whenever possible, encrypt data at rest for all block volumes (the server’s hard drives / volumes).
- It is highly recommended to connect the servers to a managed vulnerability assessment service, in order to detect software vulnerabilities (services such as Amazon Inspector or Azure Security Center).
- It is highly recommended to connect the servers to a managed patch management service in-order to ease the work of patch management (services such as AWS Systems Manager Patch Manager, Azure Automation Update Management or Google OS Patch Management).
When selecting to deploy containers in the cloud environment, it is highly recommended to follow the following guidelines:
- Use a Container image from a well know container repository.
- Update all binaries and all dependencies inside the Container image.
- Store all Container images inside a managed container repository inside the cloud environment (services such as Amazon ECR, Azure Container Registry, GCP Container Registry, Oracle Cloud Container Registry, etc.)
- Avoid using Root account inside the Containers.
- Avoid storing data (such as session IDs) inside the Container – make sure the container is stateless.
- It is highly recommended to connect the CI/CD process and the container update process to a managed vulnerability assessment service, in-order to detect software vulnerabilities (services such as Amazon ECR Image scanning, Azure Container Registry, GCP Container Analysis, etc.)
Storing sensitive information
It is highly recommended to avoid storing sensitive information, such as credentials, encryption keys, secrets, API keys, etc., in clear text inside virtual machines, containers, text files or on the local desktop.
Sensitive information should be stored inside managed vault services such as:
- AWS KMS or AWS Secrets Manager
- Azure Key Vault
- Google Cloud KMS or Google Secret Manager
- Oracle Cloud Infrastructure Key Management
- HashiCorp Vault
Object Storage
When using Object Storage, it is recommended to follow the following guidelines:
- Avoid allowing public access to services such as Amazon S3, Azure Blob Storage, Google Cloud Storage, Oracle Cloud Object Storage, etc.
- Enable audit access on Object Storage and store the access logs in a central account in the cloud environment (which will be accessible only for a limited amount of user accounts).
- It is highly recommended to encrypt data at rest on all data inside Object Storage and when there is a business or regulatory requirement, and encrypt data using customer managed keys.
- It is highly recommended to enforce HTTPS/TLS for access to object storage (users, computers and applications).
- Avoid creating object storage bucket names with sensitive information, since object storage bucket names are unique and saved inside the DNS servers worldwide.
Networking
- Make sure access to all resources is protected by access lists (such as AWS Security Groups, Azure Network Security Groups, GCP Firewall Rules, Oracle Cloud Network Security Groups, etc.)
- Avoid allowing inbound access to cloud environments using protocols such as SSH or RDP (in case remote access is needed, use Bastion host or VPN connections).
- As much as possible, it is recommended to avoid outbound traffic from the cloud environment to the Internet. If needed, use a NAT Gateway (such as Amazon NAT Gateway, Azure NAT Gateway, GCP Cloud NAT, Oracle Cloud NAT Gateway, etc.)
- As much as possible, use DNS names to access resources instead of static IPs.
- When developing cloud environments, and subnets inside new environments, avoid IP overlapping between subnets in order to allow peering between cloud environments.
Advanced use of cloud environments
- Prefer to use managed services instead of manually managing virtual machines (services such as Amazon RDS, Azure SQL Database, Google Cloud SQL, etc.)
It allows consumption of services, rather than maintaining servers, operating systems, updates/patches, backup and availability, assuming managed services in cluster or replica mode is chosen.
- Use Infrastructure as a Code (IoC) in-order to ease environment deployments, lower human errors and standardize deployment on multiple environments (Prod, Dev, Test).
Common Infrastructure as a Code alternatives:
Summary
To sum up:
Plan. Know what you need. Think scale.
If you use the best practices outlined here, taking off to the cloud for the first time will be an easier, safer and smoother ride then you might expect.
Additional references
Smart use of cloud services

Many organizations are talking and beginning to embrace system migration to the cloud, as part of a global IT strategy to use public clouds.
The migration from the on premise to the public cloud, allows organizations to choose from a variety of alternatives, each with its own benefits, knowledge requirement and different pricing model (as compared to the on premise licensing model).
In this article, I shell review the different methods, with their pros and cons and I will try to explain which method suites which scenario.
Lift & Shift Migration
In this method, the customer chooses an existing system from the on premise environment, reviewing the required resources for running the system in a cloud environment (number of CPU/amount of Memory and required disk space), the operating system version (assuming the cloud provider has an image for this operating system), checking with the software vendor the ability to run the system a cloud environment (licensing issues) and deploying all software components on a virtual server in the cloud environment (or migrating the entire system, assuming the cloud provider offers a managed service for system migration).
This is the most common method and the simplest one (comparing to other alternatives…) for migrating to the cloud, and most cloud vendors (Infrastructure as a Service) support this method, but we should take under consideration, that cost-wise, this method is considered expensive (in terms of cost and resource usage) when comparing to purchasing physical hardware for 3-5 years in advanced in the on premise environment.
The most common ways to lower the server cost are:
• Resizing the server size (number of CPU/amount of memory) to the actual usage
• Purchase reserved instance for 1 or 3 years in advanced
• Using Spot instances for servers who does not require availability of 24×7 or for applications who can survive temporary downtime, without harming the entire service
Moving to Micro-Services and Containers
In this method, the organization begins migration from monolith application (a system where all components relay on each other and required to be deployed together) to micro-services based development, where each component runs independently (usually inside its own container) and it can be replaced, upgraded and vertically scale out as needed and independently from the rest of the system components.
It is possible to run containers on virtual servers (the entire management, update and scale is the customer’s responsibility) or as part of a managed service (such as managed Kubernetes clusters service).
This method requires the developer’s teams to know how to package their applications inside containers, take care of scaling, monitoring of containers activities (and the communications between containers), and taking care of security topics (such as who can access a container or whether or not the communication between containers is encrypted, etc.)
This method is suitable for organizations who wish to change their current application architecture or being developing new applications. Modern applications are being developed today as containers and allows the customer to migrate between the on premise environments to the public cloud, and with proper adjustments between different cloud providers (once we solve topics such as connectivity to current cloud vendor’s services such as message queuing, storage, logging, etc.)
Moving to Serverless / Function as a Service
In this method, the customer isn’t in charge of operating system maintenance, system availability or scale. Due to the fact that the entire infrastructure is been managed by the cloud vendor, the vendor takes care of scale, as required by the application needs.
This method is suitable for event based services, with short running time (few seconds to few minutes). As part of moving to modern applications, there are many scenarios for choosing specific development language, uploading the code to a managed cloud environment (Serverless), selecting the desired compute power (amount of memory, which effects the number of CPU) and creating triggers for running the function.
It is possible to embed Serverless capabilities, as part of modern micro-services architecture.
The pricing model for this method is based on the amount of time the function was running and the amount of memory used for running the function.
Common use cases for Serverless – image processing, data analysis from IoT devices, etc.
This method is not suitable for every application (due to short running intervals), and also not every development language is currently been supported by every cloud vendor.
For example:
• AWS Lambda (currently) support natively the following languages: Java, Go, PowerShell, Node.JS, C#, Python, Ruby
• Azure Functions (currently) support natively the following languages: Java, JavaScript, C#, PowerShell, Python, TrueScript
• Google Cloud Functions (currently) support natively the following languages: Python, Go, Node.JS
• Oracle Functions (currently) support natively the following languages: Java, Python, Node.JS, Go, Ruby
Migration to managed services (SaaS / PaaS)
In this method, the organization chooses an existing SaaS (such as Messaging, CRM, ERP, etc.) or existing PaaS (such as Database, Storage, etc.)
This method suites many scenarios in which the organization would like to consume existing service, without the need to maintain the infrastructure (operating system, storage, backup, security aspects, etc.). After choosing an existing service, the organization begin migrating data to the managed service, configure proper access rights, sometimes configure VPN connectivity between the on premise and the cloud environment, configures backup (according to the service support this capability) and being consuming the service.
The pricing model changes between cloud vendors (sometime is it based on monthly pricing and sometimes it is based on consumed compute power or consumed storage space).
Mature and transparent the cloud vendors, reveal accurate monthly billing information.
Also, mature cloud vendors knows how to handle privacy, low and regulation aspects (such as GDPR compliance and other privacy regulations) using data processing agreements.
Summary
In this article, I have reviewed the various methods of using cloud service wisely. As we can see, not every method suites every scenario or every organization, but there is no doubt that the future is heading cloud and managed services.
My recommendation for organizations – focus on what brings your organization business value (such as banking, commerce, retail, education, etc.), train your IT and development teams on the coming technological changes and migrate the responsibility for maintaining your organization infrastructure to vendors who specialized on the topic.
Cloud Services – Evolution and Future Trends
Cloud services are no longer a buzz, they are existing fact. Small and large organizations are leading the revolution in the IT industry for almost a decade, some migrating small environments and conducting experiments while others deploying their entire production environments using this model.
It is commonly used to consider cloud services as a continue of the data center environment and in fact this is where the concept evolved, and yet, the differences between the traditional computing services, server farms, storage and even virtualization are fundamentally different from a true cloud. Let’s evaluate the differences:
In the past we used to call “cloud”, for any compute services containing the following characteristics as defined by NIST:
- On-Demand Self-Service
- Broad Network Access
- Resource Pooling
- Rapid Elasticity
- Measured service
When looking deeper into the various cloud service models such as IaaS (Infrastructure as a Service), PaaS (Platform as a Service) and SaaS (Software as a Service), we find that things are not always black or white: In some cases we come across services that we know for fact they are cloud services, we can’t always say these services include all the above characteristics.
A good example: File sharing services such as Dropbox. As a private customer we are not exposed to data that will enable us to measure the service (in terms of performance or in terms of billing vs storage capacity cost).
In case we choose to deploy a “private cloud” inside our organizational data center, based on infrastructure such as VMWARE, OpenStack or alike, we expect all the above characteristics in our on premise as well.
Let’s differentiate between cloud and hosting service
In the current IT industry there are many companies offering compute services, on the range between cloud services and hosting services.
Hosting companies (or managed services), usually offers the customer the following capabilities:
- Compute environments – Such as physical servers (in case of special hardware requirements), virtual servers, storage and network equipment (Routers, Firewalls, VPN Gateway, etc.)
- Managed services – Such as web hosting for marketing or commercial web sites, email services, file sharing services and organizational systems such as CRM as a service.
- Backup and DR as a service.
- Managed support/IT services.
Hosting companies might offer the customer a capability to increase the number of servers and in some cases even to choose servers in data center abroad (in case we would like to allow access to the data/servers close to the end customer).
For SMB or enterprise organizations making their first move to the cloud, or for customers who wishes to outsource their IT services to external providers, there isn’t much of a difference between choosing hosting/managed service and choose public cloud service.
The differences between hosting and cloud services begins when trying to deploy entire environments in the cloud, based on architectures emphasizing service and platform (SaaS and PaaS), and less on infrastructure as a service (IaaS).
In this configuration, the system is developed based on dynamic scaling capabilities, environments deployed for a short amount of time, servers and infrastructure raised for specific purpose and stop to exist a few minutes after the entire process completes.
This model is called “Cloud Native Applications”, which allows us to avoid committing to pre-defined amount of infrastructure, specific task management, compatibility, server health check, etc., what is the role of each server or platform, in case they will be destroyed within a second? The infrastructure in this model is not important, only the service the system meant to provide.
Unlike hard-coded infrastructure management, there is a new concept – “Infrastructure as a code”. Environments are written as “recipes”, sent to the cloud provider using API’s, and environments are being created instantly and on the fly.
A few examples for the efficiencies of this model – A large American service provider destroys his entire IT environment in the cloud and deploys an entire up-to-date mirror environment within a few minutes instead of updating each and every server. A different American service provider increases the amount of servers automatically in advanced before peak hours, as a result of applicative monitoring, and after peak hours, all the new servers vanishes.
This change is not a magic, but a result of cloud efficient planning of systems and applications, training dedicated teams with the relevant capabilities, understanding the cloud provider’s services, billing, prioritization and the constant changes in the management interfaces.
Process of migrating systems to the public cloud
Infrastructure as a Service (IaaS) allows organizations to perform “Lift & Shift” (copying existing systems to the cloud with minor changes) from the on premise environment to the public cloud, as part of migration processes to the cloud.
Most organizations will quickly find out that the “Lift & Shift” strategy is indeed easier as first stage, but in the long term it is a very bad economical decision, with the same challenges that organizations struggle with today: waste of hardware resources, un-optimized operating system and running code on servers, distributed management difficulties, etc.
At later stages, organizations who migrated systems to the public cloud, begin to perform tuning to their cloud environments by measuring resource usage, for their virtual servers, adapting the proper VM instance type for the actual use in terms of CPU/memory/storage.
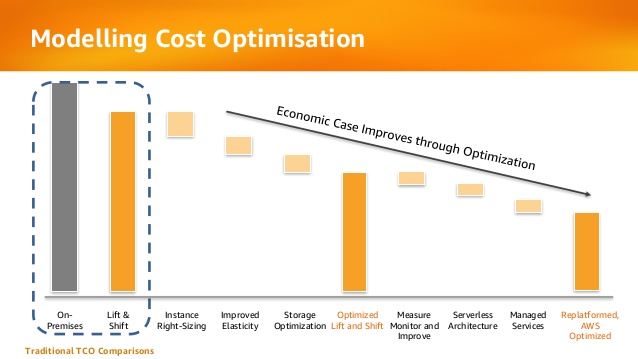
Below is an example from AWS presentation about the evolution organizations pass migrating to public cloud in terms of cost:
The future is here
Today, startup companies and enterprise organizations are developing applications for the cloud, agnostically to the hardware or infrastructure underneath.
In past, organizations used to migrate from developing on physical servers to virtual servers, and today, organizations are migrating from developing monolith applications to micro-service based applications and even Serverless applications (code running inside a managed compute environment, without the need to manage infrastructure resources such as servers, storage, etc.)
Changes in the development world is crucial to understanding what is cloud service, due to the fact that today, we are less relying on NIST definition of cloud service, and providers offering Infrastructure as a Service (as most hosting providers) and today cloud service is characterized by the following capabilities:
- Collection of API’s
- Billing capability of services/resources by their actual usage
- Services managed using API (such as the ability to provision, decommission, start/stop, etc.)
The bottom line
Today there are many providers who wrap VMWARE infrastructure with friendly user interface, allowing the customer to choose the VM type (in terms of CPU/Memory) and the number of servers the customer would like to consume, but it is not scale enough and it doesn’t allow the customer the flexibility to scale-up or scale-down to hundreds of servers automatically, and within seconds over multiple geographical regions.
Cloud provider who supports “Cloud Native Applications” enables the customer to connect his automation mechanisms, build and deployment processes using API’s to the cloud provider’s infrastructure, in-order to allow provisioning/changing compute environments, deploy micro-services based systems and even allowing the customer to deploy and run Serverless infrastructure.
The next time you are considering a service provider, whether using a hosting provider (sophisticated as he might be) or using public cloud provider, with capabilities of running hundreds of servers over multiple geographic regions within minutes, hands-free, supporting micro-services and Serverless applications, with API connectivity capabilities, simply present the service provider your requirements, and choose the most suitable service provider.
This article was written by Eyal Estrin, cloud security architect and Vitaly Unic, application security architect.
Integrate security aspects in a DevOps process
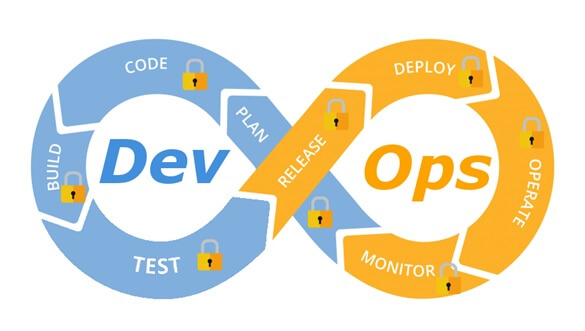
A diagram of a common DevOps lifecycle:
The DevOps world meant to provide complementary solution for both quick development (such as Agile) and a solution for cloud environments, where IT personnel become integral part of the development process. In the DevOps world, managing large number of development environments manually is practically infeasible. Monitoring mixed environments become a complex solution and deploying large number of different builds is becoming extremely fast and sensitive to changes.
The idea behind any DevOps solution is to provide a solution for deploying an entire CI/CD process, which means supporting constant changes and immediate deployment of builds/versions.
For the security department, this kind of process is at first look a nightmare – dozen builds, partial tests, no human control for any change, etc.
For this reason, it is crucial for the security department to embrace DevOps attitude, which means, embedding security in any part of the development lifecycle, software deployment or environment change.
It is important to understand that there are no constant stages as we used to have in waterfall development lifecycle, and most of the stages are parallel – in the CI/CD world everything changes quickly, components can be part of different stages, and for this reason it is important to confer the processes, methods and tools in all developments and DevOps teams.
In-order to better understand how to embed security into the DevOps lifecycle, we need to review the different stages in the development lifecycle:
Planning phase
This stage in the development process is about gathering business requirements.
At this stage, it is important to embed the following aspects:
- Gather information security requirements (such as authentication, authorization, auditing, encryptions, etc.)
- Conduct threat modeling in-order to detect possible code weaknesses
- Training / awareness programs for developers and DevOps personnel about secure coding
Creation / Code writing phase
This stage in the development process is about the code writing itself.
At this stage, it is important to embed the following aspects:
- Connect the development environments (IDE) to a static code analysis products
- Review the solution architecture by a security expert or a security champion on his behalf
- Review open source components embedded inside the code
Verification / Testing phase
This stage in the development process is about testing, conducted mostly by QA personnel.
At this stage, it is important to embed the following aspects:
- Run SAST (Static application security tools) on the code itself (pre-compiled stage)
- Run DAST (Dynamic application security tools) on the binary code (post-compile stage)
- Run IAST (Interactive application security tools) against the application itself
- Run SCA (Software composition analysis) tools in-order to detect known vulnerabilities in open source components or 3rd party components
Software packaging and pre-production phase
This stage in the development process is about software packaging of the developed code before deployment/distribution phase.
At this stage, it is important to embed the following aspects:
- Run IAST (Interactive application security tools) against the application itself
- Run fuzzing tools in-order to detect buffer overflow vulnerabilities – this can be done automatically as part of the build environment by embedding security tests for functional testing / negative testing
- Perform code signing to detect future changes (such as malwares)
Software packaging release phase
This stage is between the packaging and deployment stages.
At this stage, it is important to embed the following aspects:
- Compare code signature with the original signature from the software packaging stage
- Conduct integrity checks to the software package
- Deploy the software package to a development environment and conduct automate or stress tests
- Deploy the software package in a green/blue methodology for software quality and further security quality tests
Software deployment phase
At this stage, the software package (such as mobile application code, docker container, etc.) is moving to the deployment stage.
At this stage, it is important to embed the following aspects:
- Review permissions on destination folder (in case of code deployment for web servers)
- Review permissions for Docker registry
- Review permissions for further services in a cloud environment (such as storage, database, application, etc.) and fine-tune the service role for running the code
Configure / operate / Tune phase
At this stage, the development is in the production phase and passes modifications (according to business requirements) and on-going maintenance.
At this stage, it is important to embed the following aspects:
- Patch management processes or configuration management processes using tools such as Chef, Ansible, etc.
- Scanning process for detecting vulnerabilities using vulnerability assessment tools
- Deleting and re-deployment of vulnerable environments with an up-to-date environments (if possible)
On-going monitoring phase
At this stage, constant application monitoring is being conducted by the infrastructure or monitoring teams.
At this stage, it is important to embed the following aspects:
- Run RASP (Runtime application self-production) tools
- Implement defense at the application layer using WAF (Web application firewall) products
- Implement products for defending the application from Botnet attacks
- Implement products for defending the application from DoS / DDoS attacks
- Conduct penetration testing
- Implement monitoring solution using automated rules such as automated recovery of sensitive changes (tools such as GuardRails)
Security recommendations for developments based on CI/CD / DevOps process
- It is highly recommended to perform on-going training for the development and DevOps teams on security aspects and secure development
- It is highly recommended to nominate a security champion among the development and DevOps teams in-order to allow them to conduct threat modeling at early stages of the development lifecycle and in-order to embed security aspects as soon as possible in the development lifecycle
- Use automated tools for deploying environments in a simple and standard form.
Tools such as Puppet require root privileges for folders it has access to. In-order to lower the risk, it is recommended to enable folder access auditing. - Avoid storing passwords and access keys, hard-coded inside scripts and code.
- It is highly recommended to store credentials (SSH keys, privileged credentials, API keys, etc.) in a vault (Solutions such as HashiCorp vault or CyberArk).
- It is highly recommended to limit privilege access based on role (Role based access control) using least privileged.
- It is recommended to perform network separation between production environment and Dev/Test environments.
- Restrict all developer teams’ access to production environments, and allow only DevOps team’s access to production environments.
- Enable auditing and access control for all development environments and identify access attempts anomalies (such as developers access attempt to a production environment)
- Make sure sensitive data (such as customer data, credentials, etc.) doesn’t pass in clear text at transit. In-case there is a business requirement for passing sensitive data at transit, make sure the data is passed over encrypted protocols (such as SSH v2, TLS 1.2, etc.), while using strong cipher suites.
- It is recommended to follow OWASP organization recommendations (such as OWASP Top10, OWASP ASVS, etc.)
- When using Containers, it is recommended to use well-known and signed repositories.
- When using Containers, it is recommended not to rely on open source libraries inside the containers, and to conduct scanning to detect vulnerable versions (including dependencies) during the build creation process.
- When using Containers, it is recommended to perform hardening using guidelines such as CIS Docker Benchmark or CIS Kubernetes Benchmark.
- It is recommended to deploy automated tools for on-going tasks, starting from build deployments, code review for detecting vulnerabilities in the code and open source code, and patch management processes that will be embedded inside the development and build process.
- It is recommended to perform scanning to detect security weaknesses, using vulnerability management tools during the entire system lifetime.
- It is recommended to deploy configuration management tools, in-order to detect and automatically remediate configuration anomalies from the original configuration.
Additional reading sources:
- 20 Ways to Make Application Security Move at the Speed of DevOps
- The DevOps Security Checklist
- Making AppSec Testing Work in CI/CD
- Value driven threat modeling
- Automated Security Testing
- Security at the Speed of DevOps
- DevOps Security Best Practices
- The integration of DevOps and security
- When DevOps met Security - DevSecOps in a nutshell
- Grappling with DevOps Security
- Minimizing Risk and Improving Security in DevOps
- Security In A DevOps World
- Application Security in Devops
- Five Security Defenses Every Containerized Application Needs
- 5 ways to find and fix open source vulnerabilities
This article was written by Eyal Estrin, cloud security architect and Vitaly Unic, application security architect.
Separation Anxiety: A Tutorial for Isolating Your System with Linux Namespaces
With the advent of tools like Docker, Linux Containers, and others, it has become super easy to isolate Linux processes into their own little system environments. This makes it possible to run a whole range of applications on a single real Linux machine and ensure no two of them can interfere with each other, without having to resort to using virtual machines. These tools have been a huge boon to PaaS providers. But what exactly happens under the hood?
These tools rely on a number of features and components of the Linux kernel. Some of these features were introduced fairly recently, while others still require you to patch the kernel itself. But one of the key components, using Linux namespaces, has been a feature of Linux since version 2.6.24 was released in 2008.
Anyone familiar with chroot already has a basic idea of what Linux namespaces can do and how to use namespace generally. Just as chroot allows processes to see any arbitrary directory as the root of the system (independent of the rest of the processes), Linux namespaces allow other aspects of the operating system to be independently modified as well. This includes the process tree, networking interfaces, mount points, inter-process communication resources and more.
Why Use Namespaces for Process Isolation?
In a single-user computer, a single system environment may be fine. But on a server, where you want to run multiple services, it is essential to security and stability that the services are as isolated from each other as possible. Imagine a server running multiple services, one of which gets compromised by an intruder. In such a case, the intruder may be able to exploit that service and work his way to the other services, and may even be able compromise the entire server. Namespace isolation can provide a secure environment to eliminate this risk.
For example, using namespacing, it is possible to safely execute arbitrary or unknown programs on your server. Recently, there has been a growing number of programming contest and “hackathon” platforms, such as HackerRank, TopCoder, Codeforces, and many more. A lot of them utilize automated pipelines to run and validate programs that are submitted by the contestants. It is often impossible to know in advance the true nature of contestants’ programs, and some may even contain malicious elements. By running these programs namespaced in complete isolation from the rest of the system, the software can be tested and validated without putting the rest of the machine at risk. Similarly, online continuous integration services, such as Drone.io, automatically fetch your code repository and execute the test scripts on their own servers. Again, namespace isolation is what makes it possible to provide these services safely.
Namespacing tools like Docker also allow better control over processes’ use of system resources, making such tools extremely popular for use by PaaS providers. Services like Heroku and Google App Engine use such tools to isolate and run multiple web server applications on the same real hardware. These tools allow them to run each application (which may have been deployed by any of a number of different users) without worrying about one of them using too many system resources, or interfering and/or conflicting with other deployed services on the same machine. With such process isolation, it is even possible to have entirely different stacks of dependency softwares (and versions) for each isolated environment!
If you’ve used tools like Docker, you already know that these tools are capable of isolating processes in small “containers”. Running processes in Docker containers is like running them in virtual machines, only these containers are significantly lighter than virtual machines. A virtual machine typically emulates a hardware layer on top of your operating system, and then runs another operating system on top of that. This allows you to run processes inside a virtual machine, in complete isolation from your real operating system. But virtual machines are heavy! Docker containers, on the other hand, use some key features of your real operating system, including namespaces, and ensure a similar level of isolation, but without emulating the hardware and running yet another operating system on the same machine. This makes them very lightweight.
Process Namespace
Historically, the Linux kernel has maintained a single process tree. The tree contains a reference to every process currently running in a parent-child hierarchy. A process, given it has sufficient privileges and satisfies certain conditions, can inspect another process by attaching a tracer to it or may even be able to kill it.
With the introduction of Linux namespaces, it became possible to have multiple “nested” process trees. Each process tree can have an entirely isolated set of processes. This can ensure that processes belonging to one process tree cannot inspect or kill – in fact cannot even know of the existence of – processes in other sibling or parent process trees.
Every time a computer with Linux boots up, it starts with just one process, with process identifier (PID) 1. This process is the root of the process tree, and it initiates the rest of the system by performing the appropriate maintenance work and starting the correct daemons/services. All the other processes start below this process in the tree. The PID namespace allows one to spin off a new tree, with its own PID 1 process. The process that does this remains in the parent namespace, in the original tree, but makes the child the root of its own process tree.
With PID namespace isolation, processes in the child namespace have no way of knowing of the parent process’s existence. However, processes in the parent namespace have a complete view of processes in the child namespace, as if they were any other process in the parent namespace.
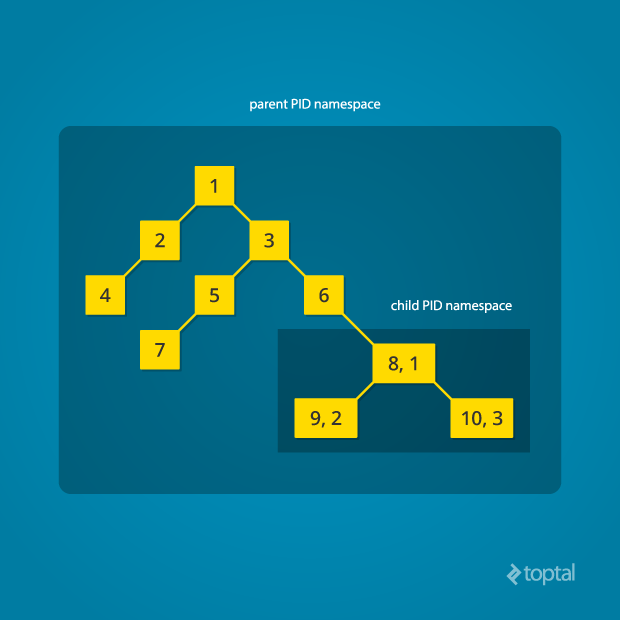
It is possible to create a nested set of child namespaces: one process starts a child process in a new PID namespace, and that child process spawns yet another process in a new PID namespace, and so on.
With the introduction of PID namespaces, a single process can now have multiple PIDs associated with it, one for each namespace it falls under. In the Linux source code, we can see that a struct named pid, which used to keep track of just a single PID, now tracks multiple PIDs through the use of a struct named upid:
struct upid {
  int nr;                     // the PID value
  struct pid_namespace *ns;   // namespace where this PID is relevant
  // ...
};

struct pid {
  // ...
  int level;                  // number of upids
  struct upid numbers[0];     // array of upids
};
To create a new PID namespace, one must call the clone() system call with a special flag CLONE_NEWPID. (C provides a wrapper to expose this system call, and so do many other popular languages.) Whereas the other namespaces discussed below can also be created using the unshare() system call, a PID namespace can only be created at the time a new process is spawned using clone(). Once clone() is called with this flag, the new process immediately starts in a new PID namespace, under a new process tree. This can be demonstrated with a simple C program:
#define _GNU_SOURCE
#include <sched.h>
#include <stdio.h>
#include <stdlib.h>
#include <sys/wait.h>
#include <unistd.h>

static char child_stack[1048576];

static int child_fn() {
  printf("PID: %ld\n", (long)getpid());
  return 0;
}

int main() {
  pid_t child_pid = clone(child_fn, child_stack+1048576, CLONE_NEWPID | SIGCHLD, NULL);
  printf("clone() = %ld\n", (long)child_pid);

  waitpid(child_pid, NULL, 0);
  return 0;
}
Compile and run this program with root privileges and you will notice an output that resembles this:
clone() = 5304
PID: 1
The PID, as printed from within the child_fn, will be 1.
Even though this namespace tutorial code above is not much longer than “Hello, world” in some languages, a lot has happened behind the scenes. The clone() function, as you would expect, has created a new process by cloning the current one and started execution at the beginning of the child_fn() function. However, while doing so, it detached the new process from the original process tree and created a separate process tree for the new process.
Try replacing the static int child_fn() function with the following, to print the parent PID from the isolated process’s perspective:
static int child_fn() {
  printf("Parent PID: %ld\n", (long)getppid());
  return 0;
}
Running the program this time yields the following output:
clone() = 11449
Parent PID: 0
Notice how the parent PID from the isolated process’s perspective is 0, indicating no parent. Try running the same program again, but this time, remove the CLONE_NEWPID flag from within the clone() function call:
pid_t child_pid = clone(child_fn, child_stack+1048576, SIGCHLD, NULL);
This time, you will notice that the parent PID is no longer 0:
clone() = 11561
Parent PID: 11560
However, this is just the first step in our tutorial. These processes still have unrestricted access to other common or shared resources. For example, the networking interface: if the child process created above were to listen on port 80, it would prevent every other process on the system from being able to listen on it.
Linux Network Namespace
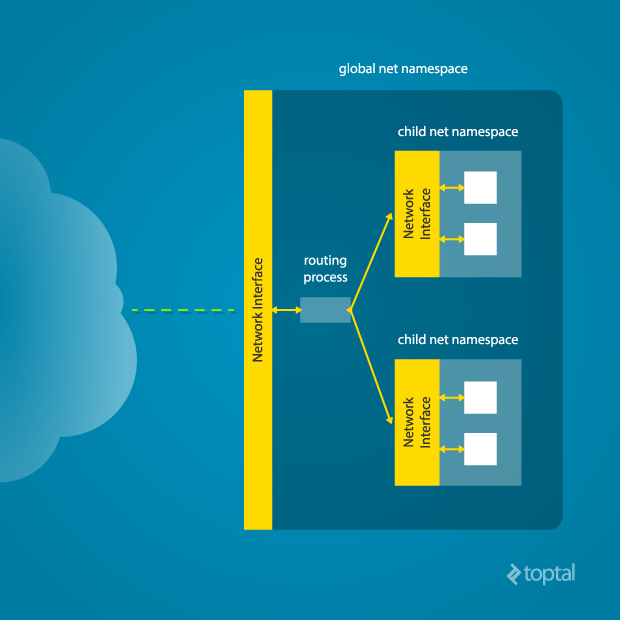
This is where a network namespace becomes useful. A network namespace allows each of these processes to see an entirely different set of networking interfaces. Even the loopback interface is different for each network namespace.
Isolating a process into its own network namespace involves introducing another flag to the clone() function call: CLONE_NEWNET;
#define _GNU_SOURCE
#include <sched.h>
#include <stdio.h>
#include <stdlib.h>
#include <sys/wait.h>
#include <unistd.h>


static char child_stack[1048576];

static int child_fn() {
  printf("New `net` Namespace:\n");
  system("ip link");
  printf("\n\n");
  return 0;
}

int main() {
  printf("Original `net` Namespace:\n");
  system("ip link");
  printf("\n\n");

  pid_t child_pid = clone(child_fn, child_stack+1048576, CLONE_NEWPID | CLONE_NEWNET | SIGCHLD, NULL);

  waitpid(child_pid, NULL, 0);
  return 0;
}
Output:
Original `net` Namespace:
1: lo: <LOOPBACK,UP,LOWER_UP> mtu 65536 qdisc noqueue state UNKNOWN mode DEFAULT group default
    link/loopback 00:00:00:00:00:00 brd 00:00:00:00:00:00
2: enp4s0: <BROADCAST,MULTICAST,UP,LOWER_UP> mtu 1500 qdisc pfifo_fast state UP mode DEFAULT group default qlen 1000
    link/ether 00:24:8c:a1:ac:e7 brd ff:ff:ff:ff:ff:ff


New `net` Namespace:
1: lo: <LOOPBACK> mtu 65536 qdisc noop state DOWN mode DEFAULT group default
    link/loopback 00:00:00:00:00:00 brd 00:00:00:00:00:00
What’s going on here? The physical ethernet device enp4s0 belongs to the global network namespace, as indicated by the “ip” tool run from this namespace. However, the physical interface is not available in the new network namespace. Moreover, the loopback device is active in the original network namespace, but is “down” in the child network namespace.
In order to provide a usable network interface in the child namespace, it is necessary to set up additional “virtual” network interfaces which span multiple namespaces. Once that is done, it is then possible to create Ethernet bridges, and even route packets between the namespaces. Finally, to make the whole thing work, a “routing process” must be running in the global network namespace to receive traffic from the physical interface, and route it through the appropriate virtual interfaces to to the correct child network namespaces. Maybe you can see why tools like Docker, which do all this heavy lifting for you, are so popular!
To do this by hand, you can create a pair of virtual Ethernet connections between a parent and a child namespace by running a single command from the parent namespace:
ip link add name veth0 type veth peer name veth1 netns <pid>
Here, <pid> should be replaced by the process ID of the process in the child namespace as observed by the parent. Running this command establishes a pipe-like connection between these two namespaces. The parent namespace retains the veth0 device, and passes the veth1 device to the child namespace. Anything that enters one of the ends, comes out through the other end, just as you would expect from a real Ethernet connection between two real nodes. Accordingly, both sides of this virtual Ethernet connection must be assigned IP addresses.
Mount Namespace
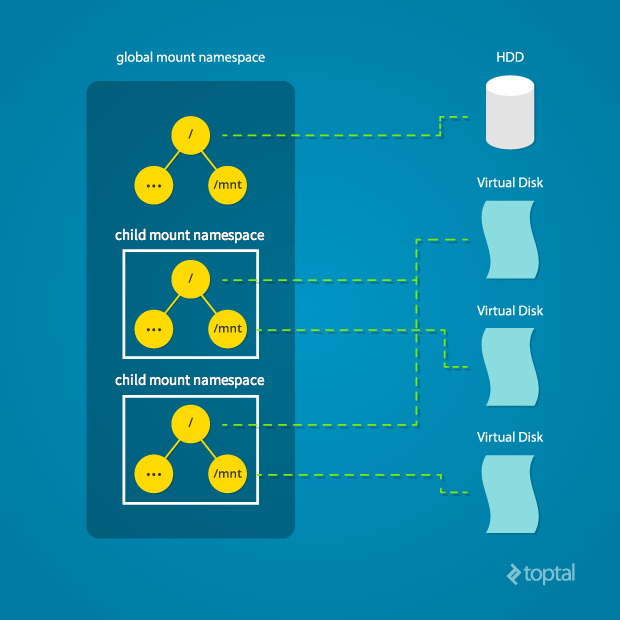
Linux also maintains a data structure for all the mountpoints of the system. It includes information like what disk partitions are mounted, where they are mounted, whether they are readonly, et cetera. With Linux namespaces, one can have this data structure cloned, so that processes under different namespaces can change the mountpoints without affecting each other.
Creating separate mount namespace has an effect similar to doing a chroot(). chroot() is good, but it does not provide complete isolation, and its effects are restricted to the root mountpoint only. Creating a separate mount namespace allows each of these isolated processes to have a completely different view of the entire system’s mountpoint structure from the original one. This allows you to have a different root for each isolated process, as well as other mountpoints that are specific to those processes. Used with care per this tutorial, you can avoid exposing any information about the underlying system.
The clone() flag required to achieve this is CLONE_NEWNS:
clone(child_fn, child_stack+1048576, CLONE_NEWPID | CLONE_NEWNET | CLONE_NEWNS | SIGCHLD, NULL)
Initially, the child process sees the exact same mountpoints as its parent process would. However, being under a new mount namespace, the child process can mount or unmount whatever endpoints it wants to, and the change will affect neither its parent’s namespace, nor any other mount namespace in the entire system. For example, if the parent process has a particular disk partition mounted at root, the isolated process will see the exact same disk partition mounted at the root in the beginning. But the benefit of isolating the mount namespace is apparent when the isolated process tries to change the root partition to something else, as the change will only affect the isolated mount namespace.
Interestingly, this actually makes it a bad idea to spawn the target child process directly with the CLONE_NEWNS flag. A better approach is to start a special “init” process with the CLONE_NEWNS flag, have that “init” process change the “/”, “/proc”, “/dev” or other mountpoints as desired, and then start the target process. This is discussed in a little more detail near the end of this namespace tutorial.
Other Namespaces
There are other namespaces that these processes can be isolated into, namely user, IPC, and UTS. The user namespace allows a process to have root privileges within the namespace, without giving it that access to processes outside of the namespace. Isolating a process by the IPC namespace gives it its own interprocess communication resources, for example, System V IPC and POSIX messages. The UTS namespace isolates two specific identifiers of the system: nodename and domainname.
A quick example to show how UTS namespace is isolated is shown below:
#define _GNU_SOURCE
#include <sched.h>
#include <stdio.h>
#include <stdlib.h>
#include <sys/utsname.h>
#include <sys/wait.h>
#include <unistd.h>


static char child_stack[1048576];

static void print_nodename() {
  struct utsname utsname;
  uname(&utsname);
  printf("%s\n", utsname.nodename);
}

static int child_fn() {
  printf("New UTS namespace nodename: ");
  print_nodename();

  printf("Changing nodename inside new UTS namespace\n");
  sethostname("GLaDOS", 6);

  printf("New UTS namespace nodename: ");
  print_nodename();
  return 0;
}

int main() {
  printf("Original UTS namespace nodename: ");
  print_nodename();

  pid_t child_pid = clone(child_fn, child_stack+1048576, CLONE_NEWUTS | SIGCHLD, NULL);

  sleep(1);

  printf("Original UTS namespace nodename: ");
  print_nodename();

  waitpid(child_pid, NULL, 0);

  return 0;
}
This program yields the following output:
Original UTS namespace nodename: XT
New UTS namespace nodename: XT
Changing nodename inside new UTS namespace
New UTS namespace nodename: GLaDOS
Original UTS namespace nodename: XT
Here, child_fn() prints the nodename, changes it to something else, and prints it again. Naturally, the change happens only inside the new UTS namespace.
More information on what all of the namespaces provide and isolate can be found in the tutorial here
Cross-Namespace Communication
Often it is necessary to establish some sort of communication between the parent and the child namespace. This might be for doing configuration work within an isolated environment, or it can simply be to retain the ability to peek into the condition of that environment from outside. One way of doing that is to keep an SSH daemon running within that environment. You can have a separate SSH daemon inside each network namespace. However, having multiple SSH daemons running uses a lot of valuable resources like memory. This is where having a special “init” process proves to be a good idea again.
The “init” process can establish a communication channel between the parent namespace and the child namespace. This channel can be based on UNIX sockets or can even use TCP. To create a UNIX socket that spans two different mount namespaces, you need to first create the child process, then create the UNIX socket, and then isolate the child into a separate mount namespace. But how can we create the process first, and isolate it later? Linux provides unshare(). This special system call allows a process to isolate itself from the original namespace, instead of having the parent isolate the child in the first place. For example, the following code has the exact same effect as the code previously mentioned in the network namespace section:
#define _GNU_SOURCE
#include <sched.h>
#include <stdio.h>
#include <stdlib.h>
#include <sys/wait.h>
#include <unistd.h>


static char child_stack[1048576];

static int child_fn() {
  // calling unshare() from inside the init process lets you create a new namespace after a new process has been spawned
  unshare(CLONE_NEWNET);

  printf("New `net` Namespace:\n");
  system("ip link");
  printf("\n\n");
  return 0;
}

int main() {
  printf("Original `net` Namespace:\n");
  system("ip link");
  printf("\n\n");

  pid_t child_pid = clone(child_fn, child_stack+1048576, CLONE_NEWPID | SIGCHLD, NULL);

  waitpid(child_pid, NULL, 0);
  return 0;
}
And since the “init” process is something you have devised, you can make it do all the necessary work first, and then isolate itself from the rest of the system before executing the target child.
Conclusion
This tutorial is just an overview of how to use namespaces in Linux. It should give you a basic idea of how a Linux developer might start to implement system isolation, an integral part of the architecture of tools like Docker or Linux Containers. In most cases, it would be best to simply use one of these existing tools, which are already well-known and tested. But in some cases, it might make sense to have your very own, customized process isolation mechanism, and in that case, this namespace tutorial will help you out tremendously.
There is a lot more going on under the hood than I’ve covered in this article, and there are more ways you might want to limit your target processes for added safety and isolation. But, hopefully, this can serve as a useful starting point for someone who is interested in knowing more about how namespace isolation with Linux really works.
Originally from Toptal
Scaling Scala: How to Dockerize Using Kubernetes
Kubernetes is the new kid on the block, promising to help deploy applications into the cloud and scale them more quickly. Today, when developing for a microservices architecture, it’s pretty standard to choose Scala for creating API servers.
If there is a Scala application in your plans and you want to scale it into a cloud, then you are at the right place. In this article I am going to show step-by-step how to take a generic Scala application and implement Kubernetes with Docker to launch multiple instances of the application. The final result will be a single application deployed as multiple instances, and load balanced by Kubernetes.
All of this will be implemented by simply importing the Kubernetes source kit in your Scala application. Please note, the kit hides a lot of complicated details related to installation and configuration, but it is small enough to be readable and easy to understand if you want to analyze what it does. For simplicity, we will deploy everything on your local machine. However, the same configuration is suitable for a real-world cloud deployment of Kubernetes.

What is Kubernetes?
Before going into the gory details of the implementation, let’s discuss what Kubernetes is and why it’s important.
You may have already heard of Docker. In a sense, it is a lightweight virtual machine.
For these reasons, it is already one of the more widely used tools for deploying applications in clouds. A Docker image is pretty easy and fast to build and duplicable, much easier than a traditional virtual machine like VMWare, VirtualBox, or XEN.
Kubernetes complements Docker, offering a complete environment for managing dockerized applications. By using Kubernetes, you can easily deploy, configure, orchestrate, manage, and monitor hundreds or even thousands of Docker applications.
Kubernetes is an open source tool developed by Google and has been adopted by many other vendors. Kubernetes is available natively on the Google cloud platform, but other vendors have adopted it for their OpenShift cloud services too. It can be found on Amazon AWS, Microsoft Azure, RedHat OpenShift, and even more cloud technologies. We can say it is well positioned to become a standard for deploying cloud applications.
Prerequisites
Now that we covered the basics, let’s check if you have all the prerequisite software installed. First of all, you need Docker. If you are using either Windows or Mac, you need the Docker Toolbox. If you are using Linux, you need to install the particular package provided by your distribution or simply follow the official directions.
We are going to code in Scala, which is a JVM language. You need, of course, the Java Development Kit and the scala SBT tool installed and available in the global path. If you are already a Scala programmer, chances are you have those tools already installed.
If you are using Windows or Mac, Docker will by default create a virtual machine named default with only 1GB of memory, which can be too small for running Kubernetes. In my experience, I had issues with the default settings. I recommend that you open the VirtualBox GUI, select your virtual machine default, and change the memory to at least to 2048MB.

The Application to Clusterize
The instructions in this tutorial can apply to any Scala application or project. For this article to have some “meat” to work on, I chose an example used very often to demonstrate a simple REST microservice in Scala, called Akka HTTP. I recommend you try to apply source kit to the suggested example before attempting to use it on your application. I have tested the kit against the demo application, but I cannot guarantee that there will be no conflicts with your code.
So first, we start by cloning the demo application:
git clone https://github.com/theiterators/akka-http-microservice
Next, test if everything works correctly:
cd akka-http-microservice
sbt run
Then, access to http://localhost:9000/ip/8.8.8.8, and you should see something like in the following image:

Adding the Source Kit
Now, we can add the source kit with some Git magic:
git remote add ScalaGoodies https://github.com/sciabarra/ScalaGoodies
git fetch --all
git merge ScalaGoodies/kubernetes
With that, you have the demo including the source kit, and you are ready to try. Or you can even copy and paste the code from there into your application.
Once you have merged or copied the files in your projects, you are ready to start.
Starting Kubernetes
Once you have downloaded the kit, we need to download the necessary kubectl binary, by running:
bin/install.sh
This installer is smart enough (hopefully) to download the correct kubectl binary for OSX, Linux, or Windows, depending on your system. Note, the installer worked on the systems I own. Please do report any issues, so that I can fix the kit.
Once you have installed the kubectl binary, you can start the whole Kubernetes in your local Docker. Just run:
bin/start-local-kube.sh
The first time it is run, this command will download the images of the whole Kubernetes stack, and a local registry needed to store your images. It can take some time, so please be patient. Also note, it needs direct accesses to the internet. If you are behind a proxy, it will be a problem as the kit does not support proxies. To solve it, you have to configure the tools like Docker, curl, and so on to use the proxy. It is complicated enough that I recommend getting a temporary unrestricted access.
Assuming you were able to download everything successfully, to check if Kubernetes is running fine, you can type the following command:
bin/kubectl get nodes
The expected answer is:
NAME        STATUS    AGE
127.0.0.1   Ready     2m
Note that age may vary, of course. Also, since starting Kubernetes can take some time, you may have to invoke the command a couple of times before you see the answer. If you do not get errors here, congratulations, you have Kubernetes up and running on your local machine.
Dockerizing Your Scala App
Now that you have Kubernetes up and running, you can deploy your application in it. In the old days, before Docker, you had to deploy an entire server for running your application. With Kubernetes, all you need to do to deploy your application is:
- Create a Docker image.
- Push it in a registry from where it can be launched.
- Launch the instance with Kubernetes, that will take the image from the registry.
Luckily, it is way less complicated that it looks, especially if you are using the SBT build tool like many do.
In the kit, I included two files containing all the necessary definitions to create an image able to run Scala applications, or at least what is needed to run the Akka HTTP demo. I cannot guarantee that it will work with any other Scala applications, but it is a good starting point, and should work for many different configurations. The files to look for building the Docker image are:
docker.sbt
project/docker.sbt
Let’s have a look at what’s in them. The file project/docker.sbt contains the command to import the sbt-docker plugin:
addSbtPlugin("se.marcuslonnberg" % "sbt-docker" % "1.4.0")
This plugin manages the building of the Docker image with SBT for you. The Docker definition is in the docker.sbt file and looks like this:
imageNames in docker := Seq(ImageName("localhost:5000/akkahttp:latest"))

dockerfile in docker := {
  val jarFile: File = sbt.Keys.`package`.in(Compile, packageBin).value
  val classpath = (managedClasspath in Compile).value
  val mainclass = mainClass.in(Compile, packageBin).value.getOrElse(sys.error("Expected exactly one main class"))
  val jarTarget = s"/app/${jarFile.getName}"
  val classpathString = classpath.files.map("/app/" + _.getName)
    .mkString(":") + ":" + jarTarget
  new Dockerfile {
    from("anapsix/alpine-java:8")
    add(classpath.files, "/app/")
    add(jarFile, jarTarget)
    entryPoint("java", "-cp", classpathString, mainclass)
  }
}
To fully understand the meaning of this file, you need to know Docker well enough to understand this definition file. However, we are not going into the details of the Docker definition file, because you do not need to understand it thoroughly to build the image.
the SBT will take care of collecting all the files for you.
Note the classpath is automatically generated by the following command:
val classpath = (managedClasspath in Compile).value
In general, it is pretty complicated to gather all the JAR files to run an application. Using SBT, the Docker file will be generated with add(classpath.files, "/app/"). This way, SBT collects all the JAR files for you and constructs a Dockerfile to run your application.
The other commands gather the missing pieces to create a Docker image. The image will be built using an existing image APT to run Java programs (anapsix/alpine-java:8, available on the internet in the Docker Hub). Other instructions are adding the other files to run your application. Finally, by specifying an entry point, we can run it. Note also that the name starts with localhost:5000 on purpose, because localhost:5000 is where I installed the registry in the start-kube-local.sh script.
Building the Docker Image with SBT
To build the Docker image, you can ignore all the details of the Dockerfile. You just need to type:
sbt dockerBuildAndPush
The sbt-docker plugin will then build a Docker image for you, downloading from the internet all the necessary pieces, and then it will push to a Docker registry that was started before, together with the Kubernetes application in localhost. So, all you need is to wait a little bit more to have your image cooked and ready.
Note, if you experience problems, the best thing to do is to reset everything to a known state by running the following commands:
bin/stop-kube-local.sh
bin/start-kube-local.sh
Those commands should stop all the containers and restart them correctly to get your registry ready to receive the image built and pushed by sbt.
Starting the Service in Kubernetes
Now that the application is packaged in a container and pushed in a registry, we are ready to use it. Kubernetes uses the command line and configuration files to manage the cluster. Since command lines can become very long, and also be able to replicate the steps, I am using the configurations files here. All the samples in the source kit are in the folder kube.
Our next step is to launch a single instance of the image. A running image is called, in the Kubernetes language, a pod. So let’s create a pod by invoking the following command:
bin/kubectl create -f kube/akkahttp-pod.yml
You can now inspect the situation with the command:
bin/kubectl get pods
You should see:
NAME                   READY     STATUS    RESTARTS   AGE
akkahttp               1/1       Running   0          33s
k8s-etcd-127.0.0.1     1/1       Running   0          7d
k8s-master-127.0.0.1   4/4       Running   0          7d
k8s-proxy-127.0.0.1    1/1       Running   0          7d
Status actually can be different, for example, “ContainerCreating”, it can take a few seconds before it becomes “Running”. Also, you can get another status like “Error” if, for example, you forget to create the image before.
You can also check if your pod is running with the command:
bin/kubectl logs akkahttp
You should see an output ending with something like this:
[DEBUG] [05/30/2016 12:19:53.133] [default-akka.actor.default-dispatcher-5] [akka://default/system/IO-TCP/selectors/$a/0] Successfully bound to /0:0:0:0:0:0:0:0:9000
Now you have the service up and running inside the container. However, the service is not yet reachable. This behavior is part of the design of Kubernetes. Your pod is running, but you have to expose it explicitly. Otherwise, the service is meant to be internal.
Creating a Service
Creating a service and checking the result is a matter of executing:
bin/kubectl create -f kube/akkahttp-service.yaml
bin/kubectl get svc
You should see something like this:
NAME               CLUSTER-IP   EXTERNAL-IP   PORT(S)    AGE
akkahttp-service   10.0.0.54                  9000/TCP   44s
kubernetes         10.0.0.1     <none>        443/TCP    3m
Note that the port can be different. Kubernetes allocated a port for the service and started it. If you are using Linux, you can directly open the browser and type http://10.0.0.54:9000/ip/8.8.8.8 to see the result. If you are using Windows or Mac with Docker Toolbox, the IP is local to the virtual machine that is running Docker, and unfortunately it is still unreachable.
I want to stress here that this is not a problem of Kubernetes, rather it is a limitation of the Docker Toolbox, which in turn depends on the constraints imposed by virtual machines like VirtualBox, which act like a computer within another computer. To overcome this limitation, we need to create a tunnel. To make things easier, I included another script which opens a tunnel on an arbitrary port to reach any service we deployed. You can type the following command:
bin/forward-kube-local.sh akkahttp-service 9000
Note that the tunnel will not run in the background, you have to keep the terminal window open as long as you need it and close when you do not need the tunnel anymore. While the tunnel is running, you can open: http://localhost:9000/ip/8.8.8.8 and finally see the application running in Kubernetes.
Final Touch: Scale
So far we have “simply” put our application in Kubernetes. While it is an exciting achievement, it does not add too much value to our deployment. We’re saved from the effort of uploading and installing on a server and configuring a proxy server for it.
Where Kubernetes shines is in scaling. You can deploy two, ten, or one hundred instances of our application by only changing the number of replicas in the configuration file. So let’s do it.
We are going to stop the single pod and start a deployment instead. So let’s execute the following commands:
bin/kubectl delete -f kube/akkahttp-pod.yml
bin/kubectl create -f kube/akkahttp-deploy.yaml
Next, check the status. Again, you may try a couple of times because the deployment can take some time to be performed:
NAME                                   READY     STATUS    RESTARTS   AGE
akkahttp-deployment-4229989632-mjp6u   1/1       Running   0          16s
akkahttp-deployment-4229989632-s822x   1/1       Running   0          16s
k8s-etcd-127.0.0.1                     1/1       Running   0          6d
k8s-master-127.0.0.1                   4/4       Running   0          6d
k8s-proxy-127.0.0.1                    1/1       Running   0          6d
Now we have two pods, not one. This is because in the configuration file I provided, there is the value replica: 2, with two different names generated by the system. I am not going into the details of the configuration files, because the scope of the article is simply an introduction for Scala programmers to jump-start into Kubernetes.
Anyhow, there are now two pods active. What is interesting is that the service is the same as before. We configured the service to load balance between all the pods labeled akkahttp. This means we do not have to redeploy the service, but we can replace the single instance with a replicated one.
We can verify this by launching the proxy again (if you are on Windows and you have closed it):
bin/forward-kube-local.sh akkahttp-service 9000
Then, we can try to open two terminal windows and see the logs for each pod. For example, in the first type:
bin/kubectl logs -f akkahttp-deployment-4229989632-mjp6u
And in the second type:
bin/kubectl logs -f akkahttp-deployment-4229989632-s822x
Of course, edit the command line accordingly with the values you have in your system.
Now, try to access the service with two different browsers. You should expect to see the requests to be split between the multiple available servers, like in the following image:

Conclusion
Today we barely scratched the surface. Kubernetes offers a lot more possibilities, including automated scaling and restart, incremental deployments, and volumes. Furthermore, the application we used as an example is very simple, stateless with the various instances not needing to know each other. In the real world, distributed applications do need to know each other, and need to change configurations according to the availability of other servers. Indeed, Kubernetes offers a distributed keystore (etcd) to allow different applications to communicate with each other when new instances are deployed. However, this example is purposefully small enough and simplified to help you get going, focusing on the core functionalities. If you follow the tutorial, you should be able to get a working environment for your Scala application on your machine without being confused by a large number of details and getting lost in the complexity.
This article was written by Michele Sciabarra, a Toptal Scala developer.
Getting Started with Docker: Simplifying Devops
If you like whales, or are simply interested in quick and painless continuous delivery of your software to production, then I invite you to read this introductory Docker Tutorial. Everything seems to indicate that software containers are the future of IT, so let’s go for a quick dip with the container whales Moby Dock andMolly.

Docker, represented by a logo with a friendly looking whale, is an open source project that facilitates deployment of applications inside of software containers. Its basic functionality is enabled by resource isolation features of the Linux kernel, but it provides a user-friendly API on top of it. The first version was released in 2013, and it has since become extremely popular and is being widely used by many big players such as eBay, Spotify, Baidu, and more. In the last funding round, Docker has landed a huge $95 million.
Transporting Goods Analogy
The philosophy behind Docker could be illustrated with a following simple analogy. In the international transportation industry, goods have to be transported by different means like forklifts, trucks, trains, cranes, and ships. These goods come in different shapes and sizes and have different storing requirements: sacks of sugar, milk cans, plants etc. Historically, it was a painful process depending on manual intervention at every transit point for loading and unloading.

It has all changed with the uptake of intermodal containers. As they come in standard sizes and are manufactured with transportation in mind, all the relevant machineries can be designed to handle these with minimal human intervention. The additional benefit of sealed containers is that they can preserve the internal environment like temperature and humidity for sensitive goods. As a result, the transportation industry can stop worrying about the goods themselves and focus on getting them from A to B.

And here is where Docker comes in and brings similar benefits to the software industry.
How Is It Different from Virtual Machines?
At a quick glance, virtual machines and Docker containers may seem alike. However, their main differences will become apparent when you take a look at the following diagram:

Applications running in virtual machines, apart from the hypervisor, require a full instance of the operating system and any supporting libraries. Containers, on the other hand, share the operating system with the host. Hypervisor is comparable to the container engine (represented as Docker on the image) in a sense that it manages the lifecycle of the containers. The important difference is that the processes running inside the containers are just like the native processes on the host, and do not introduce any overheads associated with hypervisor execution. Additionally, applications can reuse the libraries and share the data between containers.
As both technologies have different strengths, it is common to find systems combining virtual machines and containers. A perfect example is a tool named Boot2Docker described in the Docker installation section.
Docker Architecture

At the top of the architecture diagram there are registries. By default, the main registry is the Docker Hub which hosts public and official images. Organizations can also host their private registries if they desire.
On the right-hand side we have images and containers. Images can be downloaded from registries explicitly (docker pull imageName) or implicitly when starting a container. Once the image is downloaded it is cached locally.
Containers are the instances of images – they are the living thing. There could be multiple containers running based on the same image.
At the centre, there is the Docker daemon responsible for creating, running, and monitoring containers. It also takes care of building and storing images. Finally, on the left-hand side there is a Docker client. It talks to the daemon via HTTP. Unix sockets are used when on the same machine, but remote management is possible via HTTP based API.
Installing Docker
For the latest instructions you should always refer to the official documentation.
Docker runs natively on Linux, so depending on the target distribution it could be as easy as sudo apt-get install docker.io. Refer to the documentation for details. Normally in Linux, you prepend the Docker commands with sudo, but we will skip it in this article for clarity.
As the Docker daemon uses Linux-specific kernel features, it isn’t possible to run Docker natively in Mac OS or Windows. Instead, you should install an application called Boot2Docker. The application consists of a VirtualBox Virtual Machine, Docker itself, and the Boot2Docker management utilities. You can follow the official installation instructions for MacOS and Windows to install Docker on these platforms.
Using Docker
Let us begin this section with a quick example:
docker run phusion/baseimage echo "Hello Moby Dock. Hello Molly."
We should see this output:
Hello Moby Dock. Hello Molly.
However, a lot more has happened behind the scenes than you may think:
- The image ‘phusion/baseimage’ was download from Docker Hub (if it wasn’t already in local cache)
- A container based on this image was started
- The command echo was executed within the container
- The container was stopped when the command exitted
On first run, you may notice a delay before the text is printed on screen. If the image had been cached locally, everything would have taken a fraction of a second. Details about the last container can be retrieved by by running docker ps -l:
CONTAINER ID		IMAGE					COMMAND				CREATED			STATUS				PORTS	NAMES
af14bec37930		phusion/baseimage:latest		"echo 'Hello Moby Do		2 minutes ago		Exited (0) 3 seconds ago		stoic_bardeen
Taking the Next Dive
As you can tell, running a simple command within Docker is as easy as running it directly on a standard terminal. To illustrate a more practical use case, throughout the remainder of this article, we will see how we can utilize Docker to deploy a simple web server application. To keep things simple, we will write a Java program that handles HTTP GET requests to ‘/ping’ and responds with the string ‘pong\n’.
import java.io.IOException;
import java.io.OutputStream;
import java.net.InetSocketAddress;
import com.sun.net.httpserver.HttpExchange;
import com.sun.net.httpserver.HttpHandler;
import com.sun.net.httpserver.HttpServer;

public class PingPong {

    public static void main(String[] args) throws Exception {
        HttpServer server = HttpServer.create(new InetSocketAddress(8080), 0);
        server.createContext("/ping", new MyHandler());
        server.setExecutor(null);
        server.start();
    }

    static class MyHandler implements HttpHandler {
        @Override
        public void handle(HttpExchange t) throws IOException {
            String response = "pong\n";
            t.sendResponseHeaders(200, response.length());
            OutputStream os = t.getResponseBody();
            os.write(response.getBytes());
            os.close();
        }
    }
}
Dockerfile
Before jumping in and building your own Docker image, it’s a good practice to first check if there is an existing one in the Docker Hub or any private registries you have access to. For example, instead of installing Java ourselves, we will use an official image: java:8.
To build an image, first we need to decide on a base image we are going to use. It is denoted by FROMinstruction. Here, it is an official image for Java 8 from the Docker Hub. We are going to copy it into our Java file by issuing a COPY instruction. Next, we are going to compile it with RUN. EXPOSE instruction denotes that the image will be providing a service on a particular port. ENTRYPOINT is an instruction that we want to execute when a container based on this image is started and CMD indicates the default parameters we are going to pass to it.
FROM java:8
COPY PingPong.java /
RUN javac PingPong.java
EXPOSE 8080
ENTRYPOINT ["java"]
CMD ["PingPong"]
After saving these instructions in a file called “Dockerfile”, we can build the corresponding Docker image by executing:
docker build -t toptal/pingpong .
The official documentation for Docker has a section dedicated to best practices regarding writing Dockerfile.
Running Containers
When the image has been built, we can bring it to life as a container. There are several ways we could run containers, but let’s start with a simple one:
docker run -d -p 8080:8080 toptal/pingpong
where -p [port-on-the-host]:[port-in-the-container] denotes the ports mapping on the host and the container respectively. Furthermore, we are telling Docker to run the container as a daemon process in the background by specifying -d. You can test if the web server application is running by attempting to access ‘http://localhost:8080/ping’. Note that on platforms where Boot2docker is being used, you will need to replace ‘localhost’ with the IP address of the virtual machine where Docker is running.
On Linux:
curl http://localhost:8080/ping
On platforms requiring Boot2Docker:
curl $(boot2docker ip):8080/ping
If all goes well, you should see the response:
pong
Hurray, our first custom Docker container is alive and swimming! We could also start the container in an interactive mode -i -t. In our case, we will override the entrypoint command so we are presented with a bash terminal. Now we can execute whatever commands we want, but exiting the container will stop it:
docker run -i -t --entrypoint="bash" toptal/pingpong
There are many more options available to use for starting up the containers. Let us cover a few more. For example, if we want to persist data outside of the container, we could share the host filesystem with the container by using -v. By default, the access mode is read-write, but could be changed to read-only mode by appending :ro to the intra-container volume path. Volumes are particularly important when we need to use any security information like credentials and private keys inside of the containers, which shouldn’t be stored on the image. Additionally, it could also prevent the duplication of data, for example by mapping your local Maven repository to the container to save you from downloading the Internet twice.
Docker also has the capability of linking containers together. Linked containers can talk to each other even if none of the ports are exposed. It can be achieved with –link other-container-name. Below is an example combining mentioned above parameters:
docker run -p 9999:8080
    --link otherContainerA --link otherContainerB
    -v /Users/$USER/.m2/repository:/home/user/.m2/repository
toptal/pingpongUnsurprisingly, the list of operations that one could apply to the containers and images is rather long. For brevity, let us look at just a few of them:
- stop – Stops a running container.
- start – Starts a stopped container.
- commit – Creates a new image from a container’s changes.
- rm – Removes one or more containers.
- rmi – Removes one or more images.
- ps – Lists containers.
- images – Lists images.
- exec – Runs a command in a running container.
Last command could be particularly useful for debugging purposes, as it lets you to connect to a terminal of a running container:
docker exec -i -t <container-id> bash
Docker Compose for the Microservice World
If you have more than just a couple of interconnected containers, it makes sense to use a tool like docker-compose. In a configuration file, you describe how to start the containers and how they should be linked with each other. Irrespective of the amount of containers involved and their dependencies, you could have all of them up and running with one command: docker-compose up.
Docker in the Wild
Let’s look at three stages of project lifecycle and see how our friendly whale could be of help.
Development
Docker helps you keep your local development environment clean. Instead of having multiple versions of different services installed such as Java, Kafka, Spark, Cassandra, etc., you can just start and stop a required container when necessary. You can take things a step further and run multiple software stacks side by side avoiding the mix-up of dependency versions.
With Docker, you can save time, effort, and money. If your project is very complex to set up, “dockerise” it. Go through the pain of creating a Docker image once, and from this point everyone can just start a container in a snap.
You can also have an “integration environment” running locally (or on CI) and replace stubs with real services running in Docker containers.
Testing / Continuous Integration
With Dockerfile, it is easy to achieve reproducible builds. Jenkins or other CI solutions can be configured to create a Docker image for every build. You could store some or all images in a private Docker registry for future reference.
With Docker, you only test what needs to be tested and take environment out of the equation. Performing tests on a running container can help keep things much more predictable.
Another interesting feature of having software containers is that it is easy to spin out slave machines with the identical development setup. It can be particularly useful for load testing of clustered deployments.
Production
Docker can be a common interface between developers and operations personnel eliminating a source of friction. It also encourages the same image/binaries to be used at every step of the pipeline. Moreover, being able to deploy fully tested container without environment differences help to ensure that no errors are introduced in the build process.
You can seamlessly migrate applications into production. Something that was once a tedious and flaky process can now be as simple as:
docker stop container-id; docker run new-image
And if something goes wrong when deploying a new version, you can always quickly roll-back or change to other container:
docker stop container-id; docker start other-container-id
… guaranteed not to leave any mess behind or leave things in an inconsistent state.
Summary
A good summary of what Docker does is included in its very own motto: Build, Ship, Run.
- Build – Docker allows you to compose your application from microservices, without worrying about inconsistencies between development and production environments, and without locking into any platform or language.
- Ship – Docker lets you design the entire cycle of application development, testing, and distribution, and manage it with a consistent user interface.
- Run – Docker offers you the ability to deploy scalable services securely and reliably on a wide variety of platforms.
Have fun swimming with the whales!
Part of this work is inspired by an excellent book Using Docker by Adrian Mouat.
This article was written by RADEK OSTROWSKI, a Toptal Java developer.
Separation Anxiety: A Tutorial for Isolating Your System with Linux Namespaces
The following article is a guest post by Mahmud Ridwan, Technical Editor at Toptal. Toptal is an elite network of freelancers that enables businesses to connect with the top 3% of software engineers and designers in the world.
With the advent of tools like Docker, Linux Containers, and others, it has become super easy to isolate Linux processes into their own little system environments. This makes it possible to run a whole range of applications on a single real Linux machine and ensure no two of them can interfere with each other, without having to resort to using virtual machines. These tools have been a huge boon to PaaS providers. But what exactly happens under the hood?
These tools rely on a number of features and components of the Linux kernel. Some of these features were introduced fairly recently, while others still require you to patch the kernel itself. But one of the key components, using Linux namespaces, has been a feature of Linux since version 2.6.24 was released in 2008.
Anyone familiar with chroot already has a basic idea of what Linux namespaces can do and how to use namespace generally. Just as chroot allows processes to see any arbitrary directory as the root of the system (independent of the rest of the processes), Linux namespaces allow other aspects of the operating system to be independently modified as well. This includes the process tree, networking interfaces, mount points, inter-process communication resources and more.
Why Use Namespaces for Process Isolation?
In a single-user computer, a single system environment may be fine. But on a server, where you want to run multiple services, it is essential to security and stability that the services are as isolated from each other as possible. Imagine a server running multiple services, one of which gets compromised by an intruder. In such a case, the intruder may be able to exploit that service and work his way to the other services, and may even be able compromise the entire server. Namespace isolation can provide a secure environment to eliminate this risk.
For example, using namespacing, it is possible to safely execute arbitrary or unknown programs on your server. Recently, there has been a growing number of programming contest and “hackathon” platforms, such as HackerRank, TopCoder, Codeforces, and many more. A lot of them utilize automated pipelines to run and validate programs that are submitted by the contestants. It is often impossible to know in advance the true nature of contestants’ programs, and some may even contain malicious elements. By running these programs namespaced in complete isolation from the rest of the system, the software can be tested and validated without putting the rest of the machine at risk. Similarly, online continuous integration services, such as Drone.io, automatically fetch your code repository and execute the test scripts on their own servers. Again, namespace isolation is what makes it possible to provide these services safely.
Namespacing tools like Docker also allow better control over processes’ use of system resources, making such tools extremely popular for use by PaaS providers. Services like Heroku and Google App Engine use such tools to isolate and run multiple web server applications on the same real hardware. These tools allow them to run each application (which may have been deployed by any of a number of different users) without worrying about one of them using too many system resources, or interfering and/or conflicting with other deployed services on the same machine. With such process isolation, it is even possible to have entirely different stacks of dependency softwares (and versions) for each isolated environment!
If you’ve used tools like Docker, you already know that these tools are capable of isolating processes in small “containers”. Running processes in Docker containers is like running them in virtual machines, only these containers are significantly lighter than virtual machines. A virtual machine typically emulates a hardware layer on top of your operating system, and then runs another operating system on top of that. This allows you to run processes inside a virtual machine, in complete isolation from your real operating system. But virtual machines are heavy! Docker containers, on the other hand, use some key features of your real operating system, including namespaces, and ensure a similar level of isolation, but without emulating the hardware and running yet another operating system on the same machine. This makes them very lightweight.
Process Namespace
Historically, the Linux kernel has maintained a single process tree. The tree contains a reference to every process currently running in a parent-child hierarchy. A process, given it has sufficient privileges and satisfies certain conditions, can inspect another process by attaching a tracer to it or may even be able to kill it.
With the introduction of Linux namespaces, it became possible to have multiple “nested” process trees. Each process tree can have an entirely isolated set of processes. This can ensure that processes belonging to one process tree cannot inspect or kill – in fact cannot even know of the existence of – processes in other sibling or parent process trees.
Every time a computer with Linux boots up, it starts with just one process, with process identifier (PID) 1. This process is the root of the process tree, and it initiates the rest of the system by performing the appropriate maintenance work and starting the correct daemons/services. All the other processes start below this process in the tree. The PID namespace allows one to spin off a new tree, with its own PID 1 process. The process that does this remains in the parent namespace, in the original tree, but makes the child the root of its own process tree.
With PID namespace isolation, processes in the child namespace have no way of knowing of the parent process’s existence. However, processes in the parent namespace have a complete view of processes in the child namespace, as if they were any other process in the parent namespace.

It is possible to create a nested set of child namespaces: one process starts a child process in a new PID namespace, and that child process spawns yet another process in a new PID namespace, and so on.
With the introduction of PID namespaces, a single process can now have multiple PIDs associated with it, one for each namespace it falls under. In the Linux source code, we can see that a struct named pid, which used to keep track of just a single PID, now tracks multiple PIDs through the use of a struct named upid:
struct upid {
  int nr;                     // the PID value
  struct pid_namespace *ns;   // namespace where this PID is relevant
  // ...
};

struct pid {
  // ...
  int level;                  // number of upids
  struct upid numbers[0];     // array of upids
};
To create a new PID namespace, one must call the clone() system call with a special flag CLONE_NEWPID. (C provides a wrapper to expose this system call, and so do many other popular languages.) Whereas the other namespaces discussed below can also be created using the unshare() system call, a PID namespace can only be created at the time a new process is spawned using clone(). Once clone() is called with this flag, the new process immediately starts in a new PID namespace, under a new process tree. This can be demonstrated with a simple C program:
#define _GNU_SOURCE
#include <sched.h>
#include <stdio.h>
#include <stdlib.h>
#include <sys/wait.h>
#include <unistd.h>

static char child_stack[1048576];

static int child_fn() {
  printf("PID: %ld\n", (long)getpid());
  return 0;
}

int main() {
  pid_t child_pid = clone(child_fn, child_stack+1048576, CLONE_NEWPID | SIGCHLD, NULL);
  printf("clone() = %ld\n", (long)child_pid);

  waitpid(child_pid, NULL, 0);
  return 0;
}
Compile and run this program with root privileges and you will notice an output that resembles this:
clone() = 5304
PID: 1
The PID, as printed from within the child_fn, will be 1.
Even though this namespace tutorial code above is not much longer than “Hello, world” in some languages, a lot has happened behind the scenes. The clone() function, as you would expect, has created a new process by cloning the current one and started execution at the beginning of the child_fn() function. However, while doing so, it detached the new process from the original process tree and created a separate process tree for the new process.
Try replacing the static int child_fn() function with the following, to print the parent PID from the isolated process’s perspective:
static int child_fn() {
  printf("Parent PID: %ld\n", (long)getppid());
  return 0;
}
Running the program this time yields the following output:
clone() = 11449
Parent PID: 0
Notice how the parent PID from the isolated process’s perspective is 0, indicating no parent. Try running the same program again, but this time, remove the CLONE_NEWPID flag from within the clone() function call:
pid_t child_pid = clone(child_fn, child_stack+1048576, SIGCHLD, NULL);
This time, you will notice that the parent PID is no longer 0:
clone() = 11561
Parent PID: 11560
However, this is just the first step in our tutorial. These processes still have unrestricted access to other common or shared resources. For example, the networking interface: if the child process created above were to listen on port 80, it would prevent every other process on the system from being able to listen on it.
Linux Network Namespace
This is where a network namespace becomes useful. A network namespace allows each of these processes to see an entirely different set of networking interfaces. Even the loopback interface is different for each network namespace.
Isolating a process into its own network namespace involves introducing another flag to the clone() function call: CLONE_NEWNET;
#define _GNU_SOURCE
#include <sched.h>
#include <stdio.h>
#include <stdlib.h>
#include <sys/wait.h>
#include <unistd.h>


static char child_stack[1048576];

static int child_fn() {
  printf("New `net` Namespace:\n");
  system("ip link");
  printf("\n\n");
  return 0;
}

int main() {
  printf("Original `net` Namespace:\n");
  system("ip link");
  printf("\n\n");

  pid_t child_pid = clone(child_fn, child_stack+1048576, CLONE_NEWPID | CLONE_NEWNET | SIGCHLD, NULL);

  waitpid(child_pid, NULL, 0);
  return 0;
}
Output:
Original `net` Namespace:
1: lo: <LOOPBACK,UP,LOWER_UP> mtu 65536 qdisc noqueue state UNKNOWN mode DEFAULT group default
    link/loopback 00:00:00:00:00:00 brd 00:00:00:00:00:00
2: enp4s0: <BROADCAST,MULTICAST,UP,LOWER_UP> mtu 1500 qdisc pfifo_fast state UP mode DEFAULT group default qlen 1000
    link/ether 00:24:8c:a1:ac:e7 brd ff:ff:ff:ff:ff:ff


New `net` Namespace:
1: lo: <LOOPBACK> mtu 65536 qdisc noop state DOWN mode DEFAULT group default
    link/loopback 00:00:00:00:00:00 brd 00:00:00:00:00:00
What’s going on here? The physical ethernet device enp4s0 belongs to the global network namespace, as indicated by the “ip” tool run from this namespace. However, the physical interface is not available in the new network namespace. Moreover, the loopback device is active in the original network namespace, but is “down” in the child network namespace.
In order to provide a usable network interface in the child namespace, it is necessary to set up additional “virtual” network interfaces which span multiple namespaces. Once that is done, it is then possible to create Ethernet bridges, and even route packets between the namespaces. Finally, to make the whole thing work, a “routing process” must be running in the global network namespace to receive traffic from the physical interface, and route it through the appropriate virtual interfaces to to the correct child network namespaces. Maybe you can see why tools like Docker, which do all this heavy lifting for you, are so popular!

To do this by hand, you can create a pair of virtual Ethernet connections between a parent and a child namespace by running a single command from the parent namespace:
ip link add name veth0 type veth peer name veth1 netns <pid>
Here, <pid> should be replaced by the process ID of the process in the child namespace as observed by the parent. Running this command establishes a pipe-like connection between these two namespaces. The parent namespace retains the veth0 device, and passes the veth1 device to the child namespace. Anything that enters one of the ends, comes out through the other end, just as you would expect from a real Ethernet connection between two real nodes. Accordingly, both sides of this virtual Ethernet connection must be assigned IP addresses.
Mount Namespace
Linux also maintains a data structure for all the mountpoints of the system. It includes information like what disk partitions are mounted, where they are mounted, whether they are readonly, et cetera. With Linux namespaces, one can have this data structure cloned, so that processes under different namespaces can change the mountpoints without affecting each other.
Creating separate mount namespace has an effect similar to doing a chroot(). chroot() is good, but it does not provide complete isolation, and its effects are restricted to the root mountpoint only. Creating a separate mount namespace allows each of these isolated processes to have a completely different view of the entire system’s mountpoint structure from the original one. This allows you to have a different root for each isolated process, as well as other mountpoints that are specific to those processes. Used with care per this tutorial, you can avoid exposing any information about the underlying system.

The clone() flag required to achieve this is CLONE_NEWNS:
clone(child_fn, child_stack+1048576, CLONE_NEWPID | CLONE_NEWNET | CLONE_NEWNS | SIGCHLD, NULL)
Initially, the child process sees the exact same mountpoints as its parent process would. However, being under a new mount namespace, the child process can mount or unmount whatever endpoints it wants to, and the change will affect neither its parent’s namespace, nor any other mount namespace in the entire system. For example, if the parent process has a particular disk partition mounted at root, the isolated process will see the exact same disk partition mounted at the root in the beginning. But the benefit of isolating the mount namespace is apparent when the isolated process tries to change the root partition to something else, as the change will only affect the isolated mount namespace.
Interestingly, this actually makes it a bad idea to spawn the target child process directly with the CLONE_NEWNSflag. A better approach is to start a special “init” process with the CLONE_NEWNS flag, have that “init” process change the “/”, “/proc”, “/dev” or other mountpoints as desired, and then start the target process. This is discussed in a little more detail near the end of this namespace tutorial.
Other Namespaces
There are other namespaces that these processes can be isolated into, namely user, IPC, and UTS. The user namespace allows a process to have root privileges within the namespace, without giving it that access to processes outside of the namespace. Isolating a process by the IPC namespace gives it its own interprocess communication resources, for example, System V IPC and POSIX messages. The UTS namespace isolates two specific identifiers of the system: nodename and domainname.
A quick example to show how UTS namespace is isolated is shown below:
#define _GNU_SOURCE
#include <sched.h>
#include <stdio.h>
#include <stdlib.h>
#include <sys/utsname.h>
#include <sys/wait.h>
#include <unistd.h>


static char child_stack[1048576];

static void print_nodename() {
  struct utsname utsname;
  uname(&utsname);
  printf("%s\n", utsname.nodename);
}

static int child_fn() {
  printf("New UTS namespace nodename: ");
  print_nodename();

  printf("Changing nodename inside new UTS namespace\n");
  sethostname("GLaDOS", 6);

  printf("New UTS namespace nodename: ");
  print_nodename();
  return 0;
}

int main() {
  printf("Original UTS namespace nodename: ");
  print_nodename();

  pid_t child_pid = clone(child_fn, child_stack+1048576, CLONE_NEWUTS | SIGCHLD, NULL);

  sleep(1);

  printf("Original UTS namespace nodename: ");
  print_nodename();

  waitpid(child_pid, NULL, 0);

  return 0;
}
This program yields the following output:
Original UTS namespace nodename: XT
New UTS namespace nodename: XT
Changing nodename inside new UTS namespace
New UTS namespace nodename: GLaDOS
Original UTS namespace nodename: XT
Here, child_fn() prints the nodename, changes it to something else, and prints it again. Naturally, the change happens only inside the new UTS namespace.
More information on what all of the namespaces provide and isolate can be found in the tutorial here
Cross-Namespace Communication
Often it is necessary to establish some sort of communication between the parent and the child namespace. This might be for doing configuration work within an isolated environment, or it can simply be to retain the ability to peek into the condition of that environment from outside. One way of doing that is to keep an SSH daemon running within that environment. You can have a separate SSH daemon inside each network namespace. However, having multiple SSH daemons running uses a lot of valuable resources like memory. This is where having a special “init” process proves to be a good idea again.
The “init” process can establish a communication channel between the parent namespace and the child namespace. This channel can be based on UNIX sockets or can even use TCP. To create a UNIX socket that spans two different mount namespaces, you need to first create the child process, then create the UNIX socket, and then isolate the child into a separate mount namespace. But how can we create the process first, and isolate it later? Linux provides unshare(). This special system call allows a process to isolate itself from the original namespace, instead of having the parent isolate the child in the first place. For example, the following code has the exact same effect as the code previously mentioned in the network namespace section:
#define _GNU_SOURCE
#include <sched.h>
#include <stdio.h>
#include <stdlib.h>
#include <sys/wait.h>
#include <unistd.h>


static char child_stack[1048576];

static int child_fn() {
  // calling unshare() from inside the init process lets you create a new namespace after a new process has been spawned
  unshare(CLONE_NEWNET);

  printf("New `net` Namespace:\n");
  system("ip link");
  printf("\n\n");
  return 0;
}

int main() {
  printf("Original `net` Namespace:\n");
  system("ip link");
  printf("\n\n");

  pid_t child_pid = clone(child_fn, child_stack+1048576, CLONE_NEWPID | SIGCHLD, NULL);

  waitpid(child_pid, NULL, 0);
  return 0;
}
And since the “init” process is something you have devised, you can make it do all the necessary work first, and then isolate itself from the rest of the system before executing the target child.
Conclusion
This tutorial is just an overview of how to use namespaces in Linux. It should give you a basic idea of how a Linux developer might start to implement system isolation, an integral part of the architecture of tools like Docker or Linux Containers. In most cases, it would be best to simply use one of these existing tools, which are already well-known and tested. But in some cases, it might make sense to have your very own, customized process isolation mechanism, and in that case, this namespace tutorial will help you out tremendously.
There is a lot more going on under the hood than I’ve covered in this article, and there are more ways you might want to limit your target processes for added safety and isolation. But, hopefully, this can serve as a useful starting point for someone who is interested in knowing more about how namespace isolation with Linux really works.