Security challenges with SaaS applications
This post was originally published by the Cloud Security Alliance.
According to the Shared Responsibility Model, “The consumer does not manage or control the underlying cloud infrastructure”.
As customers, this leaves us with very little control over services managed by remote service providers, as compared to the amount of control we have over IaaS (Infrastructure as a Service), where we control the operating system and anything inside it (applications, configuration, etc.)
The fact that many modern applications are offered as a SaaS, has many benefits such as:
- (Almost) zero maintenance (we are still in charge of authorization)
- (Almost) zero requirements to deal with availability or performance issues (depending on business requirements and the maturity of the SaaS vendor)
- (Almost) zero requirement to deal with security and compliance (at the end of the day, we are still responsible for complying with laws and regulations and we still have obligations to our customers and employees, depending on the data classification we are about to store in the cloud)
- The minimum requirement to handle licensing (depending on the SaaS pricing offers)
- As customers, we can consume a service and focus on our business (instead of infrastructure and application maintenance)
While there are many benefits of switching from maintaining servers to consuming (SaaS) applications, there are many security challenges we need to be aware of and risks to control.
In this blog post, I will review some of the security challenges facing SaaS applications.
Identity and Access Management
We may not control the underlining infrastructure, but as customers, we are still in charge of configuring proper authentication and authorization for our customers (internal or external).
As customers, we would like to take advantage of our current identities and leverage a federation mechanism to allow our end-users to log in once and through SSO to be able to access the SaaS application, all using standard protocols such as SAML, OAuth, or OpenID Connect.
Once the authentication phase is done, we need to take care of access permissions, following the role description/requirement.
We must always follow the principle of least privilege.
We should never accept a SaaS application that does not support granular role-based access control.
While working with SaaS applications, we need to make sure we can audit who had access to our data and what actions have been done.
The final phase is to make sure access is granted by business needs – once an employee no longer needs access to a SaaS application, we must revoke the access immediately.
Data Protection
Once we are using SaaS applications, we need to understand we no longer have “physical” control over our data – whether it is employee’s data, customers’ data, intellectual property, or any other type of data.
Once data is stored and processed by an external party, there is always a chance for a data breach, that may lead to data leakage, data tampering, encryption by ransomware, and more.
If we are planning to store sensitive data (PII’s, financial, healthcare, etc.) in the cloud, we must understand how data is being protected.
We must make sure data is encrypted both in transit and at rest (including backups, logs, etc.) and at any given time, access to data by anyone (from our employees, SaaS vendor employees, or even third-party companies), must be authenticated, authorized, and audited.
Misconfiguration
The most common vulnerability is misconfiguration.
The easiest way is for an employee with administrative privileges to make a configuration mistake and grant someone unnecessary access permissions, make data publicly available, forget to turn encryption at rest on (depending on specific SaaS applications), and more.
Some SaaS applications allow you to set configuration control using CASB (Cloud Access Security Brokers) or SSPM (SaaS Security Posture Management).
The problem is the lack of standardization in the SaaS industry.
There is no standard for allowing central configuration management using APIs.
If you are using common SaaS applications such as Office 365, Dropbox, SalesForce, or any other common SaaS application, you may be able to find many third-party security solutions that will allow you to mitigate misconfiguration.
Otherwise, if you are working with a small start-up vendor or with an immature SaaS vendor, your only options are a good legal contract (defining the obligations of the SaaS vendor), demand for certifications (such as SOC2 Type II reports) and accepting the risk (depending on the business risk tolerance).
Insecure API’s
Many SaaS applications allow you to connect using APIs (from audit logs to configuration management).
Regardless of the data classification, you must always make sure your SaaS vendor’s APIs support the following:
- All APIs require authentication and perform a back-end authorization process.
- All traffic to the API is encrypted in transit
- All-access to API is audited (for further analysis)
- If the SaaS application allows traffic initiation through API back to your organization, make sure you enforce input validation to avoid inserting malicious code into your internal systems
I recommend you never rely on third-party SaaS vendors – always coordinate penetration testing on exposed APIs to mitigate the risk of insecure APIs.
Third-Party Access
Some SaaS vendors allow (or rely on) third-party vendor access.
When conducting due diligence with SaaS vendors, make sure to check if it allows any third-party vendor access to customers’ data and how is data protected.
Also, make sure the contract specifies if data is transferred to third-party vendors, who are they and for which purpose.
Make sure everything is written in the contract with the SaaS vendor and that the SaaS vendor must notify you of any change regarding data access or transfer to third-party vendors.
Patch Management and System Vulnerabilities
Since we are only consumers of a managed service, we have no control or visibility to infrastructure or application layers.
Everything is made of software and software is vulnerable by design.
We may be able to coordinate vulnerability scanning or even short-term penetration testing with the SaaS vendor (depending on the SaaS vendor maturity), but we are still dependent on the transparency of the SaaS vendor and this is a risk we need to accept (depending on the business risk tolerance).
Lack of SaaS Vendor Transparency
This is very important.
Mature SaaS vendors will make sure we are up to date with information such as breach notifications, outages, and scheduled maintenance (at least when everybody on the Internet talks about critical software vulnerabilities requiring immediate patching, and assuming downtime is required).
As part of vendor transparency, I would expect the legal contract to force the SaaS vendor to keep us up to date with data breach incidents or potential unauthorized access to customers’ data.
Since in most cases, we do not have a real way to audit SaaS vendors’ security controls, I recommend working only with mature vendors who can provide proof of their maturity level (such as SOC 2 Type II reports every year) and coordinate your assessments on the SaaS vendor.
Mature SaaS vendors will allow us access to audit logs, to query who has access to our data and what actions have been done with the data.
Regulatory Compliance
Regardless of the cloud service model, we are always responsible for our data and we must always comply with laws and regulations, wherever our customers reside or wherever our SaaS vendor stores our data.
Mature SaaS vendors allow us to comply with data residency and make sure data does not leave a specific country or region.
Compliance goes for the entire lifecycle of our data – from upload/store, process, data backup or retention, to finally data destruction.
Make sure the legal contract specifies data residency and the vendor’s obligations regarding compliance.
From a customer’s point of view, make sure you get legal advice on how to comply with all relevant laws and regulations.
Summary
In this blog post, I have reviewed some of the most common security challenges working with SaaS applications.
SaaS applications have many benefits (from a customer point of view), but they also contain security risks that we need to be aware of and manage regularly.
Digital Transformation in the Post-Covid Era
In 2020, the world has suddenly stopped due to the pandemic.
A couple of years later, we began to see changes in the way both home consumers and organizations are using technology.
Common areas that have changed in the post-covid era
Here are a couple of areas that adapted in the post-covid era:
Customer support
Traditional engagement methods (such as phone calls, Fax, or even emails) have decreased in the past couple of years.
Today, customers are looking for fast and mobile methods to connect to contact centers from anywhere – from using mobile apps to connecting via chat (in some cases even a chatbot is a viable solution).
The use of mobile apps
Customers are using mobile apps for more than a decade – from social networks (for personal interaction), e-commerce (for purchasing products), banking (checking account status, money transfer, etc.), travel (for ordering flight tickets or hotels), and more.
The use of mobile apps is not something new, but in the past couple of years, we see customers using mobile for almost every step of their daily life.
The use of the public cloud
The public cloud has been in use for almost two decades, but during the Covid, more and more organizations began to see the benefits of the cloud and began migrating systems to the cloud.
It is true, that there are still organizations choosing to invest in maintaining data centers for running their applications, but as time goes by, more and more organizations are embracing the public cloud.
The fact that we pay for the resources we consume, and the (almost) infinite compute capacity, made the cloud very attractive to most organizations around the world – from large corporations to newly founded start-ups.
Hybrid work and work-life balance
In the post-covid era, more and more organizations are offering their employees the option of choosing whether to work from the office or from anywhere else, as long as the employee gets their work done.
Employers understand the importance of work-life balance and began to respect employee’s personal life, which decrease the levels of stress and creates satisfied and productive employees.
The use of AI
For many years, researchers have tried to teach computers how to support people in decision-making.
In the past couple of years, we see AI/ML solutions for almost any area in human lives.
From advising on which music should listen to (based on their past listening history), aiding doctors in providing better medical care to patients (based on their health status and technological improvements), using AI to quickly calculate customers’ credit scores and be able to offer customers with relevant investment plans, and more.
How can organizations prepare for the digital transformation?
There are various areas where organizations should adapt and better prepare themselves for the digital transformation:
Customer-centric
Organizations should change their mindset and put their customers first.
Conduct customer surveys and research what can provide your customers the most value, from better customer service to an easy-to-navigate mobile app or anything that will keep your customers satisfied.
Be transparent with your customers, for example – if your organization is collecting personal data from customers, provide them with information about the data you are collecting, the purpose and what are you planning to do with the data, and allow your customers to choose whether to provide you their data.
Keep your employees engaged
Explain to your employees about the coming changes, allow them to provide their feedback, and be part of the process.
As technology evolves, employees would like to re-invent themselves or even choose a different career path.
An organization should support its employees and find ways to allow employees to expand their knowledge or even switch to a different role within the organization.
Conduct training, allowing employees to expand their knowledge (from new ways to interact with customers, new technologies, new or modern development languages, and more).
Allow your employees the ability to combine work from the office with remote work from home, to support employees’ work-life balance.
Embrace the public cloud
No matter how professional your employees are, most of the chance your organization will never have the expertise of the public cloud providers, the scale, or the elasticity that the public cloud allows your organization and customers to get.
Develop a cloud strategy that clearly defines what workloads or data can be migrated to the cloud and begin to modernize your applications.
Modernize your applications
Your organization may have many applications, already serving you and your customers.
Now is the time to ask yourself, what applications are still providing you value and what applications can be modernized or re-architect and provide better usability, higher availability, and elasticity with lower cost.
Consider embracing cloud-native applications and gain the full benefit of the public cloud.
Summary
Digital transformation is disrupting the way home consumers and organizations are using technology to make everyday life better.
Every day we find new ways to consume information, purchase products, get better healthcare or financial services, or even better ways to conduct business and interact with our customers.
To embrace digital transformation, we need to adapt to the change.
If you have not done so yet, now is the time to jump on the digital transformation train.
Identity and Access Management in Multi-Cloud Environments

IAM (Identity and Access Management) is a crucial part of any cloud environment.
As organizations evolve, they may look at multi-cloud as a solution to consume cloud services in different cloud providers’ technologies (such as AI/ML, data analytics, and more), to have the benefit of using different pricing models, or to decrease the risk of vendor lock-in.
Before we begin the discussion about IAM, we need to understand the following fundamental concepts:
- Identity – An account represents a persona (human) or service (non-interactive account)
- Authentication – The act where an identity proves himself against a system (such as providing username and password, certificate, API key, and more)
- Authorization – The act of validating granting an identity’s privileges to take actions on a system (such as view configuration, read database content, upload a file to object storage, and more)
- Access Management – The entire lifecycle of IAM – from account provisioning, granting access, and validating privileges until account or privilege revocation.
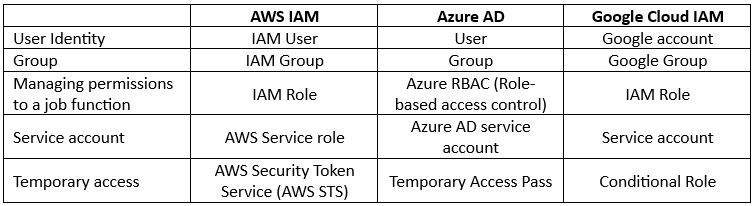
Identity and Access Management Terminology
Authorization in the Cloud
Although all cloud providers have the same concept of identities, when we deep dive into the concept of authorization or access management to resources/services, we need to understand the differences between cloud providers.
Authorization in AWS
AWS has two concepts for managing permissions to resources:
- IAM Role – Permissions assigned to an identity temporarily.
- IAM Policy – A document defines a set of permissions assigned to an IAM role.
Permissions in AWS can be assigned to:
- Identity – A policy attached to a user, group, or role.
- Resource – A policy attached to a resource (such as Amazon S3 bucket).
Authorization in Azure
Permissions in Azure AD are controlled by roles.
A role defines the permissions an identity has over an Azure resource.
Within Azure AD, you control permissions using RBAC (Role-based access control).
Azure AD supports the following types of roles:
- Built-in roles – A pre-defined role according to job function (as you can read on the link).
- Custom roles – A role that we create ourselves to match the principle of least privilege.
Authorization in Google Cloud
Permissions in Google Cloud IAM are controlled by IAM roles.
Google Cloud IAM supports the following types of IAM roles:
- Basic roles – The most permissive type of roles (Owner, Editor, and Viewer).
- Predefined roles – Roles managed by Google, which provides granular access to specific services (as you can read on the link).
- Custom roles – User-specific roles, which provide the most granular access to resources.
Authorization – Default behavior
As we can see below each cloud provider takes a different approach to default permissions:
- AWS – By default, new IAM users have no permission to access any resource in AWS.
To allow access to resources or take actions, you need to manually assign the user an IAM role. - Azure – By default, all Azure AD users are granted a set of default permissions (such as listing all users, reading all properties of users and groups, registering new applications, and more).
- Google Cloud – By default, a new service account is granted the Editor role on the project level.
Identity Federation
When we are talking about identity federation, there are two concepts:
- Service Provider (SP) – Provide access to resources
- Identity Provider (IdP) – Authenticate the identities
Identities (user accounts, service accounts, groups, etc.) are managed by an Identity Provider (IdP).
An IdP can exist in the local data center (such as Microsoft Active Directory) or the public cloud (such as AWS IAM, Azure AD, Google Cloud IAM, etc.)
Federation is the act of creating trust between separate IdP’s.
Federation allows us to keep identity in one repository (i.e., Identity Provider).
Once we set up an identity federation, we can grant an identity privilege to consume resources in a remote repository.
Example: a worker with an account in Microsoft Active Directory, reading a file from object storage in Azure, once a federation trust was established between Microsoft Active Directory and Azure Active Directory.
When federating between the on-premise and cloud environments, we need to recall the use of different protocols.
On-premise environments are using legacy authentication protocols such as Kerberos or LDAP.
In the public cloud, the common authentication protocols are SAML 2.0, Open ID Connect (OIDC), and OAuth 2.0
Each cloud provider has a list of supported external third-party identity providers to federate with, as you can read in the list below:
- Integrating third-party SAML solution providers with AWS
- Azure AD Identity Provider Compatibility Docs
- Google Cloud IAM – Configure workforce identity federation
Single Sign-On
The concept behind SSO is to allow identities (usually end-users) access to resources in the cloud while having to sign (to an identity provider) once.
Over the past couple of years, the concept of SSO was extended and now it is possible to allow a single identity (who authenticated to a specific identity provider), access to resources over federated login to an external (mostly SAML) identity provider.
Each cloud provider has its own SSO service, supporting federation with external identity providers:
- AWS IAM Identity Center
- Azure Active Directory single sign-on
- Google Cloud Workload identity federation
Steps for creating a federation between cloud providers
The process below explains (at a high level) the steps require to set up identity federation between different cloud providers:
- Choose an IdP (where identities will be created and authenticated to).
- Create a SAML identity provider.
- Configure roles for your third-party identity provider.
- Assign roles to the target users.
- Create trust between SP and IdP.
- Test the ability to authenticate and identify (user) to a resource in a remote/external cloud provider.
Additional References:
- AWS IAM Identity Center and Azure AD as IdP
- How to set up IAM federation using Google Workspace
- Azure AD SSO integration with AWS IAM Identity Center
- Azure AD SSO integration with Google Cloud / G Suite Connector by Microsoft
- Federating Google Cloud with Azure Active Directory
- Configure Google workload identity federation with AWS or Azure
Summary
In this blog post, we had a deep dive into identity and access management in the cloud, comparing different aspects of IAM in AWS, Azure, and GCP.
After we have reviewed how authentication and authorization work for each of the three cloud providers, we have explained how federation and SSO work in a multi-cloud environment.
Important to keep in mind:
When we are building systems in the cloud, whether they are publicly exposed or even internal, we need to follow some basic rules:
- All-access to resources/systems/applications must be authenticated
- Permissions must follow the principle of least privileged and business requirements
- All access must be audited (for future analysis, investigation purposes, etc.)
Privacy by Design and Privacy by Default in the Cloud

This post was originally published by the Cloud Security Alliance.
When we are talking about building new systems, in the context of privacy or data protection, we often hear two concepts – Privacy by Design (PbD) and Privacy by Default.
Dealing with human privacy is not something new.
We build applications that store and process personal data – from e-commerce sites, banking, healthcare, advertisement, and more.
The concept of Privacy by Design (PbD) was embraced by the GDPR (General Data Protection Regulation) in Article 5 and Article 25, the CCPA (California Consumer Protection Act) in W410-1, the LGPD (Brazilian Data Protection Law) in Article 46 and the Canadian PIPEDA (Personal Information Protection and Electronic Documents Act) in Recommendation 14.
When designing systems in the cloud, we must remember the Shared Responsibility Model.
The cloud provider is responsible for the underlining infrastructure layers and offers us many built-in security controls, but it is our responsibility as companies developing systems in the cloud, to use the security controls and design applications to meet all privacy requirements.
In this blog post, I will provide insights about how to implement those concepts when building new systems in the cloud.
What is Privacy by Design?
Privacy by Design (PbD) is based on seven “foundational principles”:
Principle 1: Proactive not reactive; preventive not remedial
To achieve this principle, we need to implement proactive security controls.
Examples of security controls that come built-in as part of major cloud providers:
- Identity and Access Management – Enforce authentication (who the persona claims to be) and authorization (what actions can be done by authenticated identity).
Examples of services: AWS Identity and Access Management (IAM), Azure Active Directory (Azure AD), Google Cloud Identity and Access Management (IAM), and Oracle Cloud Infrastructure Identity and Access Management (IAM).
- Network Protection – Enforce inbound/outbound access to services using access control mechanisms.
Examples of services: AWS Security groups, Azure Network security groups (NSG), GCP VPC firewall rules, and Oracle Cloud Infrastructure Security Lists.
- Data Encryption – Enforce confidentiality by encrypting data in transit and at rest.
Examples of services: AWS Key Management Service (AWS KMS), Azure Key Vault, Google Cloud KMS, and Oracle Cloud Infrastructure Vault.
Principle 2: Privacy as the default setting
To achieve this principle, we need to implement default settings at the application level and on the infrastructure level.
- Data minimization – When designing an application, we need to decide what is the minimum number of fields that will be stored (and perhaps processed) on data subjects in the application.
- Data location – When designing an application, we need to take into consideration data residency, by selecting the target region to store data according to relevant laws and regulations.
- Data retention – We need to set our application to keep data for as long as it is required and either delete or archive data when it is no longer needed (according to application/service capabilities).
Examples: Amazon S3 lifecycle management, Amazon EFS lifecycle management, Azure Storage lifecycle management, Google Cloud Storage Lifecycle Management, and Oracle Cloud Infrastructure Object Storage Lifecycle Management.
- Keeping Audit Trail – By default administrative actions (usually using APIs) are logged by all major cloud providers. If we want to increase log retention or include data actions (what identity did with the data), we need to manually enable it.
Examples of services: AWS CloudTrail, Azure Monitor, Google Cloud Audit Logs, and Oracle Cloud Infrastructure Logging service.
- Data Encryption – Enforce confidentiality by encrypting data in transit and at rest.
Principle 3: Privacy Embedded into Design
To achieve this principle, we need to embed privacy safeguards as part of the design.
Most data protection or data privacy regulations offers the data subjects the following rights:
- The right to be informed about the collection and use of their data.
- The right to view and request copies of their data.
- The right to request inaccurate or outdated personal information be updated or corrected.
- The right to request their data be deleted.
- The right to ask for their data to be transferred to another controller or provided to them.
When we design an application, we need to develop it to support the above data subject rights from day one, so once we need to use those functionalities, we will have them prepared, even before collecting information about the first data subject.
Principle 4: Full functionality – positive-sum, not zero-sum
To achieve this principle, we need to look at the bigger picture.
Privacy safeguards should be embedded as part of the application design, without affecting security controls or without causing performance impact on other services.
An example can be the security requirement to audit all actions in the system (for the incident response process) while keeping data privacy requirement to keep only a minimum amount of information about data subjects, not to mention the cost of keeping long-term audit log storage.
In the case of audit logs, we need to find the balance between having logs for investigation, while removing unnecessary information about data subjects, and perhaps moving old logs to an archive tier to save costs.
Principle 5: End-to-end security – full lifecycle protection
To achieve this principle, we need to make sure data is kept private throughout its entire lifecycle, from collection, storage, retirement, and disposal (when not required anymore).
When talking about data security, we must always remember to follow the CIA triad: Confidentiality, Integrity, and Availability.
The data lifecycle management contains the following:
- Data generation of the collection – We need to take into consideration automatic data classification.
- Storage – We need to take into consideration data retention and archiving, including storage capacity and archiving capabilities.
- Data use and sharing – We need to implement strong authentication and authorization processes to protect the data we store and process.
- Data archive – We should take advantage of built-in storage archive capabilities that exist with all major cloud providers.
- Data disposal – We should design mechanisms to allow us to destroy data no longer needed.
Principle 6: Visibility and transparency – keep it open
To achieve this principle, we need to create and publish a privacy policy, that will be available for our customers, per application or per website we publicly expose to the Internet.
The privacy policy should contain information about:
- The data we collect.
- The purpose for collecting data from our customers.
- If we share private data with third parties, the privacy policy should indicate it.
- The data subject rights (such as viewing which data is been collected, the right to update data subjects’ data or delete data subject data).
- How can data subjects contact us (to view data, update it, delete it, or export it)?
Visibility and transparency are crucial, and as such, the privacy policy must be kept up to date.
Principle 7: Respect for user privacy – keep it user-centric
To achieve this principle, we need to put our customers (or data subjects) first.
User experience is an important factor – how will our customers know that we are collecting private data? How will they be able to consent to data collection, view the data we are collecting, or ask us to delete it?
We need to configure our application with privacy settings enabled by default and allow our customers an easy way to opt-in (subscribe) or opt out (unsubscribe) from our service.
We need to design our system to allow customers an easy way to export their private data and support the portability of the data we collect to another third-party system in a standard readable format.
Summary
When designing applications that will store or process private data in the cloud, we should remember the shared responsibility model, together with the seven principles of privacy by design.
Some of the principles can be achieved using services offered by cloud providers, for some, we can use third-party solutions and for some we are responsible for the implementation, to comply with privacy laws or regulations and to keep our customers’ private data safe.
For any organization designing new applications in the cloud, I recommend creating teams containing representatives of both the technology department (such as DevOps, architects, and security personnel) and legal department (such as Lawyers, data privacy, compliance, and risk), to be able to design an end-to-end solution.
I invite anyone designing new applications, to read and get more information about the privacy law and regulations affecting their customers.
Disclaimer – This blog post contains my opinion. It does not replace any legal advice for complying with privacy obligations or regulations.
Introduction to AWS Resilience Hub

When deploying a new application in the public cloud, we need to ask the business owner what are the resiliency (or SLA) requirements – How long can the business survive while our application is down and does not serve customers?
There are various answers to that question – from 24/7 availability (not realistic) to uptime of 99.9%, etc.
The domain of resiliency has two main concepts:
- RTO (Recovery Time Objective) – the amount of time it takes to recover a system after disruption
- RPO (Recovery Point Objective) – the amount of data loss, measured by time
To achieve high resiliency, or follow business SLA requirements, there are technical and cost consequences.
Naturally, we want to provision resources in high-availability (such as a farm of front-end web servers behind load-balancer), in a cluster (such as a cluster of database instances), deployed in multiple availability zones or perhaps in multiple regions, and try to avoid single point of failure.
We need to plan an architecture that will support our business resiliency requirements.
In theory, an architect can look at proposed architecture and say whether or not he sees potential availability failures, but it does not scale in large and complex architectures.
In 2021, AWS announced the general availability of the AWS Resilience Hub.
In this blog post, I will review what is the purpose of this service and how can we use it regularly, as part of our CI/CD process.
How does AWS Resilience Hub work?
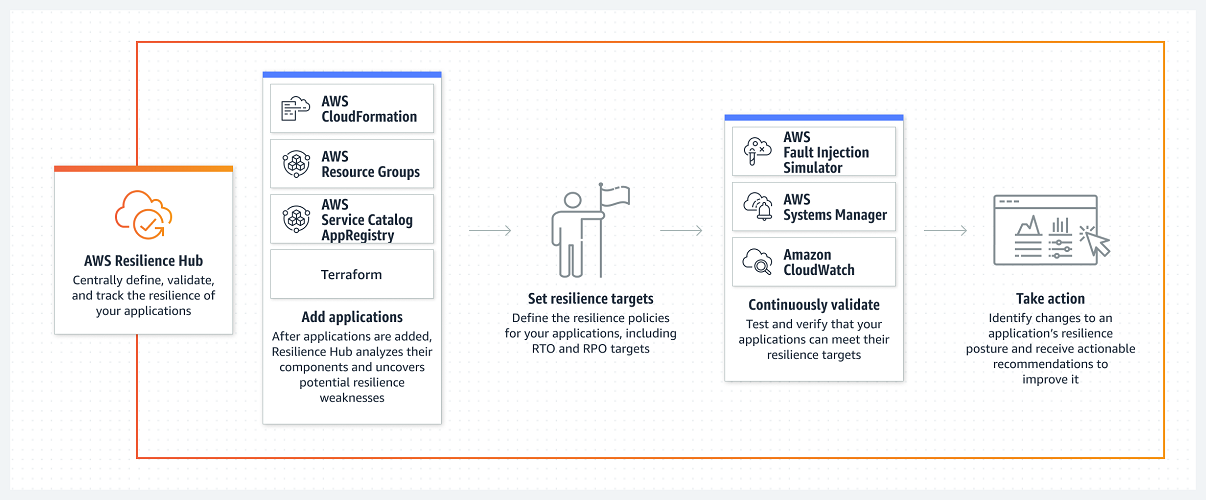
Source: https://docs.aws.amazon.com/resilience-hub/latest/userguide/how-it-works.html
To work with AWS Resilience Hub, follow the steps below:
Add an application
AWS Resilience Hub allows you to assess an application by scanning the following resources:
- AWS Resource Groups
- AWS AppRegistry applications
- AWS CloudFormation stacks
- Terraform state files
- Amazon EKS cluster configuration
Set resilience targets
AWS Resilience Hub supports the following built-in tiers:
- Foundational IT core services
- Mission critical
- Critical
- Important
- Non-critical
Choose the target policy according to the application business requirements of RTO and RPO.
Select one of the predefined suggested policies:
- Non-critical application
- Important Application
- Critical Application
- Global Critical Application
- Mission Critical Application
- Global Mission Critical Application
- Foundational Core Service
AWS Resilience Hub allows you to evaluate the resiliency of an application against the following types of disruption:
- Customer Application RTO and RPO
- AWS Infrastructure RTO and RPO
- Cloud Infrastructure Availability Zone (AZ) disruption
- AWS Region disruption
Run an assessment
AWS Resilience Hub allows you to either run manual on-time assessments or schedule an assessment daily.
To get the most value from AWS Resilience Hub, you can integrate it as part of a CI/CD pipeline, as an additional step, once you provision Infrastructure as Code (using CloudFormation templates or Terraform modules).
A common example of integration with CI/CD pipeline:
In a mature environment, you can take one step further and integrate AWS Resilience Hub with the built-in chaos engineering service AWS Fault Injection Simulator to conduct controlled experiments on your application and evaluate its resiliency.
Review results and continue improvements
Once an assessment was completed, it is time to review the results, to make sure your application meets the business resiliency requirements (in terms of RTO/RPO).
The results will be written in a report, with recommendations for improvements to your application resiliency, such as adding another node to an RDS cluster, deploying another EC2 instance in another availability zone, enabling S3 bucket versioning, etc.
To make things easy to understand and improve over time, you can build dashboards using Amazon QuickSight and send alerts using CloudWatch, as explained in the blog post:
https://aws.amazon.com/blogs/mt/resilience-reporting-dashboard-aws-resilience-hub/
For continuous and automated improvement, you can integrate AWS Resilience Hub with AWS Systems Manager to efficiently recover your application in the event of outages, as explained in the blog post:
https://docs.aws.amazon.com/resilience-hub/latest/userguide/create-custom-ssm-doc.html
Summary
In this blog post, we learned about the purpose of AWS Resilience Hub, what are the various steps for using it, and perhaps most important – how to automate the assessment as part of a CI/CD pipeline for continuous improvement.
I encourage anyone who builds applications on top of AWS to learn about the benefits of this service, providing insights into the resiliency of applications to meet business requirements.
Additional References:
Introduction to Chaos Engineering

In the past couple of years, we hear the term “Chaos Engineering” in the context of cloud.
Mature organizations have already begun to embrace the concepts of chaos engineering, and perhaps the most famous use of chaos engineering began at Netflix when they developed Chaos Monkey.
To quote Werner Vogels, Amazon CTO: “Everything fails, all the time”.
What is chaos engineering and what are the benefits of using chaos engineering for increasing the resiliency and reliability of workloads in the public cloud?
What is Chaos Engineering?
“Chaos Engineering is the discipline of experimenting on a system to build confidence in the system’s capability to withstand turbulent conditions in production.” (Source: https://principlesofchaos.org)
Production workloads on large scale, are built from multiple services, creating distributed systems.
When we design large-scale workloads, we think about things such as:
- Creating high-available systems
- Creating disaster recovery plans
- Decreasing single point of failure
- Having the ability to scale up and down quickly according to the load on our application
One thing we usually do not stop to think about is the connectivity between various components of our application and what will happen in case of failure in one of the components of our application.
What will happen if, for example, a web server tries to access a backend database, and it will not be able to do so, due to network latency on the way to the backend database?
How will this affect our application and our customers?
What if we could test such scenarios on a live production environment, regularly?
Do we trust our application or workloads infrastructure so much, that we are willing to randomly take down parts of our infrastructure, just so we will know the effect on our application?
How will this affect the reliability of our application, and how will it allow us to build better applications?
History of Chaos Engineering
In 2010 Netflix developed a tool called “Chaos Monkey“, whose goal was to randomly take down compute services (such as virtual machines or containers), part of the Netflix production environment, and test the impact on the overall Netflix service experience.
In 2011 Netflix released a toolset called “The Simian Army“, which added more capabilities to the Chaos Monkey, from reliability, security, and resiliency (i.e., Chaos Kong which simulates an entire AWS region going down).
In 2012, Chaos Monkey became an open-source project (under Apache 2.0 license).
In 2016, a company called Gremlin released the first “Failure-as-a-Service” platform.
In 2017, the LitmusChaos project was announced, which provides chaos jobs in Kubernetes.
In 2019, Alibaba Cloud announced ChaosBlade, an open-source Chaos Engineering tool.
In 2020, Chaos Mesh 1.0 was announced as generally available, an open-source cloud-native chaos engineering platform.
In 2021, AWS announced the general availability of AWS Fault Injection Simulator, a fully managed service to run controlled experiments.
In 2021, Azure announced the public preview of Azure Chaos Studio.
What exactly is Chaos Engineering?
Chaos Engineering is about experimentation based on real-world hypotheses.
Think about Chaos Engineering, as one of the tests you run as part of a CI/CD pipeline, but instead of a unit test or user acceptance test, you inject controlled faults into the system to measure its resiliency.
Chaos Engineering can be used for both modern cloud-native applications (built on top of Kubernetes) and for the legacy monolith, to achieve the same result – answering the question – will my system or application survive a failure?
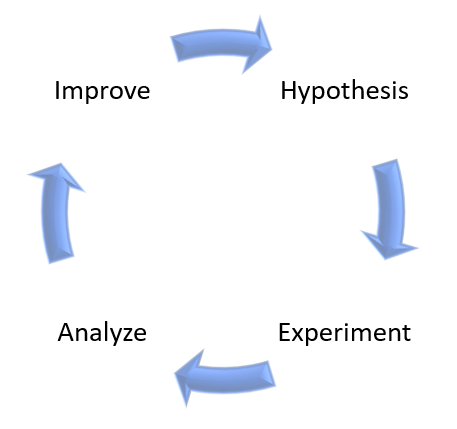
On high-level, Chaos Engineering is made of the following steps:
- Create a hypothesis
- Run an experiment
- Analyze the results
- Improve system resiliency
As an example, here is AWS’s point of view regarding the shared responsibility model, in the context of resiliency:
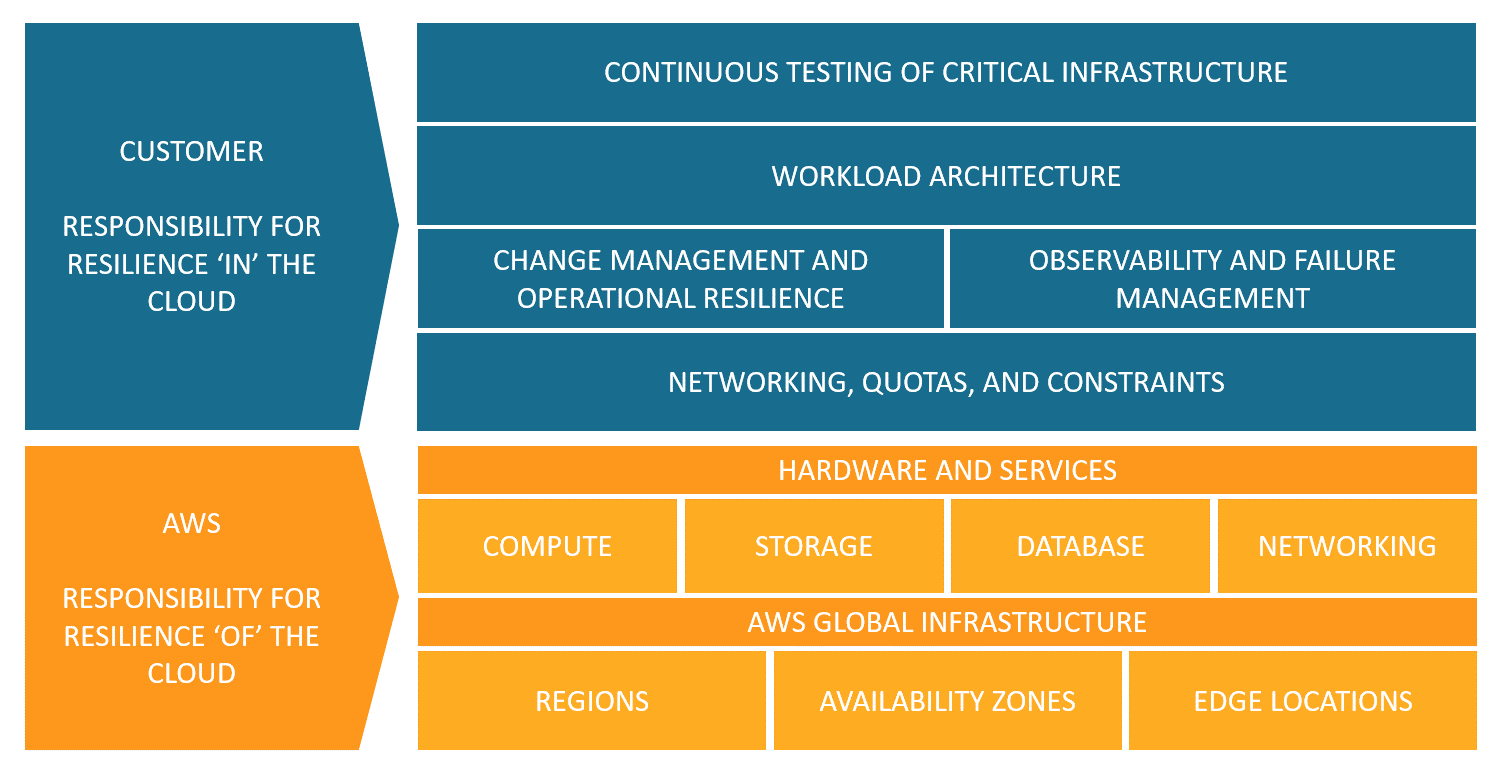
Source: https://aws.amazon.com/blogs/architecture/chaos-engineering-in-the-cloud
Chaos Engineering managed platform comparison
In the table below we can see a comparison between AWS and Azure-managed services for running Chaos Engineering experiments:

Additional References:
Summary
In this post, I have explained the concept of Chaos Engineering and compared alternatives to cloud-managed services.
Using Chaos Engineering as part of a regular development process will allow you to increase the resiliency of your applications, by studying the effect of failures and designing recovery processes.
Chaos Engineering can also be used as part of a disaster recovery and business continuity process, by testing the resiliency of your systems.
Additional References
- Chaos engineering (Wikipedia)
- Principles of Chaos Engineering
- Chaos Engineering in the Cloud
- What Chaos Engineering Is (and is not)
- AWS re:Invent 2022 – The evolution of chaos engineering at Netflix (NFX303)
- What is AWS Fault Injection Simulator?
- What is Azure Chaos Studio?
- Public Chaos Engineering Stories / Implementations
Introduction to Day 2 Kubernetes

Over the years, I have shared several blog posts about Kubernetes (What are Containers and Kubernetes, Modern Cloud deployment and usage, Introduction to Container Operating Systems, and more).
Kubernetes became a de-facto standard for running container-based workloads (for both on-premise and the public cloud), but most organizations tend to fail on what is referred to as Day 2 Kubernetes operations.
In this blog post, I will review what it means “Day 2 Kubernetes” and how to prepare your workloads for the challenges of Day 2 operations.
Ready, Set, Go!
In the software lifecycle, or the context of this post, the Kubernetes lifecycle, there are several distinct stages:
Day 0 – Planning and Design
In this stage, we focus on designing our solution (application and underlying infrastructure), understanding business needs, budget, required skills, and more.
For the context of this post, let us assume we have decided to build a cloud-native application, made of containers, deployed on top of Kubernetes.
Day 1 – Configuration and Deployment
In this stage, we focus on deploying our application using the Kubernetes orchestrator and setting up the configurations (number of replicas, public ports, auto-scale settings, and more).
Most organizations taking their first steps deploying applications on Kubernetes are stacked at this stage.
They may have multiple environments (such as Dev, Test, UAT) and perhaps even production workloads, but they are still on Day 1.
Day 2 – Operations
Mature organizations have reached this stage.
This is about ongoing maintenance, observability, and continuous improvement of security aspects of production workloads.
In this blog post, I will dive into “Day 2 Kubernetes”.
Day 2 Kubernetes challenges
Below are the most common Kubernetes challenges:
Observability
Managing Kubernetes at a large scale requires insights into the Kubernetes cluster(s).
It is not enough to monitor the Kubernetes cluster by collecting performance logs, errors, or configuration changes (such as Nodes, Pods, containers, etc.)
We need to have the ability to truly understand the internals of the Kubernetes cluster (from logs, metrics, etc.), be able to diagnose the behavior of the Kubernetes cluster – not just performance issues, but also debug problems, detect anomalies, and (hopefully) be able to anticipate problems before they affect customers.
Prefer to use cloud-native monitoring and observability tools to monitor Kubernetes clusters.
Without proper observability, we will not be able to do root cause analysis and understand problems with our Kubernetes cluster or with our application deployed on top of Kubernetes.
Common tools for observability:
- Prometheus – An open-source systems monitoring and alerting toolkit for monitoring large cloud-native deployments.
- Grafana – An open-source query, visualization, and alerting tool (resource usage, built-in and customized metrics, alerts, dashboards, log correlation, etc.)
- OpenTelemetry – A collection of open-source tools for collecting and exporting telemetry data (metrics, logs, and traces) for analyzing software performance and behavior.
Additional references for managed services:
- Amazon Managed Grafana
- Amazon Managed Service for Prometheus
- AWS Distro for OpenTelemetry
- Azure Monitor managed service for Prometheus (Still in preview on April 2023)
- Azure Managed Grafana
- OpenTelemetry with Azure Monitor
- Google Cloud Managed Service for Prometheus
- Google Cloud Logging plugin for Grafana
- OpenTelemetry Collector (Part of Google Cloud operations suite)
Security and Governance
On the one hand, it is easy to deploy a Kubernetes cluster in private mode, meaning, the API server or the Pods are on an internal subnet and not directly exposed to customers.
On the other hand, many challenges in the security domain need to be solved:
- Secrets Management – A central and secure vault for generating, storing, retrieving, rotating, and eventually revoking secrets (instead of hard-coded static credentials inside our code or configuration files).
- Access control mechanisms – Ability to control what persona (either human or service account) has access to which resources inside the Kubernetes cluster and to take what actions, using RBAC (Role-based access control) mechanisms.
- Software vulnerabilities – Any vulnerabilities related to code – from programming languages (such as Java, PHP, .NET, NodeJS, etc.), use of open-source libraries with known vulnerabilities, to vulnerabilities inside Infrastructure-as-Code (such as Terraform modules)
- Hardening – Ability to deploy a Kubernetes cluster at scale, using secured configuration, such as CIS Benchmarks.
- Networking – Ability to set isolation between different Kubernetes clusters or even between different development teams using the same cluster, not to mention multi-tenancy where using the same Kubernetes platform to serve different customers.
Additional Reference:
- Securing the Software Supply Chain in the Cloud
- OPA (Open Policy Agent) Gatekeeper
- Kyverno – Kubernetes Native Policy Management
- Foundational Cloud Security with CIS Benchmarks
- Amazon EKS Best Practices Guide for Security
- Azure security baseline for Azure Kubernetes Service (AKS)
- GKE Security Overview
Developers experience
Mature organizations have already embraced DevOps methodologies for pushing code through a CI/CD pipeline.
The entire process needs to be done automatically and without direct access of developers to production environments (for this purpose you build break-glass mechanisms for the SRE teams).
The switch to applications wrapped inside containers, allowed developers to develop locally or in the cloud and push new versions of their code to various environments (such as Dev, Test, and Prod).
Integration of CI/CD pipeline, together with containers, allows organizations to continuously develop new software versions, but it requires expanding the knowledge of developers using training.
The use of GitOps and tools such as Argo CD allowed a continuous delivery process for Kubernetes environments.
To allow developers, the best experience, you need to integrate the CI/CD process into the development environment, allowing the development team the same experience as developing any other application, as they used to do in the on-premise for legacy applications, which can speed the developer onboarding process.
Additional References:
- GitOps 101: What is it all about?
- Argo CD – Declarative GitOps CD for Kubernetes
- Continuous Deployment and GitOps delivery with Amazon EKS Blueprints and ArgoCD
- Getting started with GitOps, Argo, and Azure Kubernetes Service
- Building a Fleet of GKE clusters with ArgoCD
Storage
Any Kubernetes cluster requires persistent storage – whether organizations choose to begin with an on-premise Kubernetes cluster and migrate to the public cloud, or provision a Kubernetes cluster using a managed service in the cloud.
Kubernetes supports multiple types of persistent storage – from object storage (such as Azure Blob storage or Google Cloud Storage), block storage (such as Amazon EBS, Azure Disk, or Google Persistent Disk), or file sharing storage (such as Amazon EFS, Azure Files or Google Cloud Filestore).
The fact that each cloud provider has its implementation of persistent storage adds to the complexity of storage management, not to mention a scenario where an organization is provisioning Kubernetes clusters over several cloud providers.
To succeed in managing Kubernetes clusters over a long period, knowing which storage type to use for each scenario, requires storage expertise.
High Availability
High availability is a common requirement for any production workload.
The fact that we need to maintain multiple Kubernetes clusters (for example one cluster per environment such as Dev, Test, and Prod) and sometimes on top of multiple cloud providers, make things challenging.
We need to design in advance where to provision our cluster(s), thinking about constraints such as multiple availability zones, and sometimes thinking about how to provision multiple Kubernetes clusters in different regions, while keeping HA requirements, configurations, secrets management, and more.
Designing and maintaining HA in Kubernetes clusters requires a deep understanding of Kubernetes internals, combined with knowledge about specific cloud providers’ Kubernetes management plane.
Additional References:
- Designing Production Workloads in the Cloud
- Amazon EKS Best Practices Guide for Reliability
- AKS – High availability Kubernetes cluster pattern
- GKE best practices: Designing and building highly available clusters
Cost optimization
Cost is an important factor in managing environments in the cloud.
It can be very challenging to design and maintain multiple Kubernetes clusters while trying to optimize costs.
To monitor cost, we need to deploy cost management tools (either the basic services provided by the cloud provider) or third-party dedicated cost management tools.
For each Kubernetes cluster, we need to decide on node instance size (amount of CPU/Memory), and over time, we need to review the node utilization and try to right-size the instance type.
For non-production clusters (such as Dev or Test), we need to understand from the cloud vendor documentation, what are our options to scale the cluster size to the minimum, when not in use, and be able to spin it back up, when required.
Each cloud provider has its pricing options for provisioning Kubernetes clusters – for example, we might want to choose reserved instances or saving plans for production clusters that will be running 24/7, while for temporary Dev or Test environment, we might want to choose Spot instances and save cost.
Additional References:
- Cost optimization for Kubernetes on AWS
- Azure Kubernetes Service (AKS) – Cost Optimization Techniques
- Best practices for running cost-optimized Kubernetes applications on GKE
- 5 steps to bringing Kubernetes costs in line
- 4 Strategies for Kubernetes Cost Reduction
Knowledge gap
Running Kubernetes clusters requires a lot of knowledge.
From the design, provision, and maintenance, usually done by DevOps or experienced cloud engineers, to the deployment of new applications, usually done by development teams.
It is crucial to invest in employee training, in all aspects of Kubernetes.
Constant updates using vendor documentation, online courses, blog posts, meetups, and technical conferences will enable teams to gain the knowledge required to keep up with Kubernetes updates and changes.
Additional References:
- Kubernetes Blog
- AWS Containers Blog
- Azure Kubernetes Service (AKS) issue and feature tracking
- Google Cloud Blog – Containers & Kubernetes
Third-party integration
Kubernetes solve part of the problems related to container orchestration.
As an open-source solution, it can integrate with other open-source complimentary solutions (from monitoring, security and governance, cost management, and more).
Every organization might wish to use a different set of tools to achieve each task relating to the ongoing maintenance of the Kubernetes cluster or for application deployment.
Selecting the right tools can be challenging as well, due to various business or technological requirements.
It is recommended to evaluate and select Kubernetes native tools to achieve the previously mentioned tasks or resolve the mentioned challenges.
Summary
In this blog post, I have reviewed the most common Day 2 Kubernetes challenges.
I cannot stress enough the importance of employee training in deploying and maintaining Kubernetes clusters.
It is highly recommended to evaluate and look for a centralized management platform for deploying, monitoring (using cloud-native tools), and securing the entire fleet of Kubernetes clusters in the organization.
Another important recommendation is to invest in automation – from policy enforcement to application deployment and upgrade, as part of the CI/CD pipeline.
I recommend you continue learning and expanding your knowledge in the ongoing changed world of Kubernetes.
Introduction to deep learning hardware in the cloud
For more than a decade, organizations are using machine learning for various use cases such as predictions, assistance in the decision-making process, and more.
Due to the demand for high computational resources and in many cases expensive hardware requirements, the public cloud became one of the better ways for running machine learning or deep learning processes.
Terminology
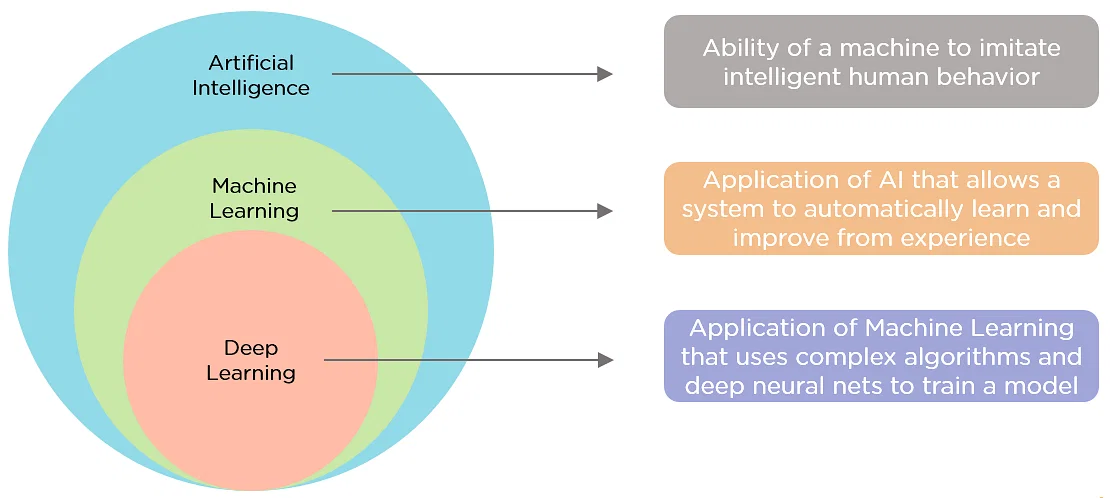
Before we dive into the topic of this post, let us begin with some terminology:
- Artificial Intelligence – “The ability of a computer program or a machine to think and learn”, Wikipedia
- Machine Learning – “The task of making computers more intelligent without explicitly teaching them how to behave”, Bill Brock, VP of Engineering at Very
- Deep Learning – “A branch of machine learning that uses neural networks with many layers. A deep neural network analyzes data with learned representations like the way a person would look at a problem”, Bill Brock, VP of Engineering at Very
Public use cases of deep learning
- Disney makes its archive accessible using deep learning built on AWS
- NBA accelerates modern app time to market to ramp up fans’ excitement
- Satair: Enhancing customer service with Lilly, a smart online assistant built on Google Cloud
In this blog post, I will focus on deep learning and hardware available in the cloud for achieving deep learning.
Deep Learning workflow
The deep learning process is made of the following steps:
- Prepare – Store data in a repository (such as object storage or a database)
- Build – Choose a machine learning framework (such as TensorFlow, PyTorch, Apache MXNet, etc.)
- Train – Choose hardware (compute, network, storage) to train the model you have built (“learn” and optimize model from data)
- Inference – Using the trained model (on large scale) to make a prediction
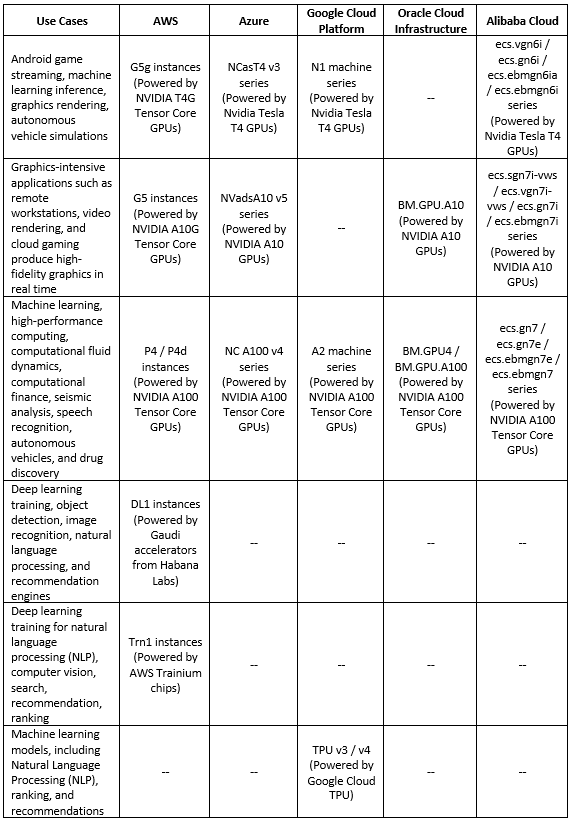
Deep Learning processors comparison (Training phase)
Below is a comparison table for the various processors available in the public cloud, dedicated to the deep learning training phase:
Additional References
- Amazon EC2 – Accelerated Computing
- AWS EC2 Instances Powered by Gaudi Accelerators for Training Deep Learning Models
- AWS Trainium
- Azure – GPU-optimized virtual machine sizes
- Google Cloud – GPU platforms
- Google Cloud – Introduction to Cloud TPU
- Oracle Cloud Infrastructure – Compute Shapes – GPU Shapes
- Alibaba Cloud GPU-accelerated compute-optimized and vGPU-accelerated instance families
- NVIDIA T4 Tensor Core GPU
- NVIDIA A10 Tensor Core GPU
- NVIDIA A100 Tensor Core GPU
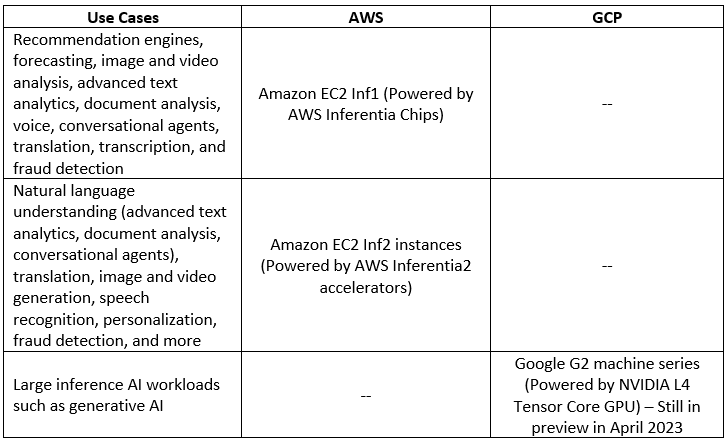
Deep Learning processors comparison (Inference phase)
Below is a comparison table for the various processors available in the public cloud, dedicated to the deep learning inference phase:
Additional References
Summary
In this blog post, I have shared information about the various alternatives for using hardware available in the public cloud to run deep learning processes.
I recommend you to keep reading and expand your knowledge on both machine learning and deep learning, what services are available in the cloud and what are the use cases to achieve outcomes from deep learning.
Additional References
- AWS Machine Learning Infrastructure
- AWS – Select the right ML instance for your training and inference jobs
- AWS – Accelerate deep learning and innovate faster with AWS Trainium
- Azure AI Infrastructure
- Google Cloud Platform – AI Infrastructure
- Oracle Cloud – Machine Learning Services
- Alibaba Cloud – Machine Learning Platform for AI
Managing network security aspects in the public cloud

Managing cloud environments on large scale has many challenges.
One of the challenges many organizations are facing is managing network inbound/outbound network connectivity to their cloud environments.
Due to the nature of the public cloud, all resources are potentially public, unless we configured them otherwise.
What are the challenges in the network security domain?
There are many challenges related to network security, here are the most common ones:
- Unauthorized inbound network access – Publicly facing resources (such as virtual machines, object storage, databases, etc.) allowing anyone on the Internet access to the resources
- Unrestricted outbound network access – Internal resources (such as virtual machines, databases, serverless, etc.) can initiate outbound traffic to resources on the public Internet
- Managing network access rules at large scale – Ability to control thousands of firewall rules created over time, while managing multiple accounts for a specific cloud provider (or even multiple different cloud providers)
- Understanding the network attack surface – Ability to get a clear view of what inbound or outbound traffic is allowed or denied in a large cloud environment with multiple accounts
- Enabling the business, while keeping the infrastructure secure – Ability to respond to multiple business requests, using small network/information security / IT team
With all the above challenges, how do we keep our cloud network infrastructure secure and at a large scale?
Set Guardrails
One of the common ways to configure guardrails is to use organizational policies using Policy-as-Code.
All major cloud providers support this capability.
It allows us to configure rules for the maximum allowed permissions over our cloud environments according to our company security policy while allowing developers / DevOps to continue provisioning resources.
AWS Service control policies (SCPs)
Below are sample service control policies that can be configured at the AWS organizational level (with inheritance to the underlining OU’s), for restricting inbound access:
- Detect whether any Amazon EC2 instance has an associated public IPv4 address
- Detect whether Amazon S3 settings to block public access are set as true for the account
- Detects whether an Amazon EKS endpoint is blocked from public access
- Detect whether the AWS Lambda function policy attached to the Lambda resource blocks public access
- Detect whether any Amazon VPC subnets are assigned a public IP address
Azure Policy
Below are sample Azure policies that can be configured at the Azure subscription level, for restricting inbound access:
- Container Apps should disable external network access
- Network interfaces should not have public IPs
- All network ports should be restricted on network security groups associated to your virtual machine
- Function apps should disable public network access
- Azure SQL Managed Instances should disable public network access
- Public network access on Azure SQL Database should be disabled
- Public network access should be disabled for MySQL servers
- Public network access should be disabled for PostgreSQL servers
- Storage accounts should disable public network access
Google Organization Policies
Below are sample Google organization policies that can be configured at the GCP Project level, for restricting inbound access:
- Restrict public IP access on Cloud SQL instances
- Enforce Public Access Prevention
- Disable VM serial port access
- Define allowed external IPs for VM instances
Controlling inbound/outbound network traffic at scale
At large scale, we cannot rely on the built-in layer 4 access control mechanisms (such as AWS Security groups, Azure Network Security Groups, or GCP Firewall Rules) to define inbound or outbound traffic from/to our cloud environments.
For large scale, we should consider alternatives that will allow us to configure network restrictions, while allowing us central visibility over our entire cloud environment.
Another aspect we should keep in mind is that the default layer 4 access control mechanisms do provide us advanced protection against today’s threats, such as the ability to perform TLS inspection, control web traffic using URL filtering, etc.
Cloud-native firewall services:
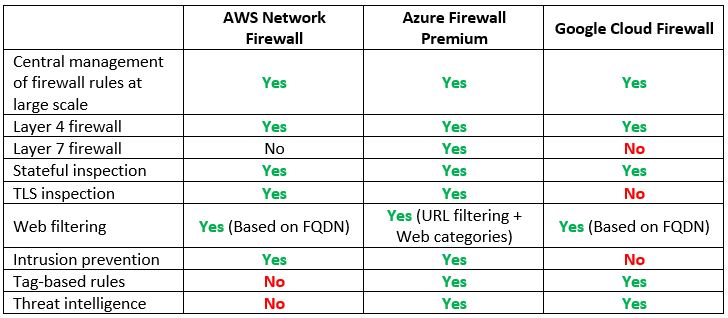
Note: If you prefer to use 3rd party NGFW, you can deploy it using AWS Gateway Load Balancer or Azure Gateway Load Balancer.
Additional references
Understanding the network attack surface
One of the common issues with large cloud environments is to have a visibility of which inbound or outbound ports are opened to the Internet, exposing the cloud environment.
Common services to allow network visibility:
Another alternative for getting insights into attack surface or network misconfiguration is to deploy 3rd party Cloud Security Posture Management (CSPM) solution, which will allow you central visibility into publicly accessible virtual machines, databases, object storage, and more, over multiple cloud providers’ environments.
Summary
In this blog post, I have presented common challenges in managing network security aspects in cloud environments.
Using a combination of organizational policies, strict inbound/outbound traffic control, and good visibility over large or complex cloud environments, it is possible to enable the business to move forward, while mitigating security risks.
As the cloud threat landscape evolves, so do security teams need to research for suitable solutions to enable the business, while keeping the cloud environments secure.
Distributed Managed PostgreSQL Database Alternatives in the Cloud
In 2020 I have published a blog post called Running MySQL Managed Database in the Cloud, comparing different alternatives for running MySQL database in the cloud.
In this blog post, I will take one step further, comparing PostgreSQL database alternatives deployed on a distributed system.
Background
PostgreSQL is an open-source relational database, used by many companies, and is very common among cloud applications, where companies prefer an open-source solution, supported by a strong community, as an alternative to commercial database engines.
The simplest way to run the PostgreSQL engine in the cloud is to choose one of the managed database services, such as Amazon RDS for PostgreSQL or Google Cloud SQL for PostgreSQL, and allow you to receive a fully managed database.
In this scenario, you as the customer, receive a fully managed PostgreSQL database cluster, that spans across multiple availability zones, and the cloud provider is responsible for maintaining the underlining operating system, including patching, hardening, monitoring, and backup (up to the service limits).
As a customer, you receive an endpoint (i.e., DNS name and port), configure access controls (such as AWS Security groups or GCP VCP Firewall rules), and set authentication and authorization for what identities have access to the managed database.
This solution is suitable for most common use cases if your applications (and perhaps customers) are in a specific region.
What happens in a scenario where you would like to design a truly highly available architecture span across multiple regions (in the rare case of an outage in a specific region) and serve customers across the globe, deploying your application close to your customers?
The solution for allowing high availability and multi-region deployment is to deploy the PostgreSQL engine in a managed distributed database.
PostgreSQL Distributed Database Alternatives
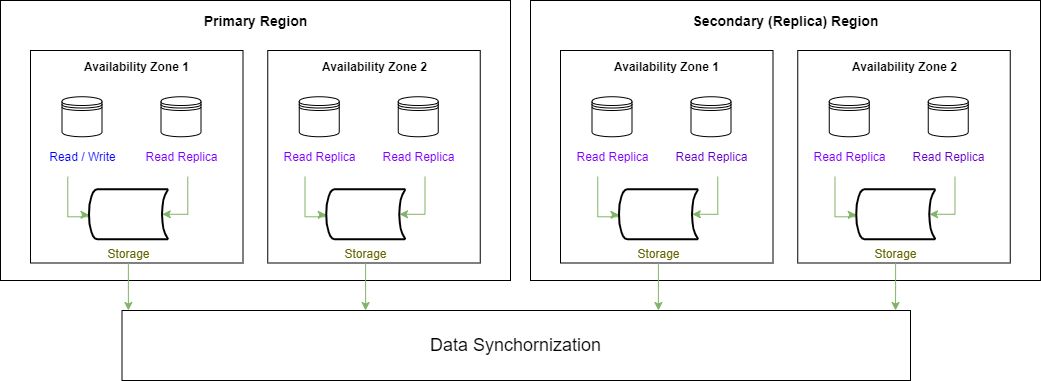
The distributed system allows you to run a database across multiple regions while keeping the data synchronized.
In a distributed database, the compute layer (i.e., virtual machines) running the database engine is deployed on separate nodes from the storage and logging layer, allowing you to gain the benefits of the cloud provider’s backend infrastructure low-latency replication capabilities.
In each system, there is a primary cluster (which oversees read/write actions) and one or more secondary clusters (read-only replicas).
Architecture diagram:
Let us examine some of the cloud providers’ alternatives:
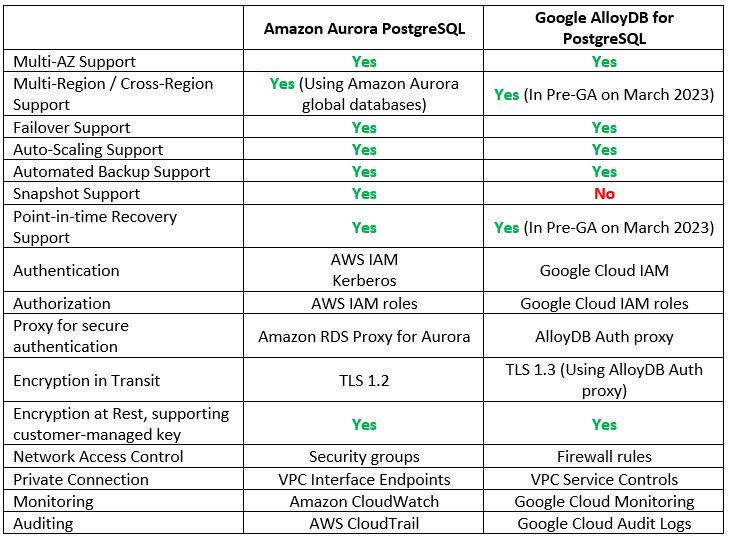
Additional References
Summary
In this blog post, I have compared two alternatives for running PostgreSQL-compatible database in a distributed architecture.
If you are looking for a relational database solution with high durability that will auto-scale according to application load, and with the capability to replicate data across multiple regions, you should consider one of the alternatives I have mentioned in this blog post.
As always, I recommend you to continue reading and expanding your knowledge on the topic and evaluate during the architecture design phase, if your workloads can benefit from a distributed database system.